Table of Contents
- Purpose
- New Sales CPQ Workflow
- How to Create a New Sales Quote in CPQ
- The CPQ Quote Line Editor (QLE)
- Building And Editing A Quote in the QLE
New Sales CPQ Workflow
- Purpose
- New Sales CPQ Workflow
- How to Create a New Sales Quote in CPQ
- The CPQ Quote Line Editor (QLE)
- Building And Editing A Quote in the QLE
Purpose
The purpose of this article is to document new sales team Salesforce CPQ functionality. This article will explain:
- Where CPQ fits into the sales process
- Creating a new sales quote
- Using the Quote Line Editor (QLE)
- Producing a quote PDF document
Intended Audience
- Account Executives (AEs)
New Sales CPQ Workflow
The new sales CPQ workflow begins with an Opportunity record and ends with a PDF Quote document for your prospective customer.

Here's a Sample District Quote Preview to give you an idea of what the CPQ process builds.
Before You Start Building a CPQ Quote:
Creating a clean and efficient quote involves some advance work. First, make sure that you understand what products the prospect desires; then make sure:
- A complete shipping address has been added to the Account
- A Salesforce Opportunity record has been created
- A Salesforce Primary Contact (with Phone and Email) has been created
The steps for creating and sending a new sales quote in CPQ are as follows:
- Creating A CPQ Quote document
- Using the CPQ Quote Line Generator to Add Products, Pricing & Discounts
- Previewing the Quote
- Sending the Quote
How to Create a New Sales Quote in CPQ
Before you start, remember that the CPQ process starts inside a Salesforce Opportunity record. Create a new Opportunity, convert a Lead, or open an existing Opportunity.
Steps to Create A New Sales Quote
Once you've opened an Opportunity record, the CPQ Quote process can be started. To create a new sales CPQ quote follow the steps below:
- Open the Opportunity record to be associated with the quote
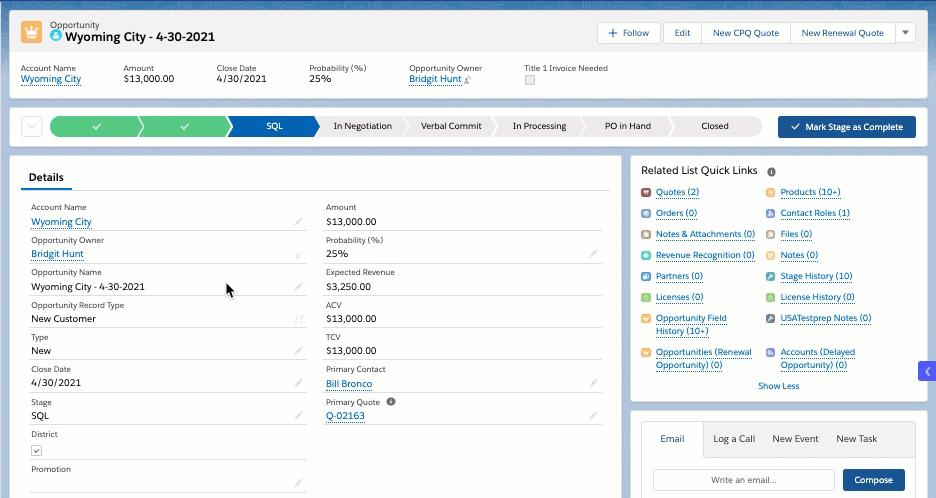
- Review the items below in the Opportunity record
- Account Name- Is this the correct account?
- Primary Contact- This name will default to the Quote record. The name associated with the quote can be changed on the quote if needed.
If a different contact will be associated with the quote it is best to add that contact's (name, email, phone) record in Salesforce before building the quote
- Review the items below in the Opportunity record
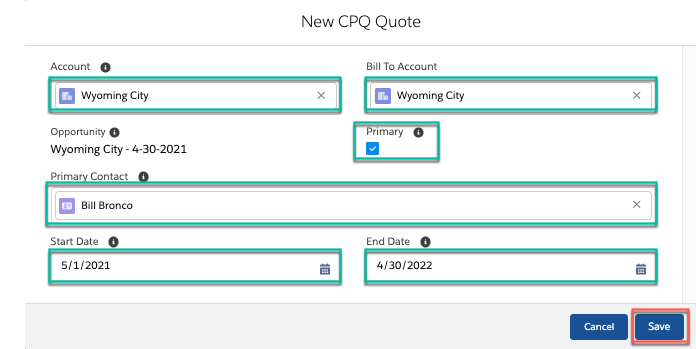
- From the Opportunity record, Click the New CPQ Quote button

- Review and complete the New CPQ Quote form fields
- Account- This will copy over from the Account name on the Opportunity record. The account name will print on the quote document.
- Bill To Account- This will copy over from the Account name on the Opportunity record. Add or edit if needed. If blank, the printed quote will display "Please Provide". If provided, this will print on the quote document
- Primary Checkbox- Select this checkbox to designate the Quote as the primary. The primary quote is synched with the Opportunity product and revenue data.
- Primary Contact- This will copy over from the Opportunity record, but can be changed here if needed. The picklist will only display contacts that are associated with the account. This person's name will print on the generated quote document.
- Start Date- This is the estimated license, or subscription(s) start date. Will default to tomorrow's date and can be manually edited. This will print on the quote document for each product line item
- End Date- This is the estimated license, or subscription(s) end date. Will default to 365 days and can be manually edited. This will print on the quote document for each product line item
- Click the Save button- This saves the quote record and returns you to the Opportunity record
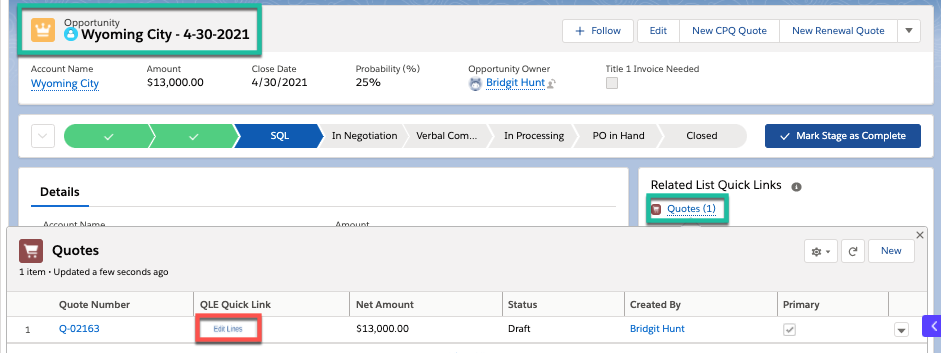
The Quote record is saved and can be opened in the Quotes Related Quick Links section in the Opportunity record- see below:
The CPQ Quote Line Editor (QLE)
The Quote Line Editor is used to add products and pricing to a sales quote.
How to Open A Quote
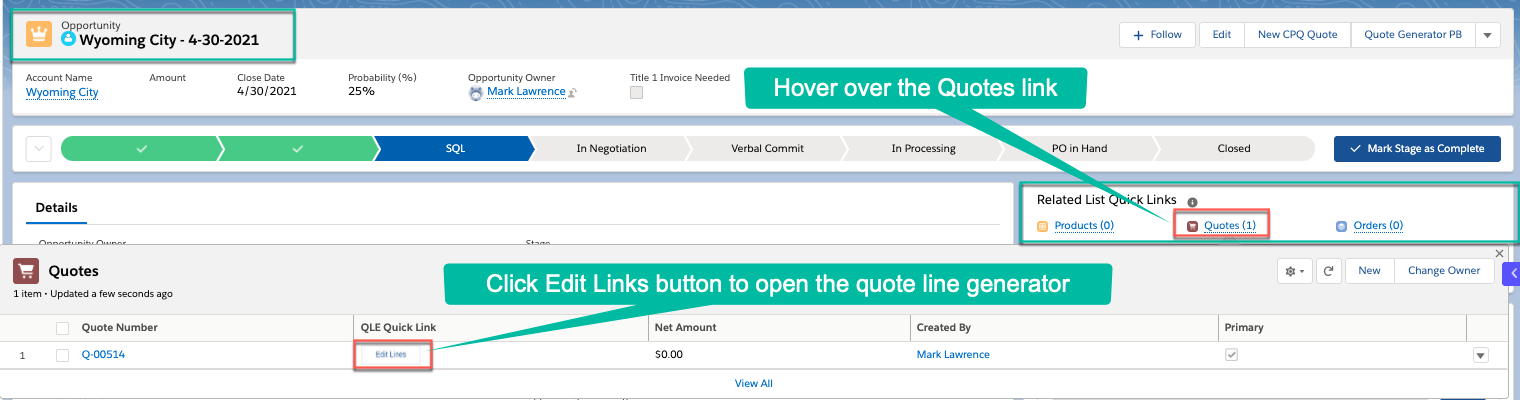
To open a quote follow the steps below:
- Open the Opportunity record that contains the quote to be opened.
- In the Opportunity record's Related Quick Links section, hover over the Quotes link to expand the Quotes view.

- Click the Edit Lines button in the Quotes expanded view to open the Quote Line Editor tool.


Building And Editing A Quote in the QLE
After the quote document has been created you are now ready to begin building the quote for the prospect. Follow the steps below to begin building the quote:
- From the Opportunity record open the quote document.
Setting Global Quote Information Parameters
Review the global Quote Information parameters at the top of the quote and update as needed. Review the CPQ Start and End Date Hierarchy logic documentation if needed.
- Edit the default global Start Date for all licenses in the quote if needed. These dates can be modified at the Group and the individual Line Item level if needed.
- Edit the default global End Date for all licenses in the quote if needed. These dates can be modified at the Group and Line Item level if needed.

- Site License Quote- check this box if this is a site license quote. This flag indicates that a site license product is included in the quote.

- Enter a Note here that you would like to be printed at the bottom of the quote document for the prospect. A note example may be "Spring Promo Discount is included".
- Enter an Additional Discount % percentage amount that you would like to be applied to all line items in the quote. This amount can be over-ridden at the Group and Line Item level if desired.
- If you have a Target Customer Amount for the quote, enter it here. CPQ will incrementally auto-discount individual line items in the quote (in addition to any preset discounts) so that the quote total matches the indicated target amount requested by the customer.Do not use any other discounts in your quote if the Target Customer Amount option is used. The quote document discount totals are over-written in the target customer discounting calculation.
- Update the Expiration Date for the quote if needed. The default expiration is 45 days. This is the date that the quote expires and prints on the quote document.
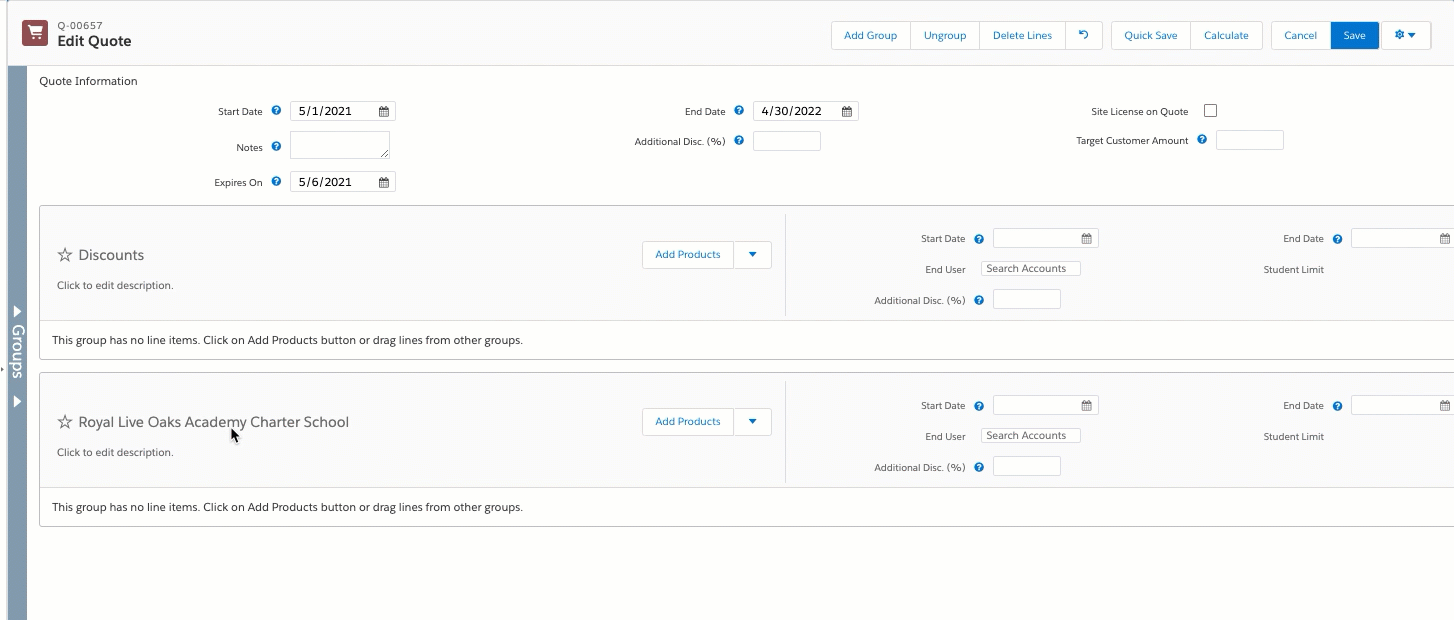
Quote Line Groups
Organize your quote using quote line groups to arrange how products and pricing will be displayed in the quote document.
Organizing Your Quote Line Groups
Each group beneath the Discount group will represent a School or a District. If you are preparing a large District quote, groups should be organized to have a separate Quote Line Group for each school in the district that is being quoted.TIP
- Before adding Products to a group, verify that you have the correct End User entered. Also verify that the End User name matches the Group Line name

- Update the Start / End Dates in the group line only if this group will have dates different from the global dates that you've already set in the Quote Information section at the top of the QLE
Remember that you can add, clone or delete groups if needed to properly organize your quote.

- Once your Group Lines are properly arranged, you are ready to add Products to each group
Add Products To A Group Line
To add products to a group line follow the steps below:
- Click the Add Products button in the group line
- In the Product Selection view, the available products will be segmented and displayed by Grade- Elementary, Middle and High School.
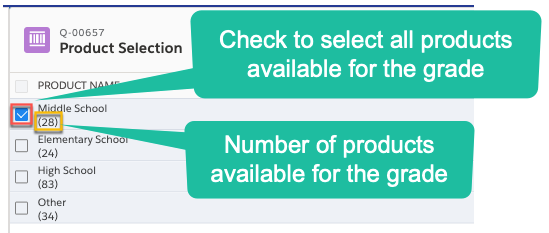
- To expand the Product Lines (Grades) that are displayed, click the arrow on the right side of the grade of on the row of the grade in the display


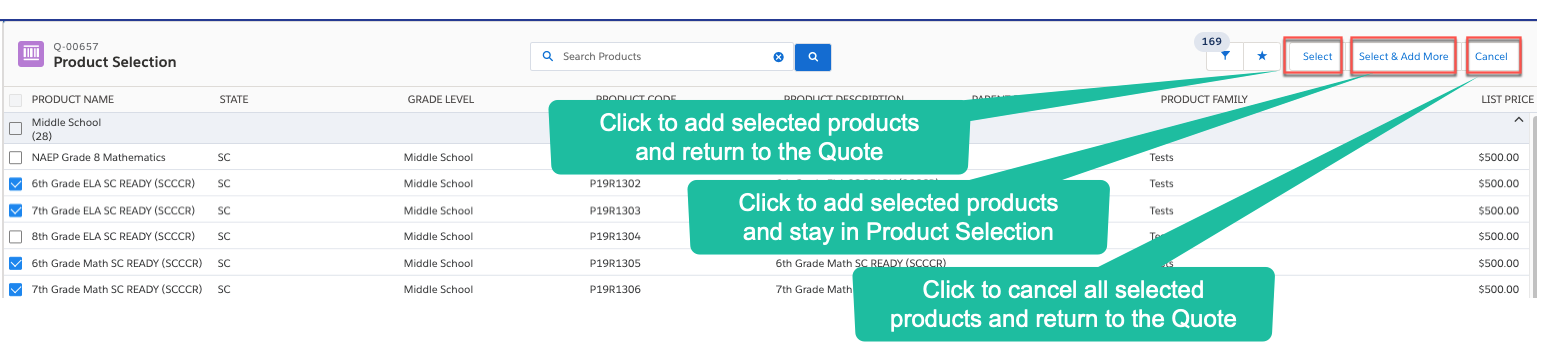
- Select the desired products for each grade by checking the box next to the Product Name.
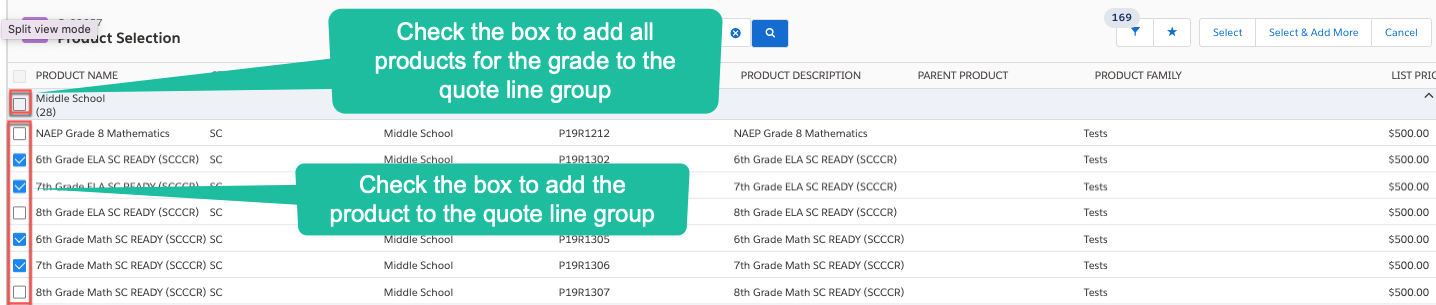
- Save your product selections for the group by clicking the Select button and return to the Quote
- You can also click Select & Add More to save your selections and remain in the Product Selections view
- Click Cancel to not save any selections and return to the Quote
Product Line Item Display & Editing
Editing Prices and Dates
Once your products are added to the quote line group you can make any needed line item date or discount changes. Edits to the selected products are made in the Product Line item display.

Start & End Dates
Remember, a subscription quote line can only have one start and end date. The dates in the quote line will display as blank unless manually entered in the product line item.
Although the product line dates and discounts display as blank (unless edited at the line item level), they will inherit the respective date or discount values input either from the global or the group line levels.

Adding Global Discounts To A Quote
As a best practice, always first complete all district or school group product configuration before working in the Discounts group. Learn more about how CPQ Discounts work in the CPQ Overview
Follow the steps below to set up any desired global discounts:

Discount start and end dates entered in the Discounts group will be applied to all line items in the quote per the Quote Hierarchy Logic.
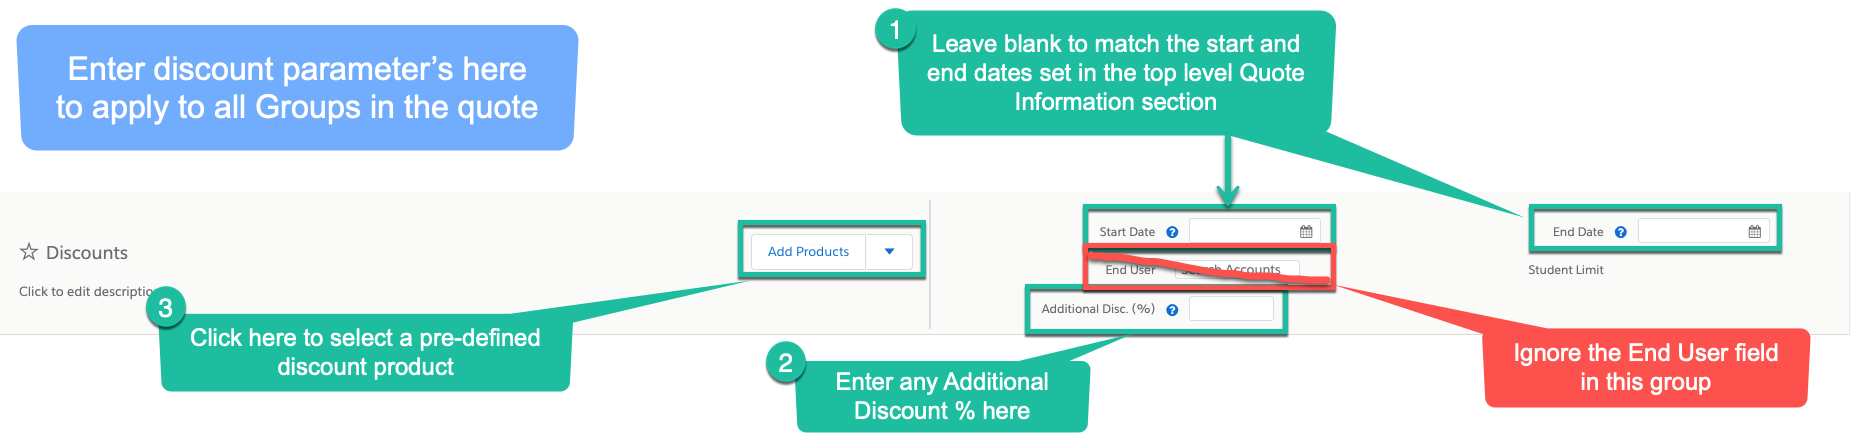
- The Start and End date fields in the Discount group should remain blank if you would like to default to the date entered in the global quote information section above.
- If you want to override the discount end date entered in the global parameters above, enter a new End Date for all licenses discounts in the quote if needed.
- This date can also be changed at the Group and Line Item level if needed. It would be rare to have a discount not run through the entire quote term.
- Enter an override to the Additional Discount % entered in the global parameters for this quote.
- Click the Add Products button to select which Discount(s) to be added to the quote

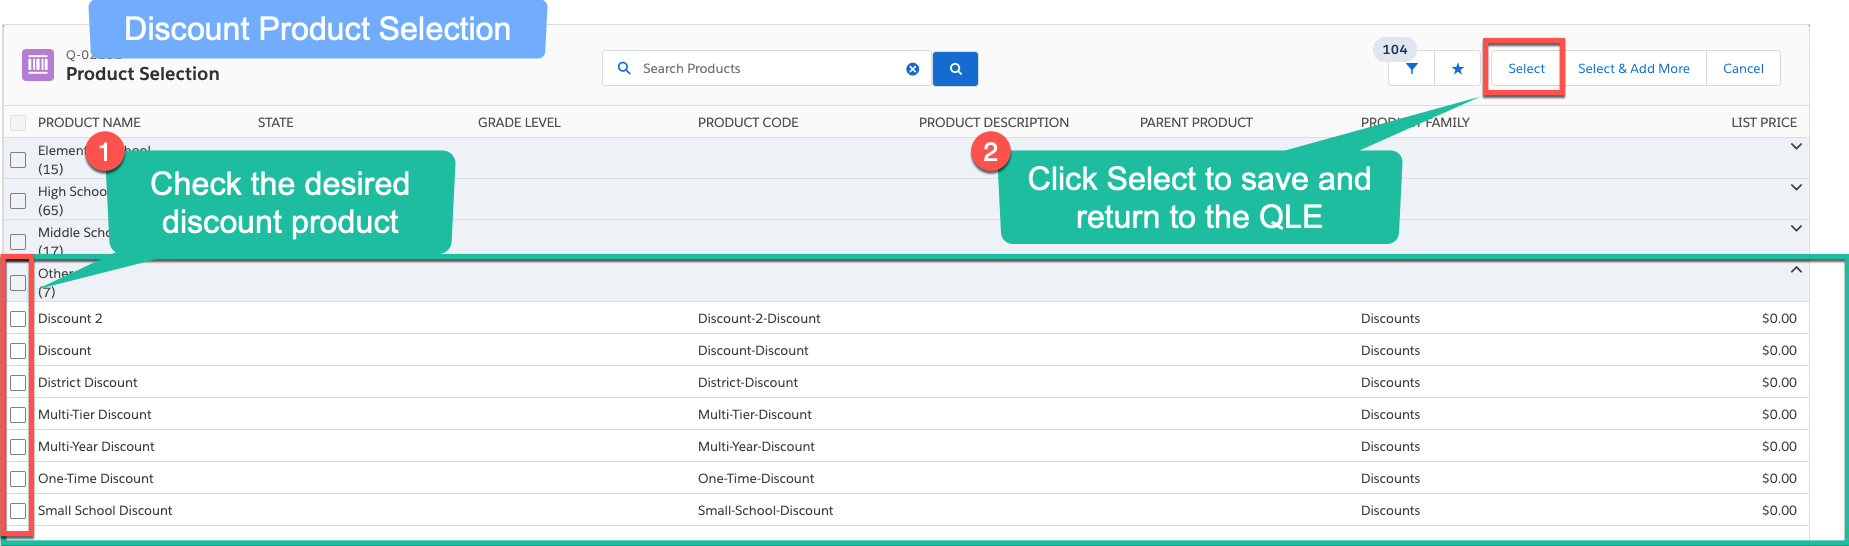
- On the row labeled Other, click the down-arrow to expand the discount options

- Select the check box)es) of the discounts to be added and Click the Select button
The discounts entered in this discount group will be applied to all other groups in the quote. Additional discounts applied within the account groups or at the line item will supersede the discounts applied in this group
- Review the Quote and adjust as needed. When complete, Click the Save button to save the quote and return to the Quote document

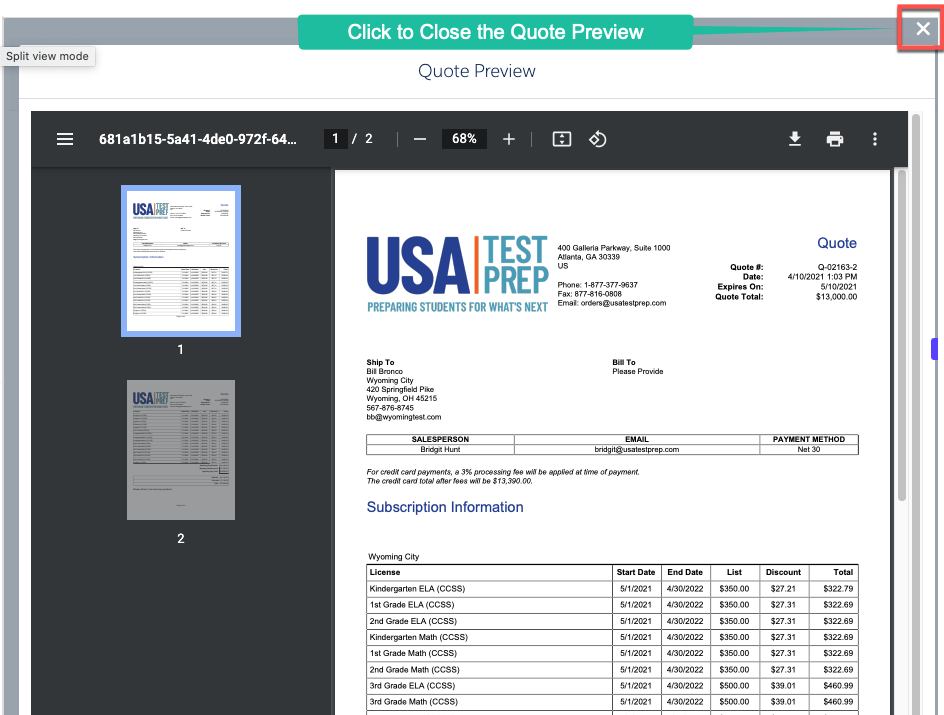
Previewing a Quote
After your Quote is saved you will be returned to the Quote document in Salesforce.
To view a preview of the Quote PDF document follow the steps below:
- From the Quote document, click the Generate Document button

- In the Generate Document screen
- Select the quote template
- Edit the Document Name if desired
- Click the Preview button
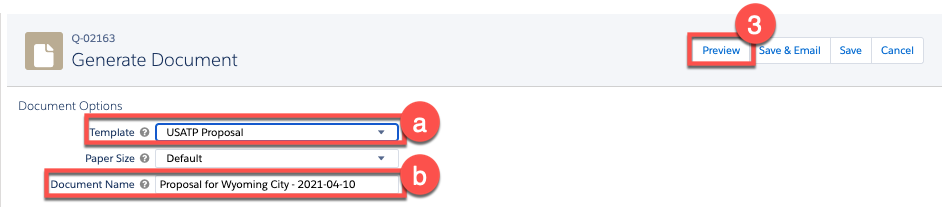
- Review the Quote document and Click to close when complete
If the account's shipping address is incomplete, Salesforce CPQ copies a combination of the account's shipping and billing addresses to the quote's shipping address. If the shipping and billing addresses are different, the resulting shipping address in the quote is incorrect.
How Do I change the Ship To address on my Quote document?
Making Edits to A Quote
In some cases multiple quotes have been sent to a prospect and an earlier quote version is returned as a Purchase Order. Because of this, a new quote record should always be created if multiple updates to a quote are being sent to a prospect. This ensures that we always have a record of what has been offered.
Each CPQ quote document has a unique Quote # for identification purposes

Editing a New (never sent to a prospect) Quote Document
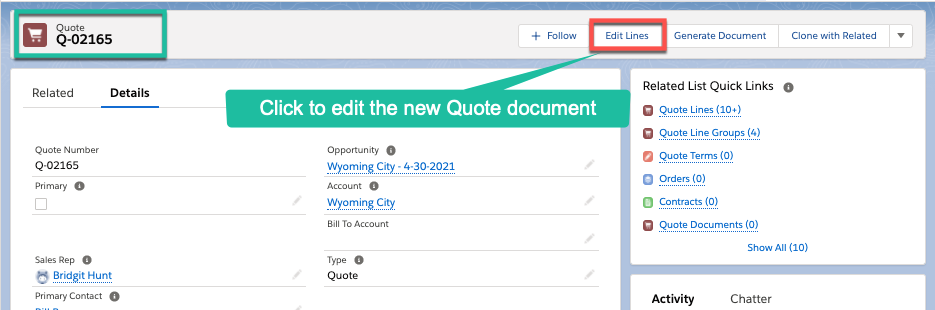
- A quote document can be re-opened for editing from within the Quote document by clicking the Edit Lines button
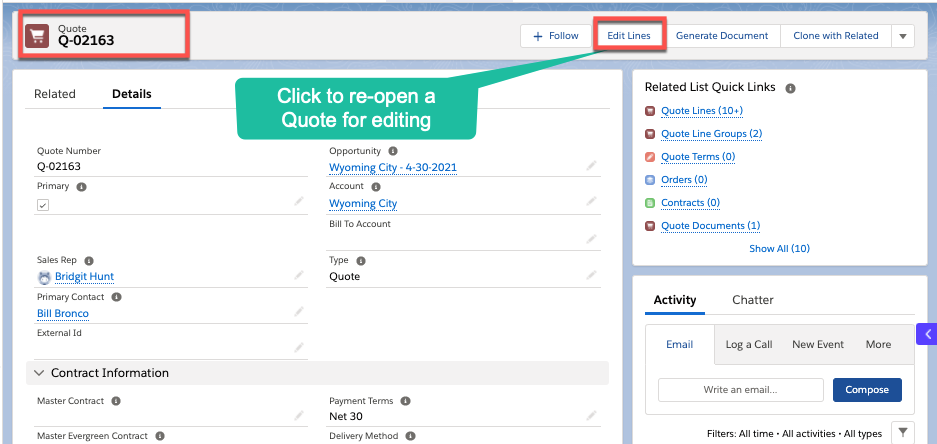
- Edits can be made to the quote as needed. The quote can then be re-saved and previewed
Cloning An Existing (delivered to a prospect) Quote Document
Existing quotes can be easily cloned and then updated by following the steps below:
- From the Opportunity record open the Quote record to be cloned
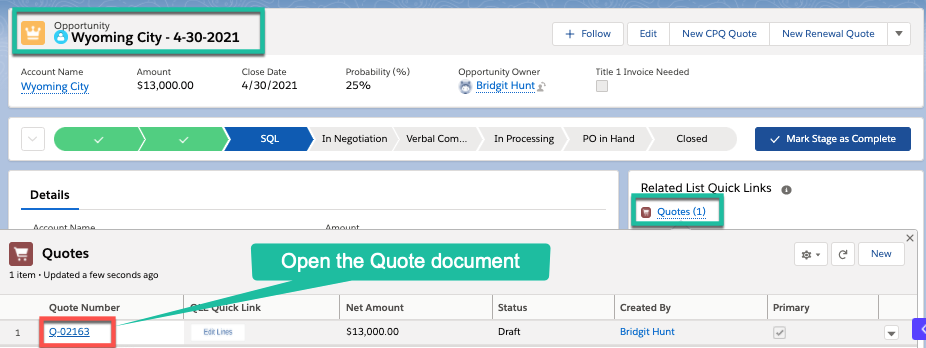
- Click the Clone with Related button
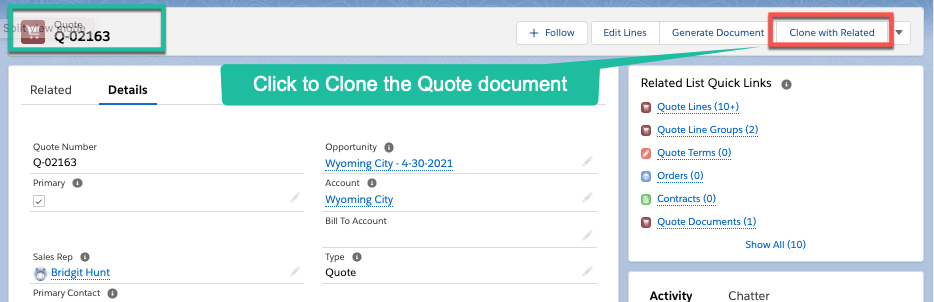
- Click the Clone button

The quote is cloned and a new quote document is generated
- From the new Quote document, click the Edit Lines button to edit the cloned quote
- Make any desired edits to the cloned quote, preview and send to the prospect
Saving and Sending a Quote
Quote PDF documents are created from the Quote document. To send a quote to a prospect, follow the steps below:
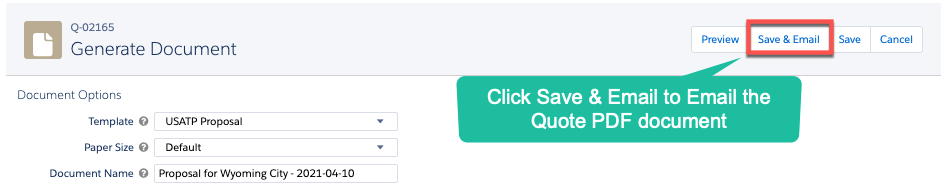
- From the Quote document, click the Generate Document button
- In the Generate Document screen
- Select the quote template
- Edit the Document Name if desired
- Click the Preview button
- Review the Quote document and Click to close when complete
- Click the Save & Email button to Email the Quote PDF document to a prospect
The Quote PDF is now available to download
- To access the quote PDF document, open the opportunity record
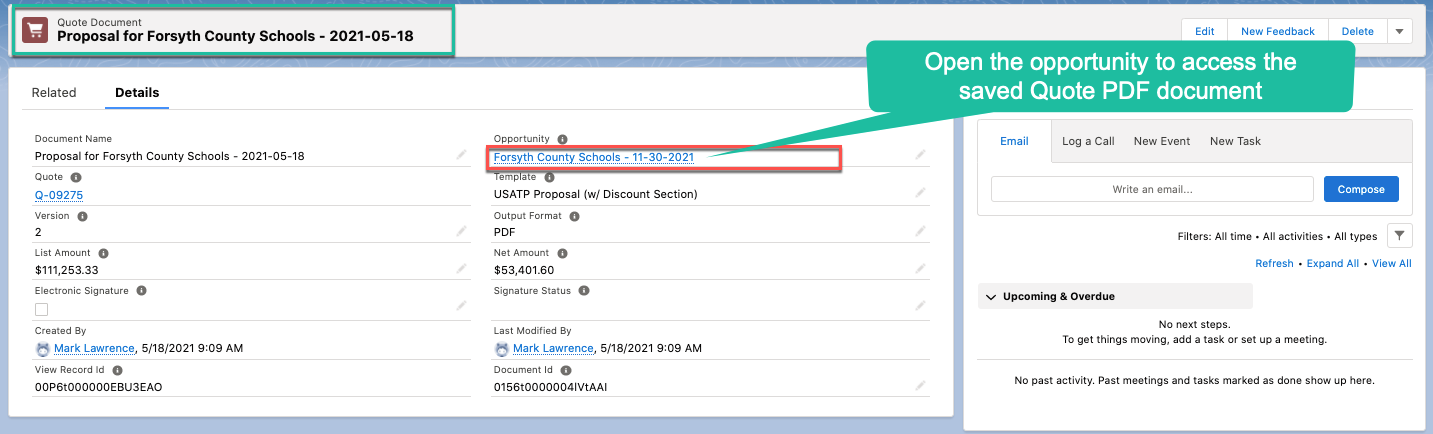
- In the opportunity record scroll down to the Notes & Attachments section (bottom right side) open the PDF quote document
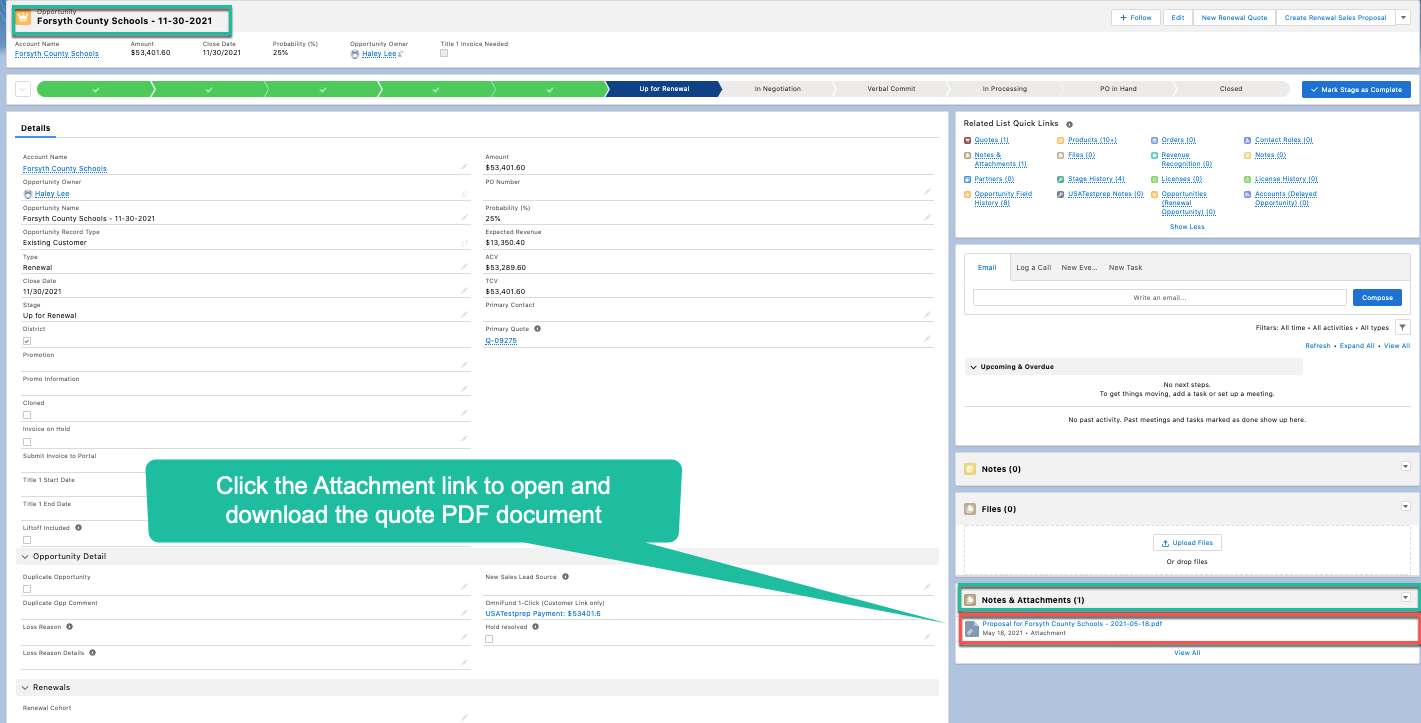
- Download and save the quote PDF to a folder for email attachment access
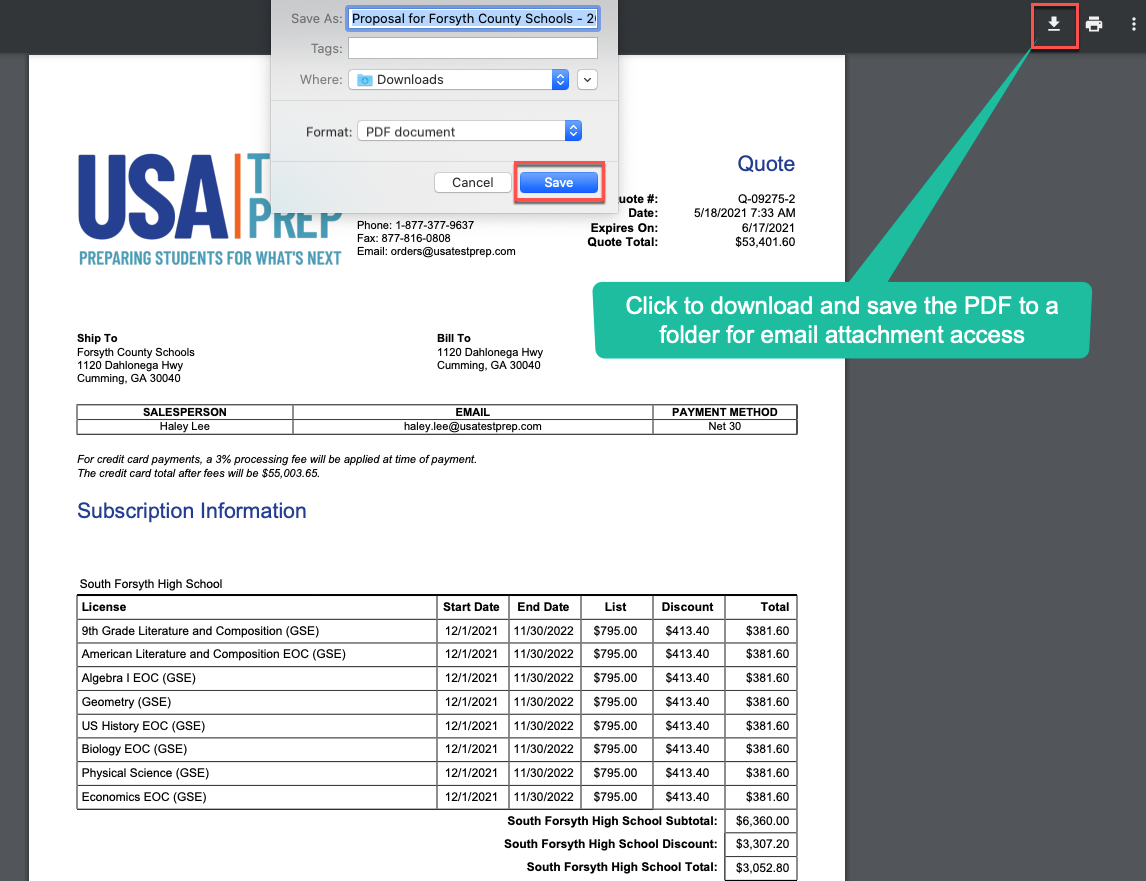
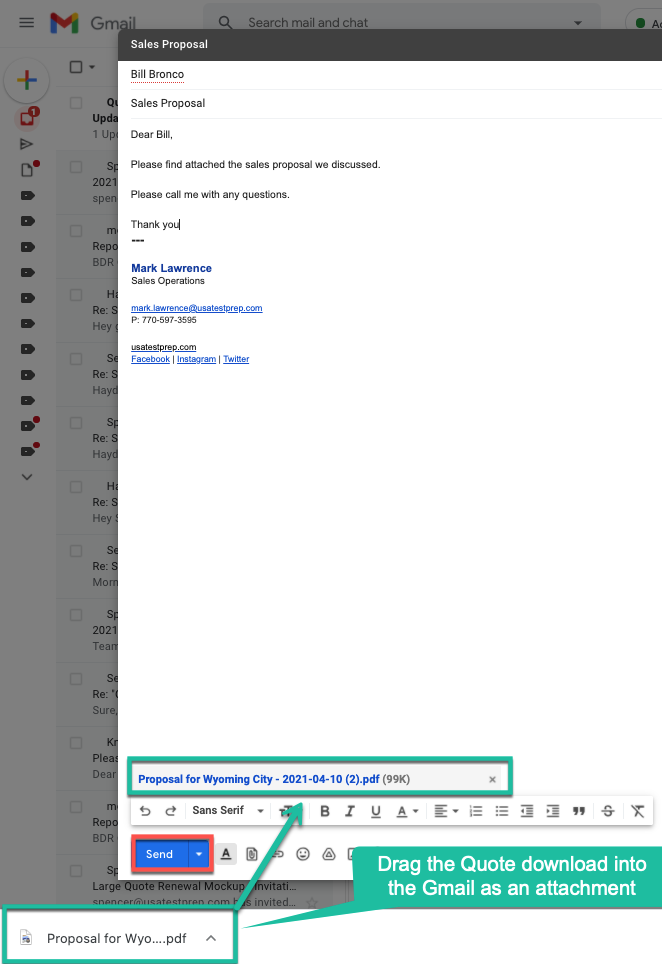
- The Quote PDF is now available in your to attach as a document to your favorite Email application
- Salesforce
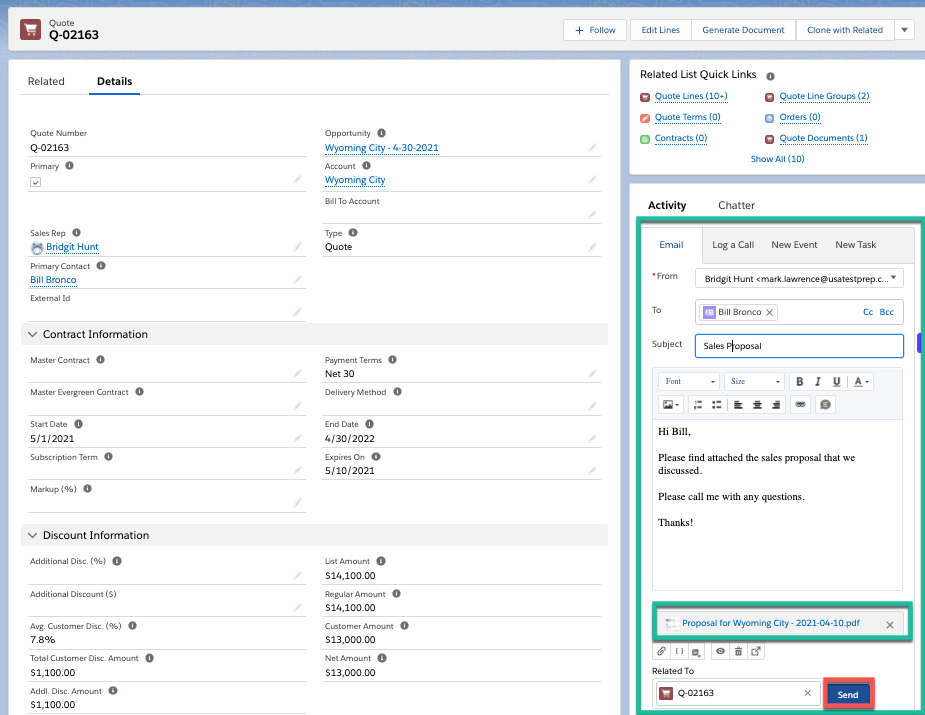
- Outreach
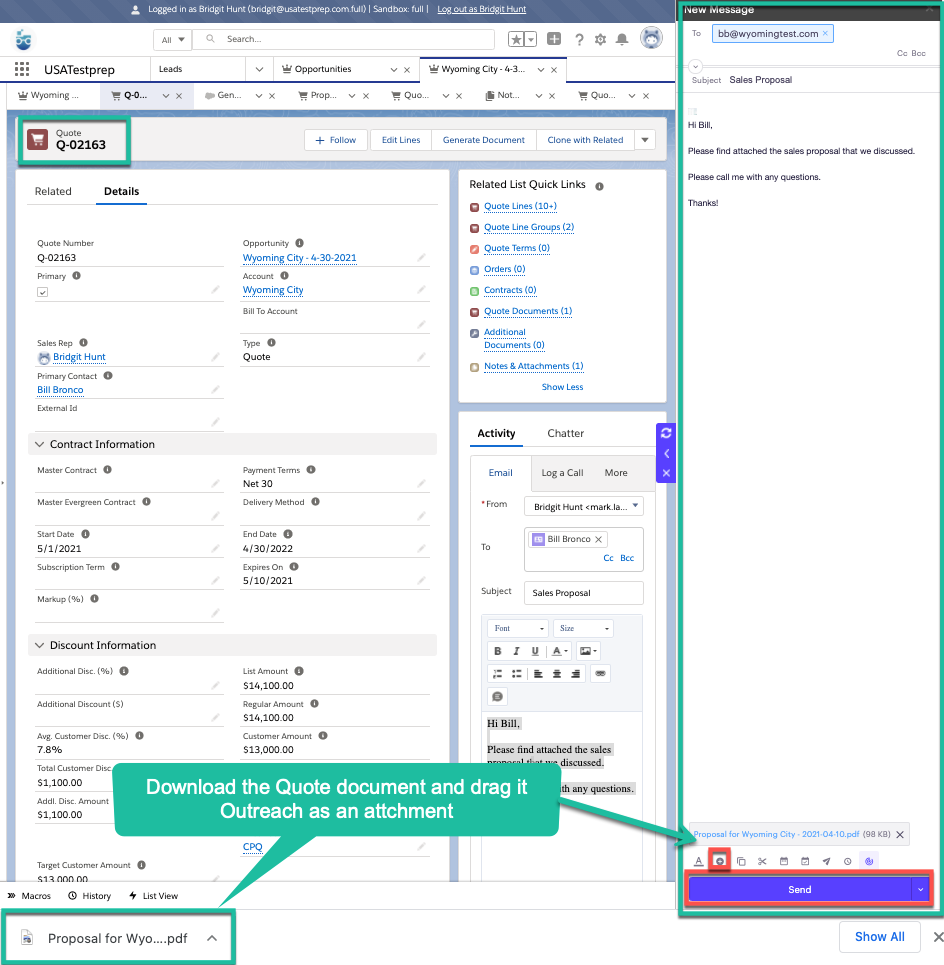
- Gmail
- Salesforce
Notes
- The User should be logged into Salesforce prior to performing this process.
- The Salesforce Lightning Extension has been added to the user’s Chrome browser.
- The Google Chrome browser must be used.
- The Outreach Extension is enabled if Outreach will be used to Email the Quote