A predefined collection or grouping of Products within CPQ. Product Bundles (Math for example) allows for fewer line items to be displayed within the sales quote
Contract
A contract is created after the ordering process and is a record of a transaction that occurred with a customer. The contract includes the subscriptions purchased, the terms, and renewal details of the transaction
Co-Termination
Co-termination is the CPQ process of consolidating two or more customer contracts to produce a common expiration date in a new merged, single contract document.
End User
The name of the School / Rooftop that will be assigned to use the Licenses or Subscriptions purchased. Can not be a District
License
A License provides access to use a product. One (1) License Unit = one (1) School or Rooftop, not one (1) District (except in rare charter or virtual school cases pre-approved by finance)
Subscription
A customer purchases a subscription with a specific start and end date to use product license(s) that are associated with the subscription. A subscription can contain multiple product licenses; a product bundle subscription for example.
Order
A record that shows a transaction was fulfilled (e.g., products turned on). Occurs during the ordering process
Product
A USATestprep test or course offering that is offered via a subscription to a customer. Products are typically segmented by State and Type (High School, Middle School, or Elementary School)
Product Types
A sub-classification of Products based on grade levels- such as High School, Middle School and Elementary School.
Purchase Order / PO
A document received from customers that consummates a purchase
Quote
A sales document to be presented to a prospective or existing customer that outlines a product and pricing proposal available for purchase before a stated expiration date.
Quotes are contained in a Quote record. Quote records are attached to an Opportunity record in Salesforce. Quotes are organized by district or school groups (Quote Line Groups) within the QLE.
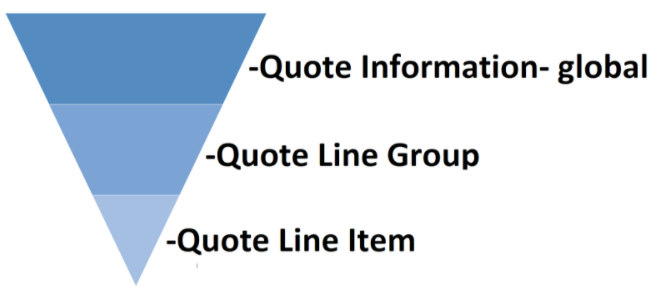
Quote Line Editor (QLE)
The tool within CPQ that is used to build- add and edit the products, dates, pricing and discounts in a Quote document. The QLE contains Quote Line Groups that contain Quote Line Items
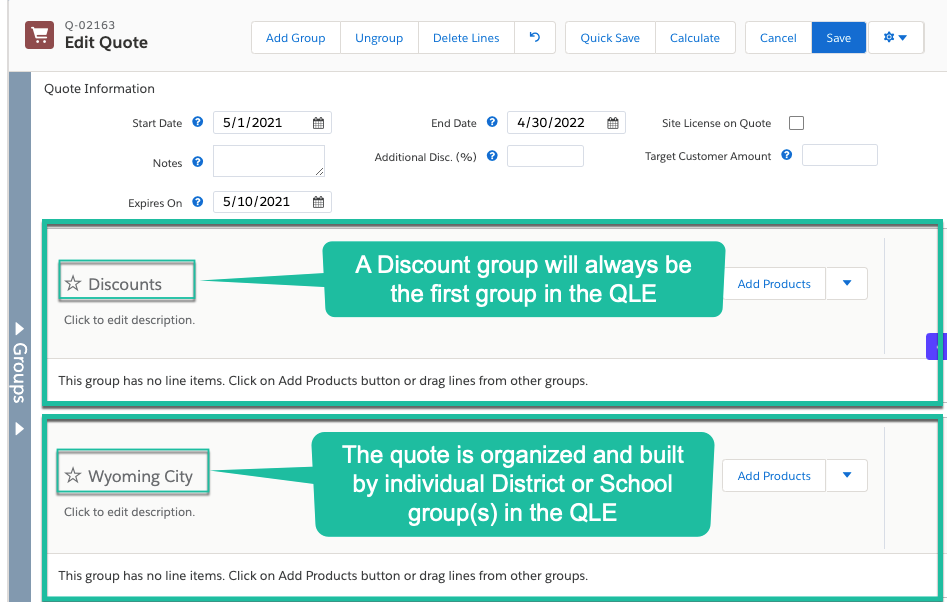
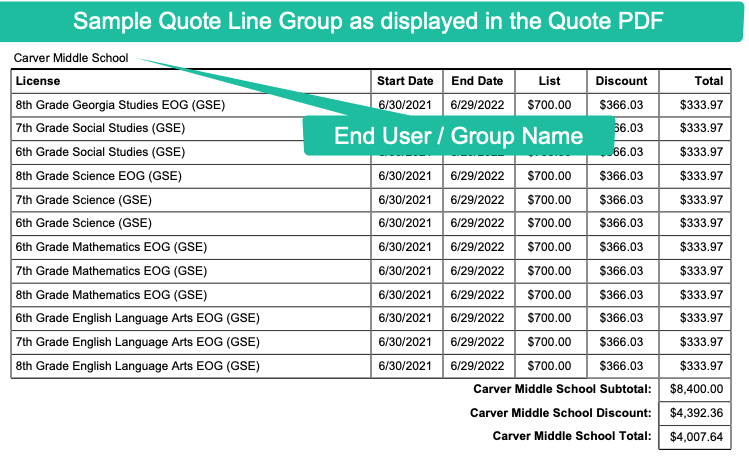
Quote Line Group / Group
Resides inside the QLE and represents an individual district or school grouping for products and pricing.
Quote Lines / Line Item
Each Quote Line Group contains one or more Quote Line Item(s). Line items represent each kind of license or subscription that is being sold. A line item includes the quantity, price, and discount(s) that are specific to a single product
Renewal Proposal
A sales document that is used pre-quote to propose options to a renewal customer and start the negotiation
Site License
A Site License is a product placeholder that can be included on a sales quote. The quote will display a price for the site license, but the product for the license can be selected by the customer prior to onboarding
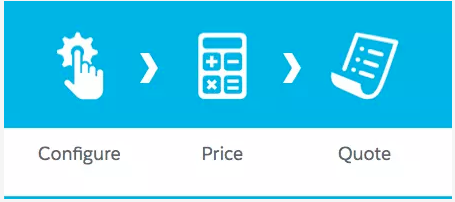
CPQ Overview
CPQ stands for Configure, Price, and Quote.
C Is for Configure
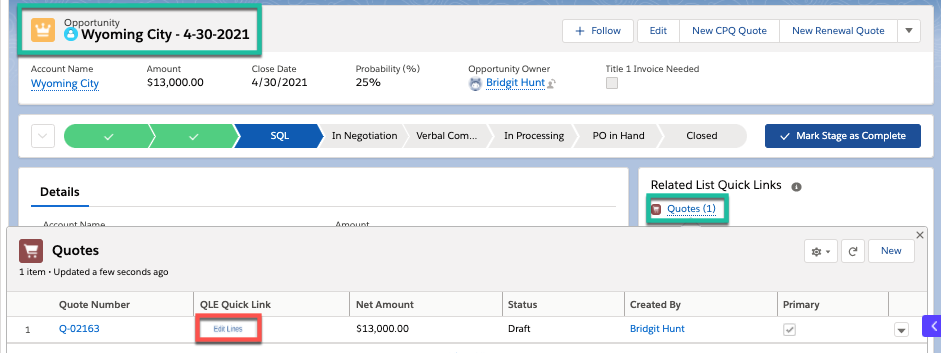
New CPQ quotes will always begin within an Opportunity record. Once the Opportunity record is ready you can create a New CPQ Quote. Multiple quote records can be created and associated to an opportunity record.
The quote record checked as the Primary will be synched with the Opportunity record. Only one quote record can be synched as the primary quote. The primary quote's revenue amount is displayed in the Opportunity.
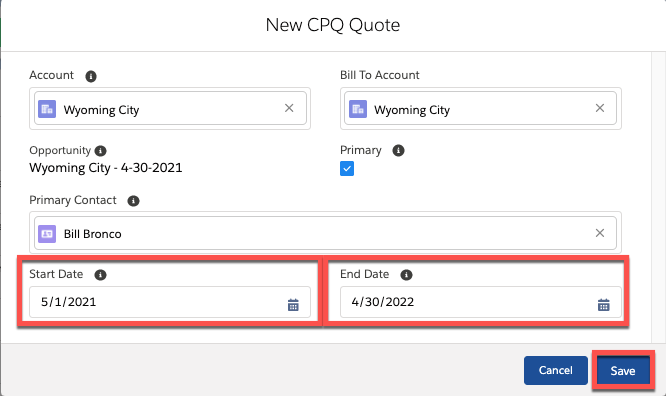
A CPQ Quote record is created when you click the New CPQ Quote button from an Opportunity record.
The New CPQ Quote dialog pops up to capture the data needed to create a new Quote record. After a few fields are entered, the CPQ Quote record is set up and ready for you to launch the Quick Line Editor (QLE)
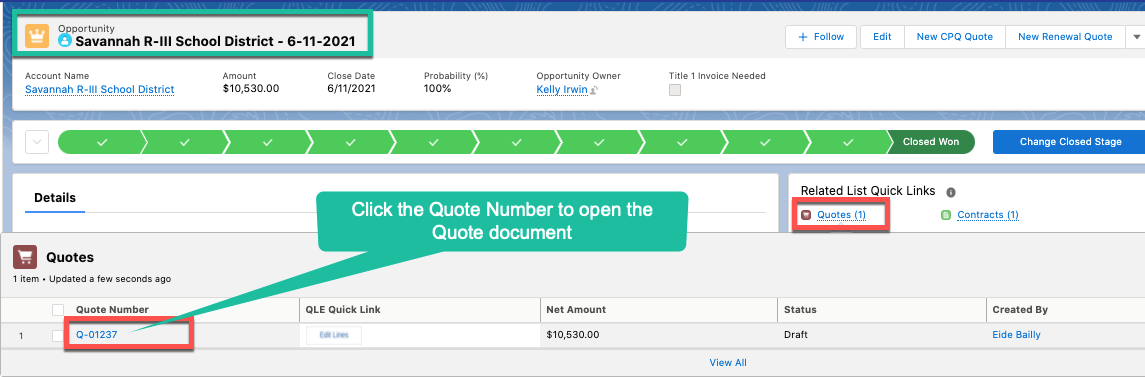
Quote records can be accessed from the Opportunity record they were created from. When an Opportunity is Closed-Won, CPQ automatically creates a new renewal opportunity with a future projected close date for the renewals team.
P Is for Price
After you create a quote, you add products and pricing (or Edit Lines) through the Quick Line Editor (QLE) tool. You access all quote records and launch the QLE to edit lines from the associated Opportunity record.
Inside the QLE tool you are ready to select the products and discounts for the quote. Our Districts, Schools and Price Book are all preloaded into the CPQ database based on the school or district information that is associated with the account.
Quote Line Editor (QLE) Overview
The Quote Line Editor has three key sections or components that are used to create your sales quote. We'll explain each section in greater detail, but below is a quick summary of each section:
The Quote Header section is locked at the top of the tool. It contains the key buttons or controls that you will use to build, organize and save your quote.
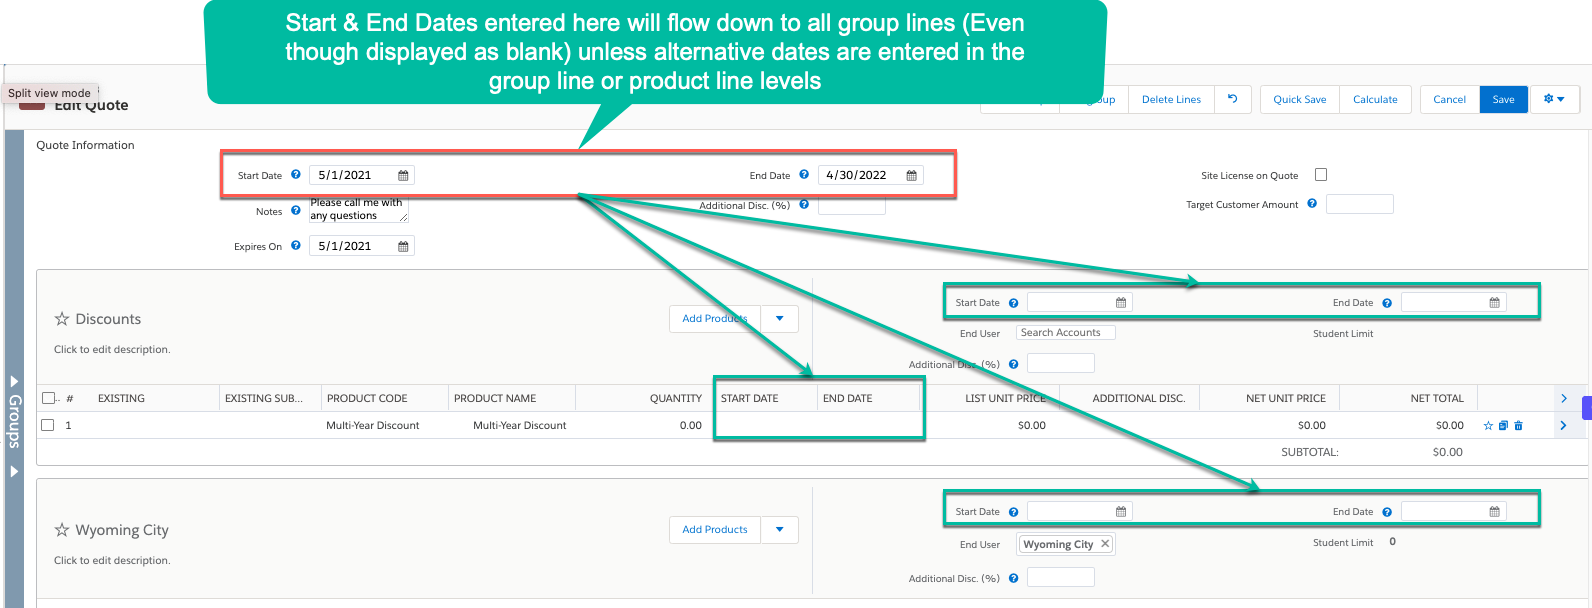
The Quote Information section contains key dates or values that are used across the entire quote.
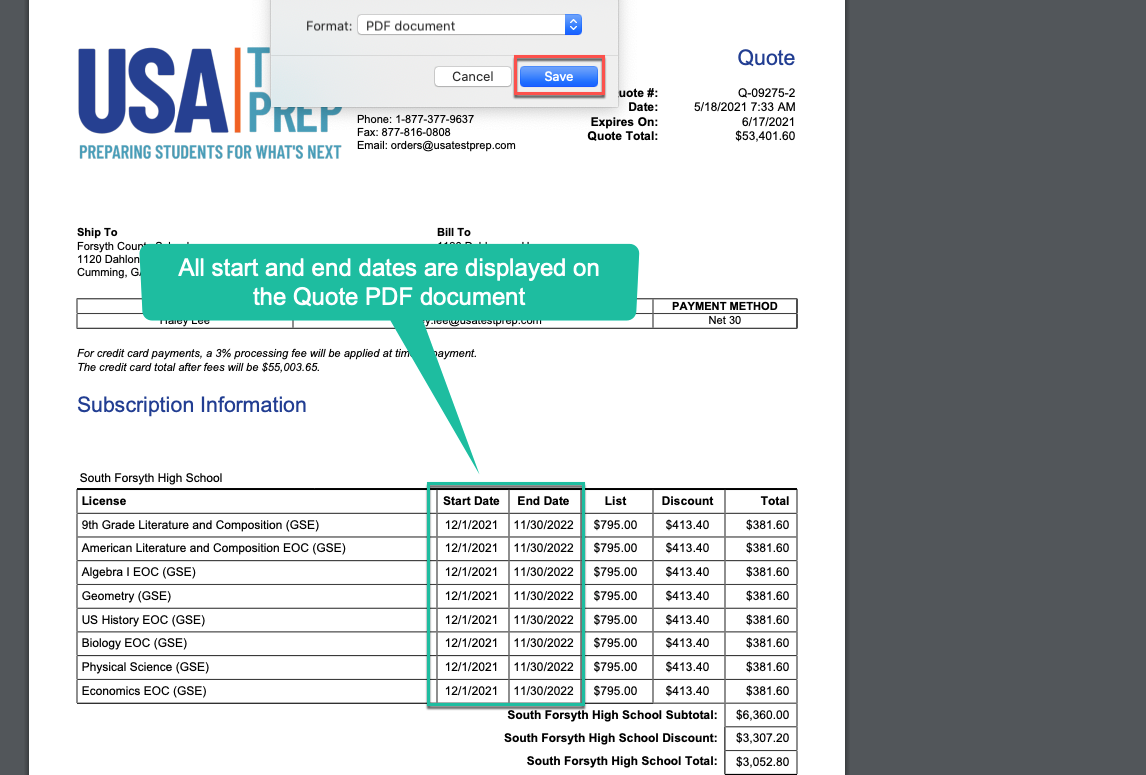
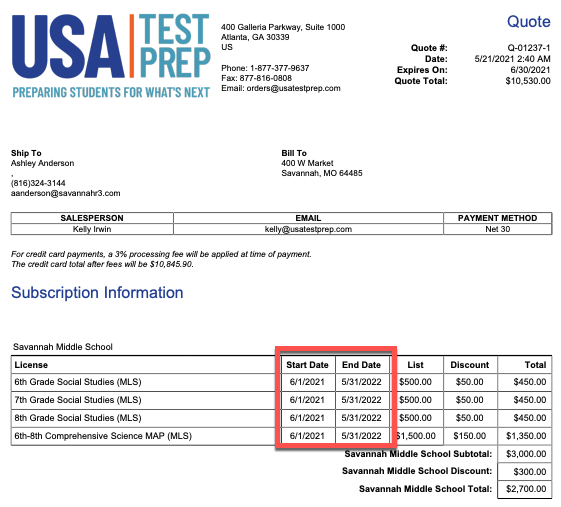
The Start and End Dates entered in the section are defaulted to all groups and product lines in the quote. Dates are displayed at the product line level as blank values- unless overwritten at the product line level. All start/end date values are displayed in the Quote PDF document
All Start and End dates are displayed in the PDF Quote document
The Quote Lines Group section is expandable and contains your quote's discount, account, product, and pricing data. A Quote Line Group in most cases will represent a single school, also known as the End User. A District quote will contain multiple Quote Line Groups- one group for each school in the district.
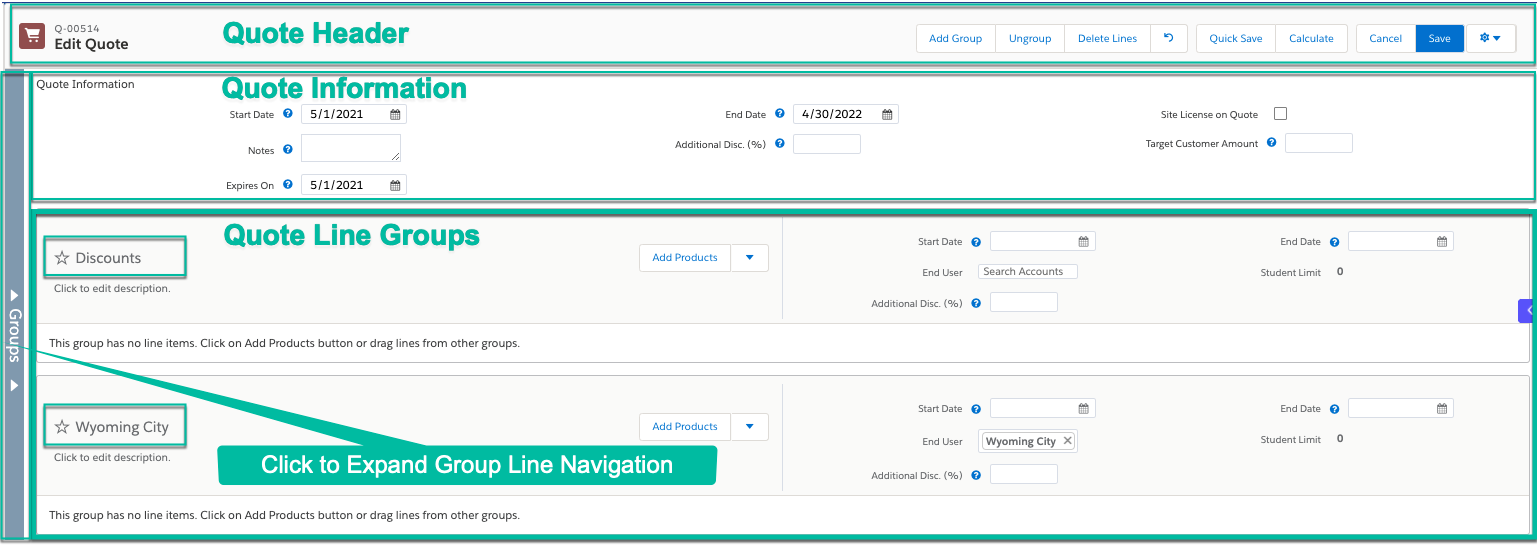
Quote Line Groups can also be navigated more easily, especially for larger quotes by clicking the Groups area on the far left of the display.
Quote Header Section
A description of the function of the buttons in the quote header section are described in the matrix below
Add Group
Adds a new blank group to the quote. A group usually will represent a school or rooftop.
Ungroup
Removes all groups from the quote- be careful with this one! It will remove the Discount group
Delete Lines
Deletes selected (checked) lines
Resets all Discounts
Quick Save
Save your quote line changes without leaving the quote line editor.
Calculate
Runs calculations in the quote
Cancel
Cancels the quote and returns you to the Opportunity record
Save
Saves the quote record and returns you to the Opportunity record
Resets the column widths within the quote document
Quote Information Section
A description of the fields in the quote information section are described in the matrix below
Start Date
The defaulted starting dates for the licenses / subscriptions in the quote
End Date
The defaulted ending dates for the licenses / subscriptions in the quote
Site License Quote
A checkbox to indicate that the quote contains a Site License. This flag indicates that a site license product has been included in the quote
Notes
A text field to enter any note that you would like to display on the sales quote document
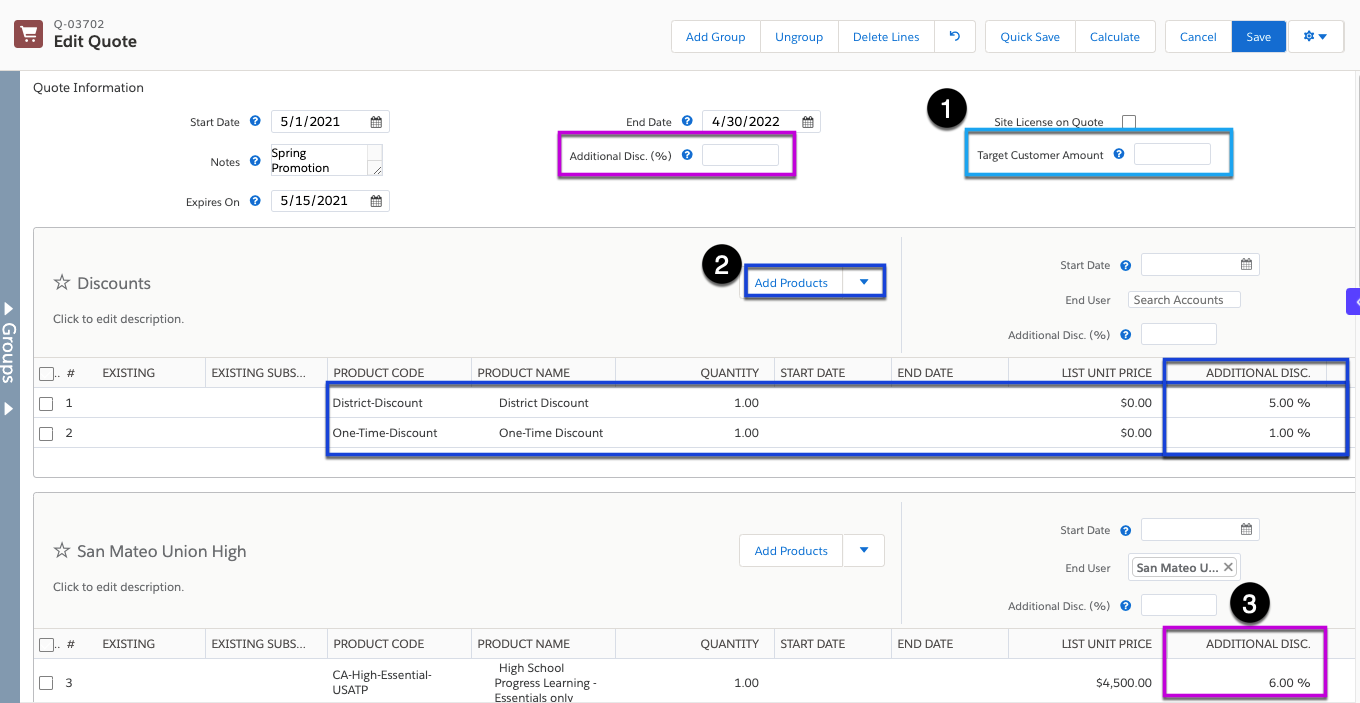
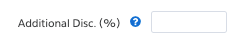
Additional Disc (%)
An additional discount extended to the customer on the quote. This value can be overridden at the individual line item level. Any line items that don't have additional discount explicitly specified will default to this value.
Enter a desired customer quote amount to automatically calculate additional discount on discountable line items. Do not use other discounts in a quote if the Target Customer Amount function is used- discounts will not print properly on the quote.
Expires On Date
The date the sales quote will expire. Defaults to 30 days.
Setting Product Start and End Dates- Quote Start and End Date Quote Hierarchy Logic
CPQ determines the start and end dates of a quote line from three levels.
First, CPQ looks for the start and end dates entered in the global parameters entered in the top level Quote Information section of the QLE
Next, CPQ looks for the start or end dates entered in the Quote Line Group section of the QLE. If either of those fields is blank, the dates from the global parameters from the Quote Information section are used
Lastly, CPQ will use start or end dates entered in the Quote Line Items section of the QLE
One Year Subscription Start Date and End Date Guidelines
As a best practice, subscriptions should always begin on the first day of the month and end on the last day of the month. Use the table below as a guide for one-year subscription contract start and end dates
START DATE
END DATE
01/01/2022
12/31/2022
02/01/2022
1/31/2023
03/01/2022
2/28/2023
04/01/2022
3/31/2023
05/01/2022
4/30/2023
06/01/2022
5/31/2023
07/01/2022
6/30/2023
08/01/2022
7/31/2023
09/01/2022
8/31/2023
10/01/2022
9/30/2023
11/01/2022
10/31/2023
12/01/2022
11/30/2023
01/01/2023
12/31/2023
02/01/2023
1/31/2024
03/01/2023
2/28/2024
04/01/2023
3/31/2024
05/01/2023
4/30/2024
06/01/2023
5/31/2024
07/01/2023
6/30/2024
08/01/2023
7/31/2024
09/01/2023
8/31/2024
10/01/2023
9/30/2024
11/01/2023
10/31/2024
12/01/2023
11/30/2024
Quote Date Alignment and Pricing Calculations
When different start or end dates are used in a CPQ quote the CPQ pricing engine handles all pricing calculations. This includes pricing calculations for product subscriptions less than one year.
Quote Line Group Arrangement
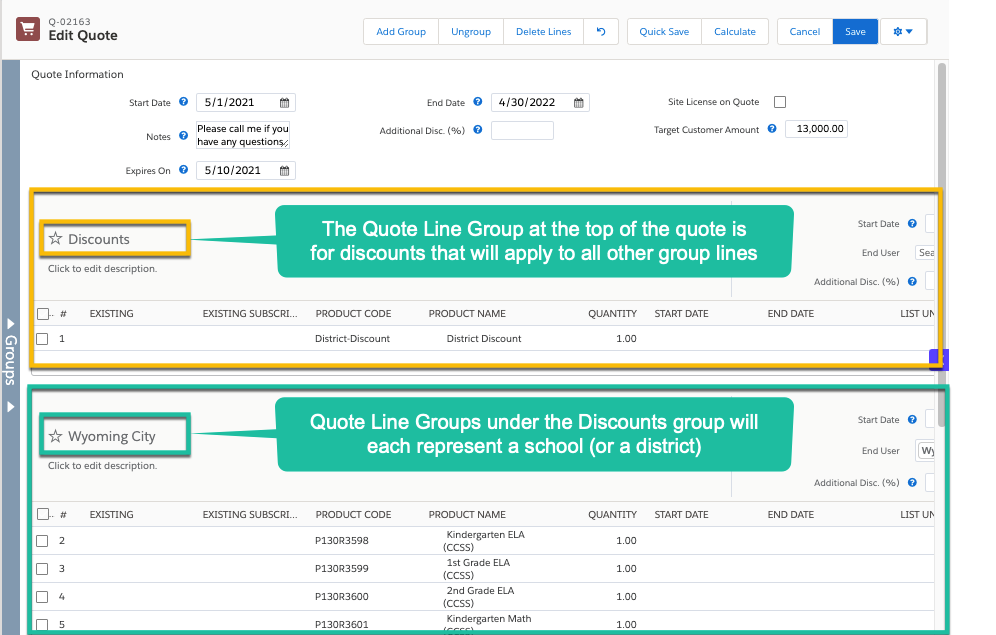
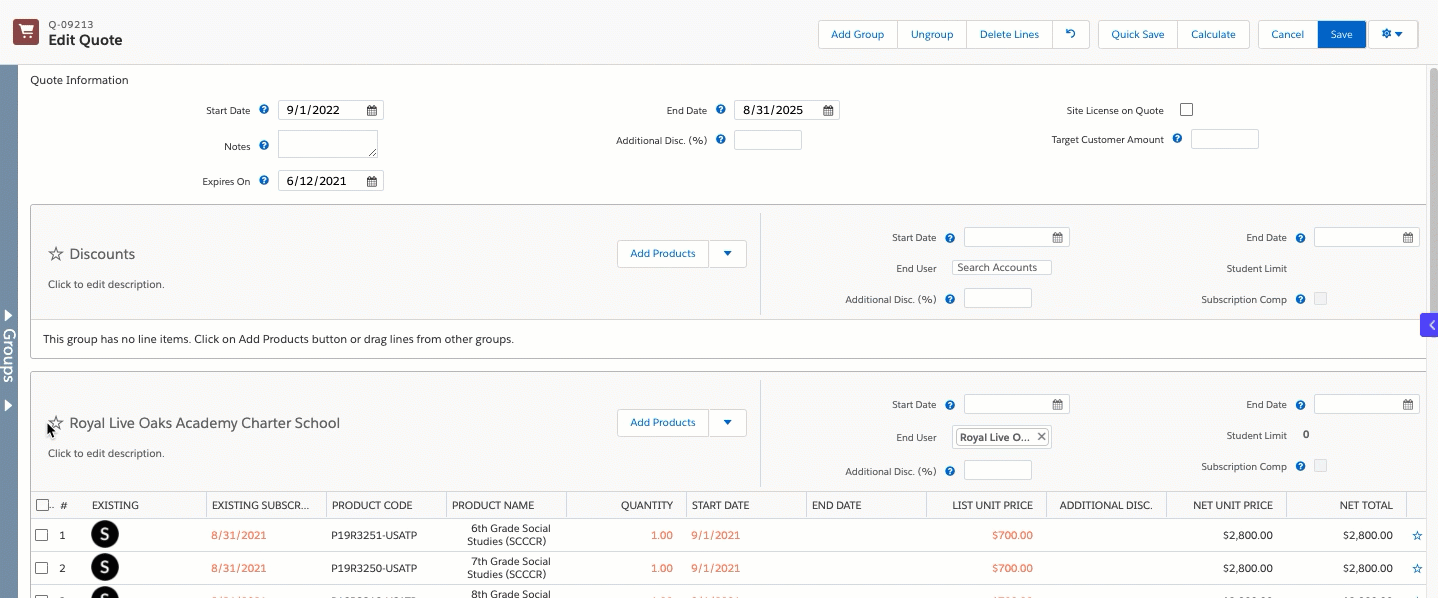
When a quote is initially created, a special Discount group is displayed as the top group line in the QLE. Beneath the discount group, separate quote line group(s) for a school, (or multiple schools if a district quote) are configured.
Each Quote Line Group will display on the Quote document as they are organized in the QLE. Each quote line group should represent a separate school or possibly a smaller combined district where licences in the group are to be shared
Contact accounting first for pre-approval if a single Quote LIne Group contains more than one school/rooftop. Improperly structured quotes will be delayed during onboarding and may require a new PO from the prospect/customer.
District quotes should not be grouped by grade level- do not include multiple rooftops in a group. For example- All High Schools) . 1 License Unit = 1 Rooftop, not 1 District
QLE Configuration Example
Quote Document Display Example
Within each group the following fields or buttons are displayed in the QLE:
Add Products Button
Used to add products by line item to the group line
Start Date
The Start Date for subscriptions in this group. If left blank, the Start Date from the Quote Information section will be used
End Date
The End Date for subscriptions in this group. If left blank, the Start Date from the Quote Information section will be used
End User
The name of the school or end user receiving and using the licenses or subscriptions. This should match the School / Rooftop name displayed on the left side of the group. Schools or groups with more than 1000 students should use a License Multiplier in the quote calculations. Districts can not be an End User.
Additional Disc (%)
Default Additional Discount amount by the percentage that will be applied to line items in this group. A discount percentage here will supersede any Additional Discount % that was entered in the Quote Information section above
Adding, Cloning & Deleting Quote Groups
As you are building a quote you may need to add or remove quote groups. Quote Groups can be added via the following methods:
Manually Add A New Quote Group
To add a new group to the bottom of the quote, follow the steps below:
Click the Add Group button in the header of the Quote Line Editor
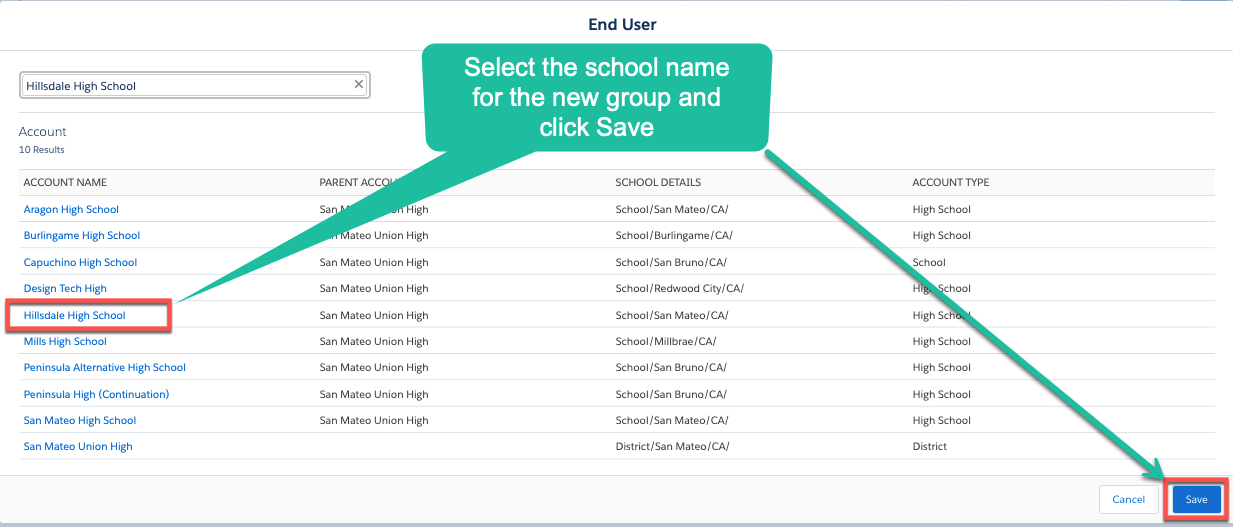
To add the name of the school for the new group, click inside the End User field in the new group and select the Search in Accounts option.
The new group will renamed and associated with the quote.
Cloning An Existing Quote Group
To clone an existing quote group, select Clone Group from the Add Products picklist in the group to be cloned
Once a new group has been created, update the End User field name in the new group so it will display properly in your quote document:
Changing theEnd User Name Field / Group Name
When a new group line is added you will need to change the name of the End User in the cloned group. To change the End User field within a group follow the steps below:
Remove the account currently populated as the end user- click the X after their name in the End User field.
In the End User field, select the Search in Accounts option, or Click in the empty End User field and hit the return key to bring up a list of all schools mapped to the account
Select the name for the new group from the list of schools mapped to the account.
If the desired school for the quote is not listed as an available End-user, it will need to be added to Salesforce and assigned/mapped under the district it rolls up to. Research the new school thoroughly to verify the correct name spelling, address, and grade level prior to adding a new account record to Salesforce
The new group will be renamed and associated with the group.
Deleting A Quote Group
Product Overview
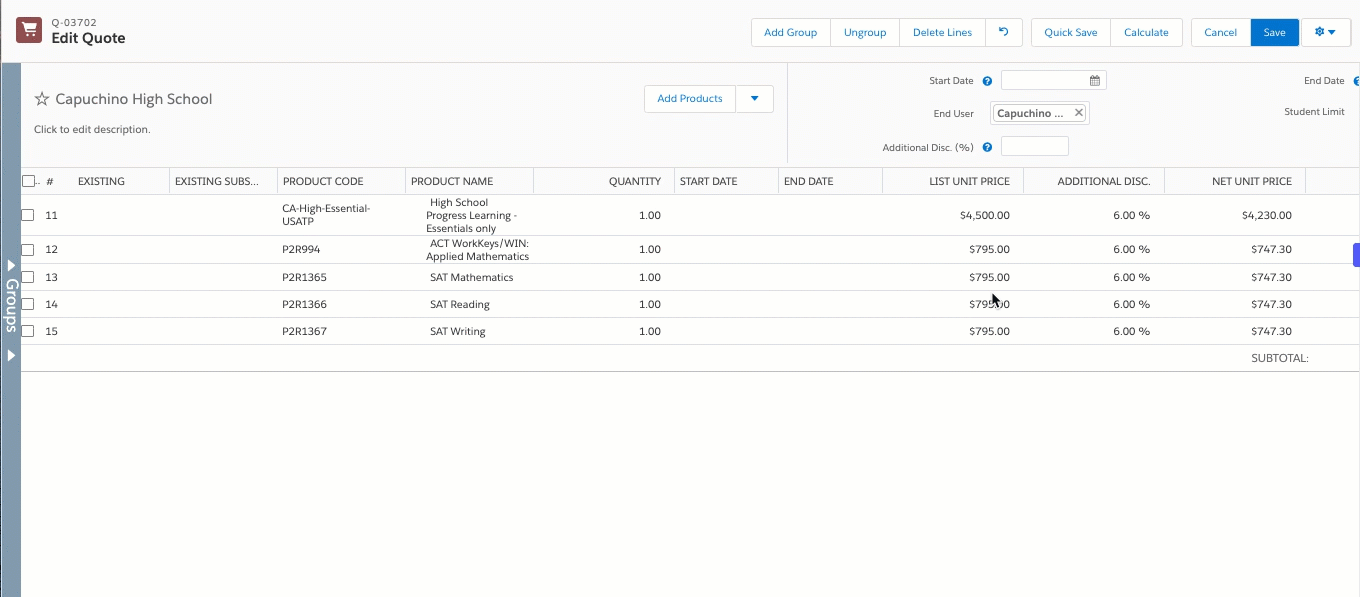
Product Line Item Display Matrix
You can make any needed individual product line changes to the start or end dates or discounts in the product line display.
Existing Product
Read Only Field. Blank, D (for District) or S (for School). If a D or S are displayed it signifies that a District (D), or a School (S) has an active subscription to the product
The district is paying for an active subscription for the product
The school is paying for an active subscription for the product
Existing Subscription Expiration Date
Editable Field. If the customer is currently subscribed to the product, this field displays the expiration date of that subscription.
Product Code
Read Only Field. Populated from the price book
Product Name
Read Only Field. Populated from the price book
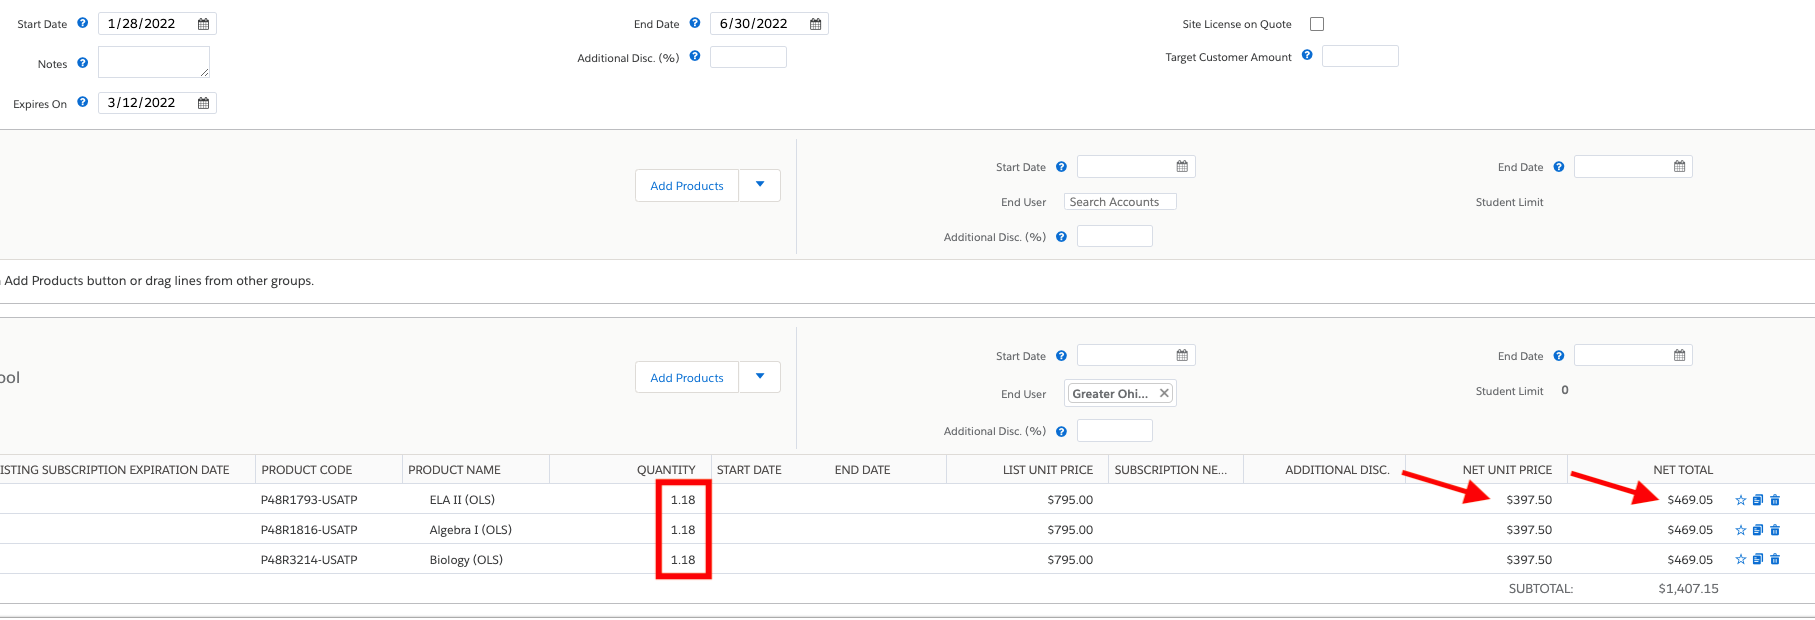
Quantity
Editable Field. Should always be 1 (one) unless a License Multiplier or Monthly Rate Quote adjustment is being added
Start Date
Editable Field. All line items in the group will first default to the Start Date entered at the global level entered at the top of the quote. This date is NOT displayed at the line item level but will print on the quote.
All line items in the group will use the Start Date entered at the group line level if a date is entered. This date is NOT displayed at the line item level but will print on the quote.
The Start Date can be changed at the line item level if needed/desired.
End Date
Editable Field. All line items in the group will first default to the End Date entered at the global level entered at the top of the quote. This date is NOT displayed at the line item level, but will print on the quote.
All line items in the group will use the End Date entered at the group line level if a date is entered. This date is NOT displayed at the line item level, but will print on the quote.
The End Date can be changed at the line item level if needed/desired.
List Unit Price
Editable Field. Populated From Price Book
Additional Discount
Editable Field. An Additional Discount amount entered at the line item level will override any additional discounts entered at the global or group line levels
Net Unit Price
Calculated, Read-Only Field. The is an auto-calculated price based on the date, pricing and discount data entered.
Net Total
Calculated, Read-Only Field. Pricing will automatically prorate if the Start or End Dates are changed.
Favorite
Add the Product to your Favorites
Clone
Clone the Product Line
Delete
Delete the Product Line
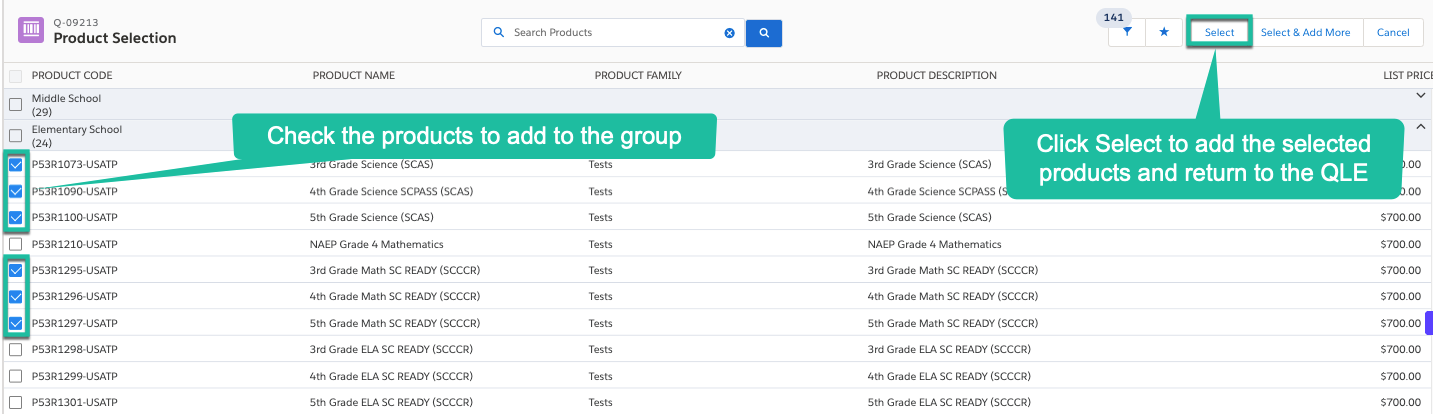
How To Add A Product To A Group
Use the Add Products button to add additional products to a group
Before adding additional a la cart products to a quote that contains bundled products, always verify that the additional a la cart products being added are not already included in the bundle. Otherwise duplicate products will be included (and quoted) in your proposal.
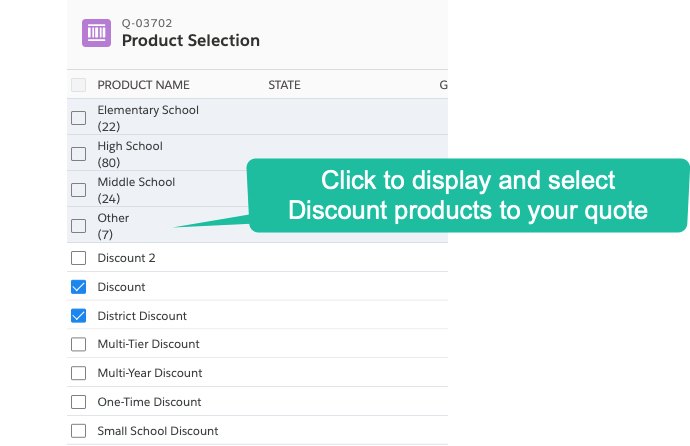
In the QLE, click the Add Products button to add new products to a group
In the Product Selection view click in the row of the desired grade level to display the available products
Check the box next to the products to be added to the group
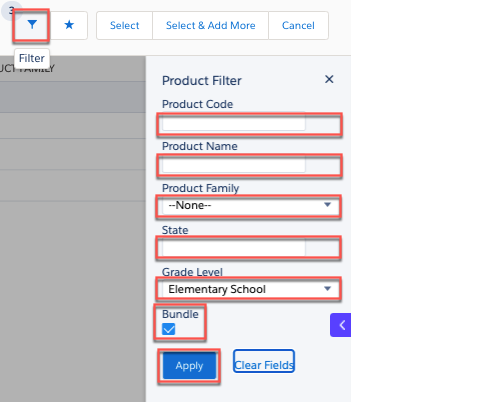
How To Use Filters To Select Products
Customizable filters help you find the products you’re looking for. CPQ has two filtering tools in the QLE to help you quickly search and locate desired products. The Top Search Bar and the Filter Tool are available to use within each quote line group.
QLE- Top Search Bar
Use the Top Search Bar in the QLE by entering the search term or phrase and then clicking the Q button.
QLE- Filter Tool
Use the Filter Tool to search by parameters that you enter and apply
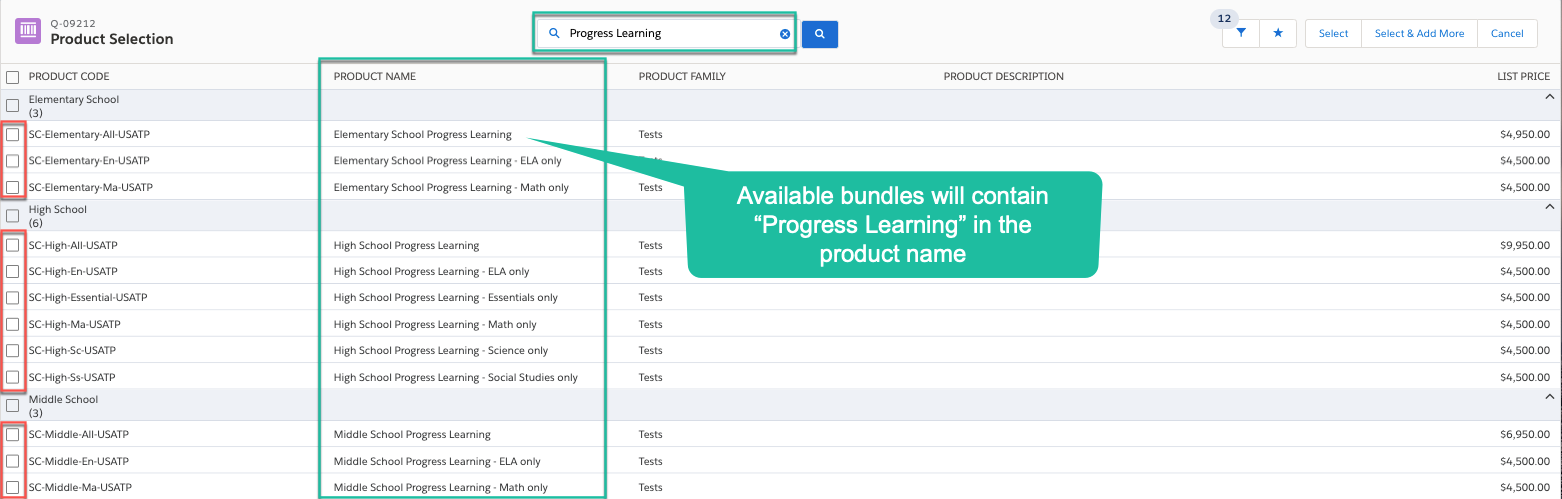
Adding Product Bundles To A Quote
Product bundles are grouped together in the Product Selection view in CPQ. Bundled products can be identified by the search term Progress Learning embedded in the product's name
Expand each class grouping to view and select the desired product bundle(s)
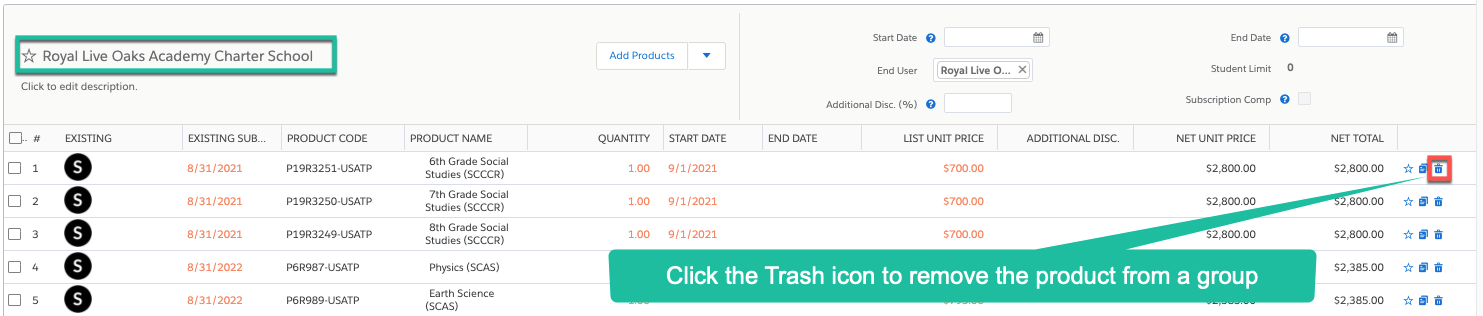
How To Remove Products From A Group
Products can be removed from a group by clicking the trash icon located on the right side of the product line
Product License Multiplier
A Product License Multiplier is used to increase pricing for individual quote groups with student counts greater than 2000. In most cases, the License Multiplier will only be applicable for virtual or charter schools with very large enrollment.
If you are quoting a single quote line group school or end-user with more than 2000 students, contact management to determine the multiplyer factor to be applied to the product line Quantity field
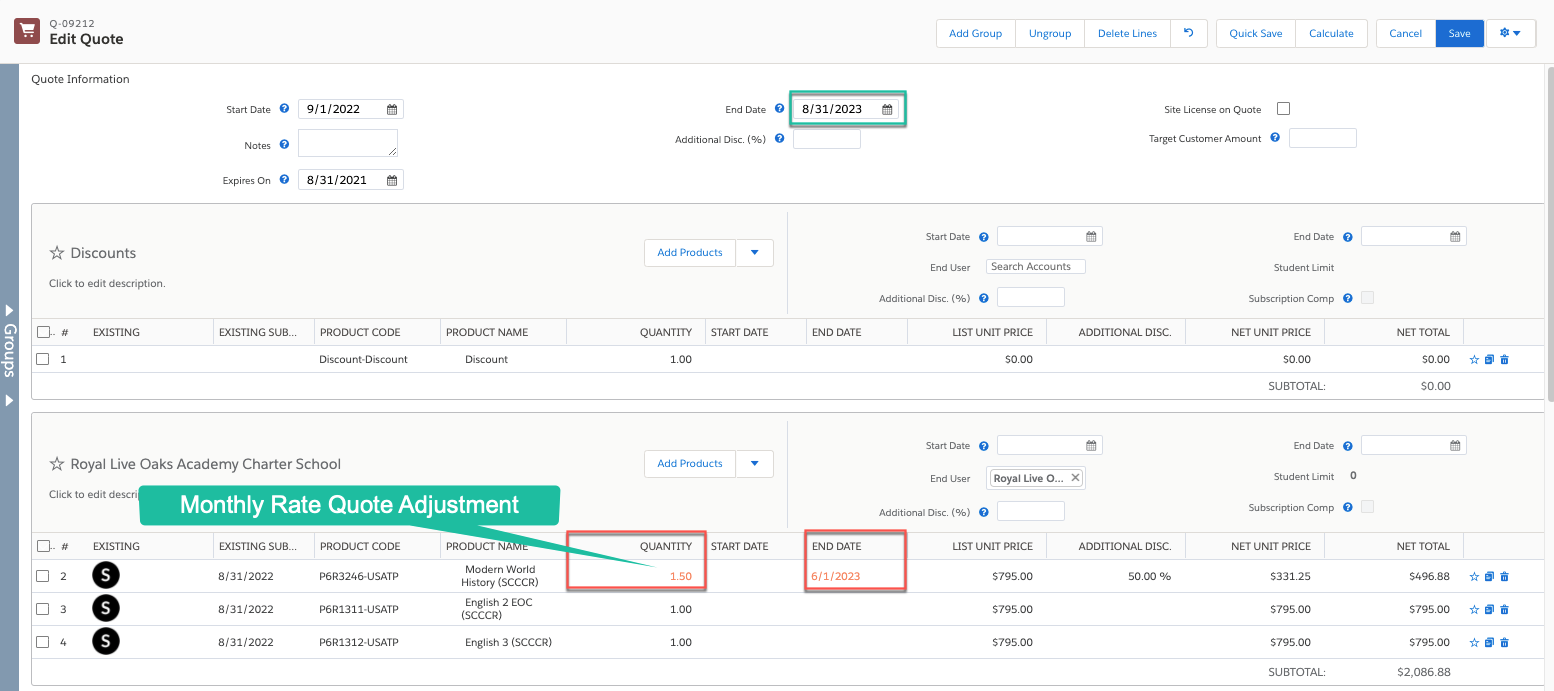
Monthly Rate Quote Adjustment
A Monthly Rate Quote adjustment is used for product licenses with a subscription term of less than one year that are not aligned with the monthly term for the rest of the quote. To apply the adjustment, change the Quantity field for the product to 1.5
Any pilot subscriptions or schools that are requesting access for less than one year will need manager approval.
If approval is granted, the customer will be subject to a premium price rate of 1.5x otherwise known as the monthly rate.
Due to DPOs, most pilots should be limited to large districts hoping to pilot with one school or one product for the consideration of a large purchase.
A pilot can be no less than 3 months. At 8 months, the monthly rate is the same as the list price. Any licenses quoted at 8, 9, 10, or 11 months will be charged the full standard rate. Any licenses between 3-7 months will be charged a premium of 1.5x.
Add notes to the quote and opportunity explaining to the customer the price rate. “Minimum subscription charges applied. This quote may not be combined with any other offers, specials, or promotions. Standard subscriptions are for 12 months.
Renewal Team Product License Multiplier Exceptions
Any renewal for less than 8 months will be charged at the monthly rate unless you have manager approval
Upsell alignments are exempt from the multiplier.
How to quote combined schools (Example: middle/high school from 8-12th grade) using the same product subscription (Example MS and HS Algebra) without double charging
Add both products (HS & MS) to the quote as separate product lines. Adjust the Quantity of one of the products to zero
Discounts Overview
CPQ offers a lot of flexibility regarding discounts, but there are a few key rules to follow to keep your quotes simple and most importantly, accurate.
While configuring discounts in your quote a helpful button is the Reset button. This will remove any/all discount amounts (% or $) that have been added to your quote.
Pick Your Discount Methodology
CPQ offers three methods you can use to discount products within the group lines. But you can only use only one method- do not mix and match the discounting methods below on the same quote!
Read below to understand how each discounting method works.
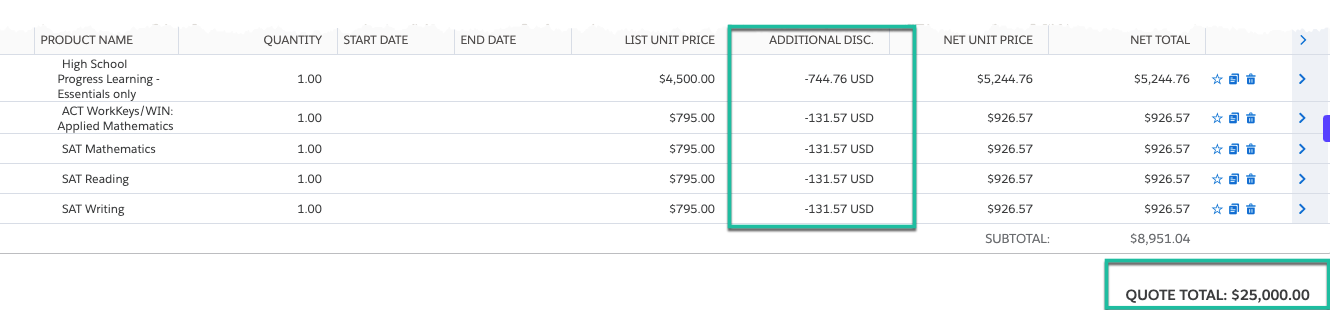
Target Customer Amount Discount
The Target Customer Amount discount calculation works by rounding down the actual quote price total to equal the desired target customer quote amount. To use this method, enter the customer's desired quote total is entered in the Target Customer Amount field.
Once the target amount is entered, CPQ will incrementally discount each line item in the quote in order to reduce the quote's pricing to match the Target Customer Amount entered. See a sample Target Customer Amount quote.
If the Target Customer Amount field is used, no other discount methods can be used in the quote.
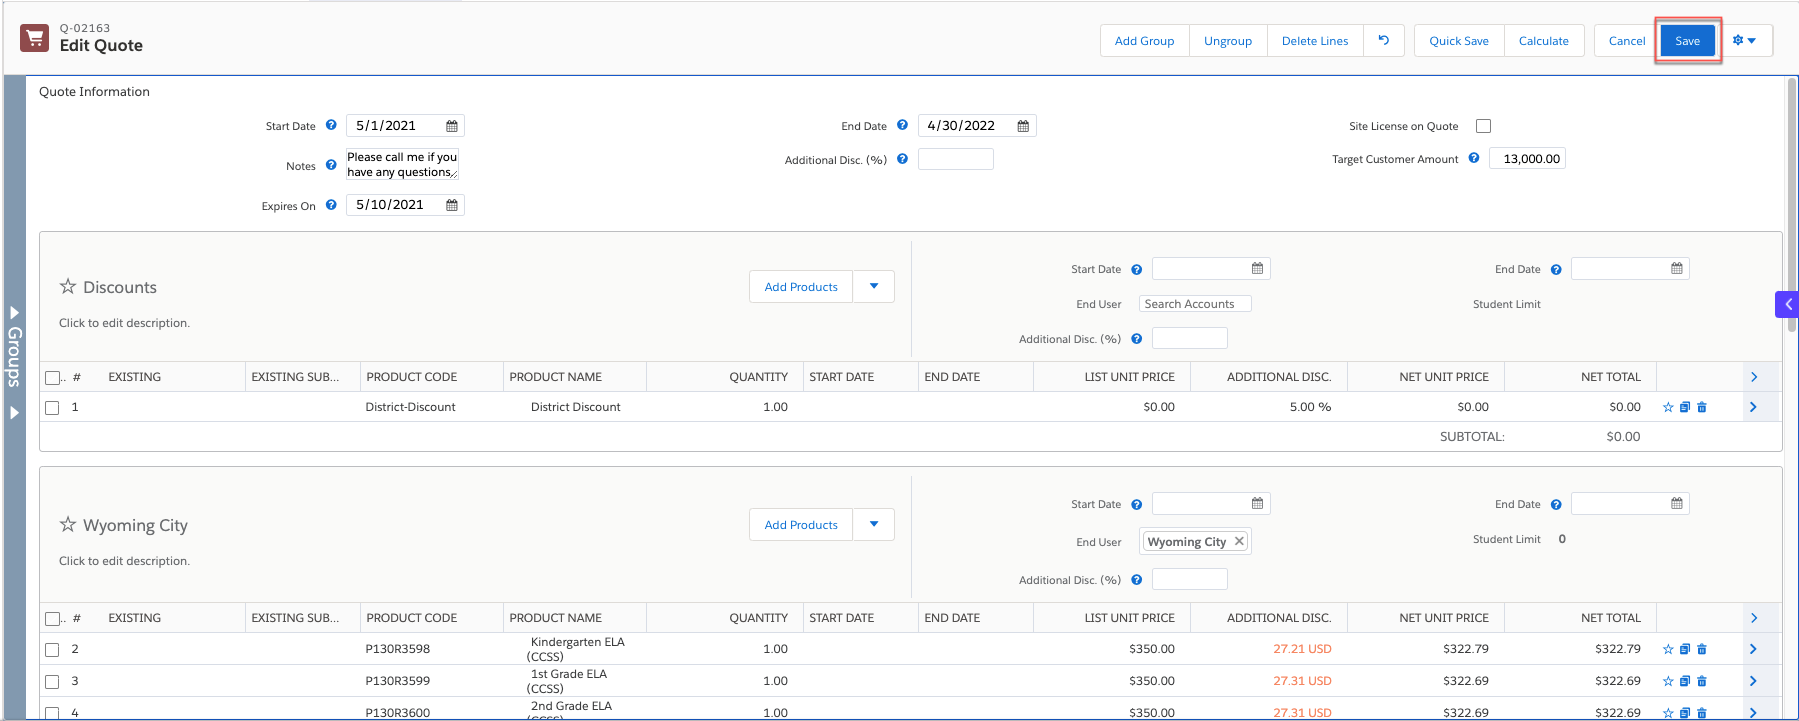
Discount Group Discounts
Discount Group functionality allows you to select the names of pre-defined discounts and add them to your quote. Any discount name that is selected will be displayed and sub-totaled on the quote document. See a sample Discount Group Customer discount quote.
Click the Add Products button in the Discounts Group and click Other in the Product Name column to display the available discount names. Press Select to save and return to the QLE.
The last step is to enter the discount percentage or USD dollar amount to be applied to all of the line items in your quote. Once the % or $ amount is entered, the discount will be added to each line item in the quote.
Discounts added via the Discount Group cannot be overridden within individual group(s) or line item levels except in the case of Complimentary Rooftops described below
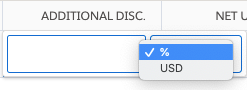
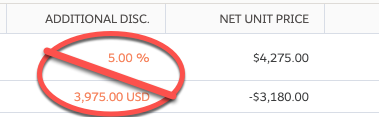
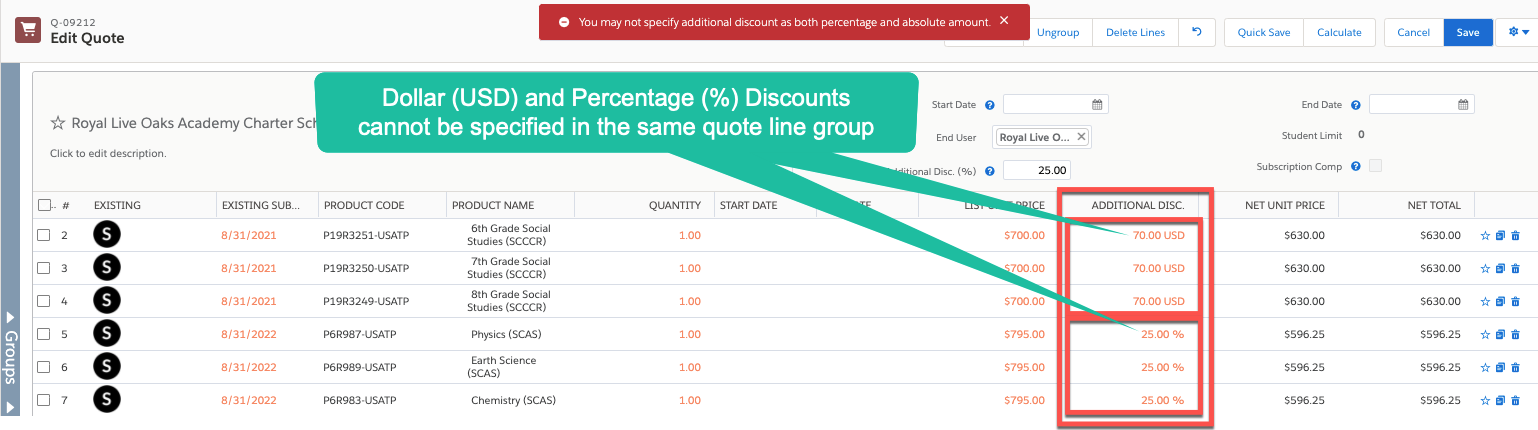
CPQ Additional Discounts
The Additional Discount fields are available at the global, group line, and product line levels in the QLE. If Additional discount types are used in a quote only a single type (Percentage or USD Dollar) can be used.
Discount Level
Discount Field
Discount Type
Global
Percentage Only
Group Line
Percentage Only
Product Line
Percentage and Dollar *
If Additional discount types are used in a quote, only a single type (Percentage or USD Dollar) can be used within each group. For example, a percentage discount cannot be offered on one line item, and a USD discount offered on another line item in the same group.
> Global- Additional Discount % Field
A discount percentage amount entered in this field will be applied to every product line item on the quote. This discount value will be overridden by any discount entered at the Discount group or product line item level. Any line items that don't have additional discounting explicitly specified will default to this global discount value.
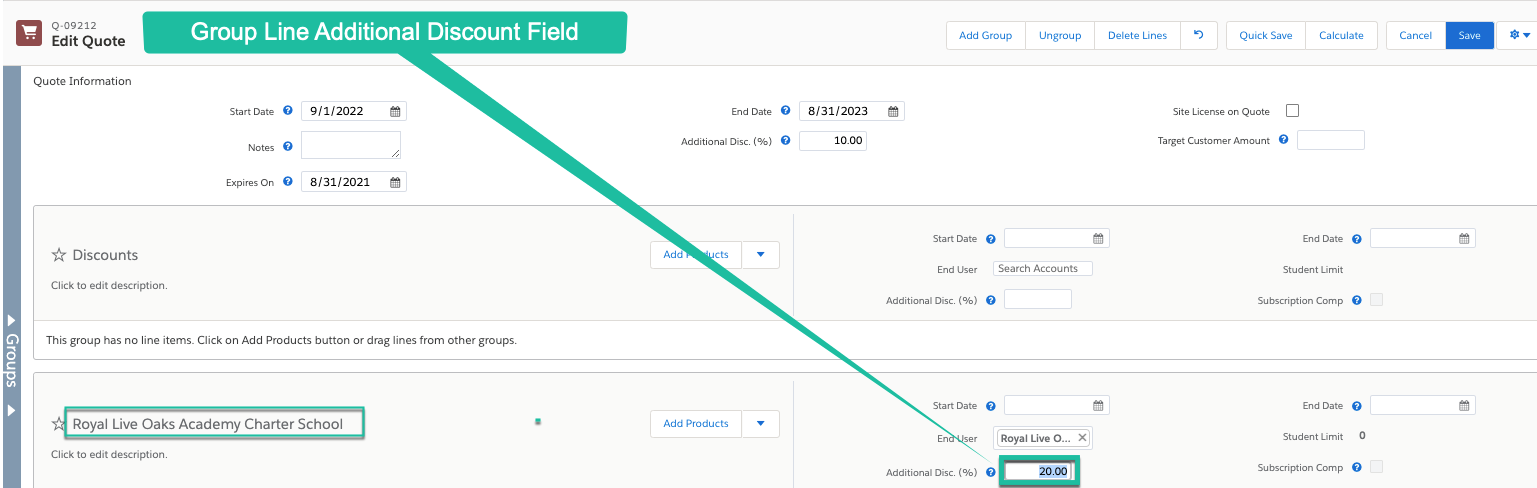
> Group Line- Additional Discount % Field
A discount percentage amount entered in this field will be applied to every product line item in the group. This discount value will override any discount entered at the level.
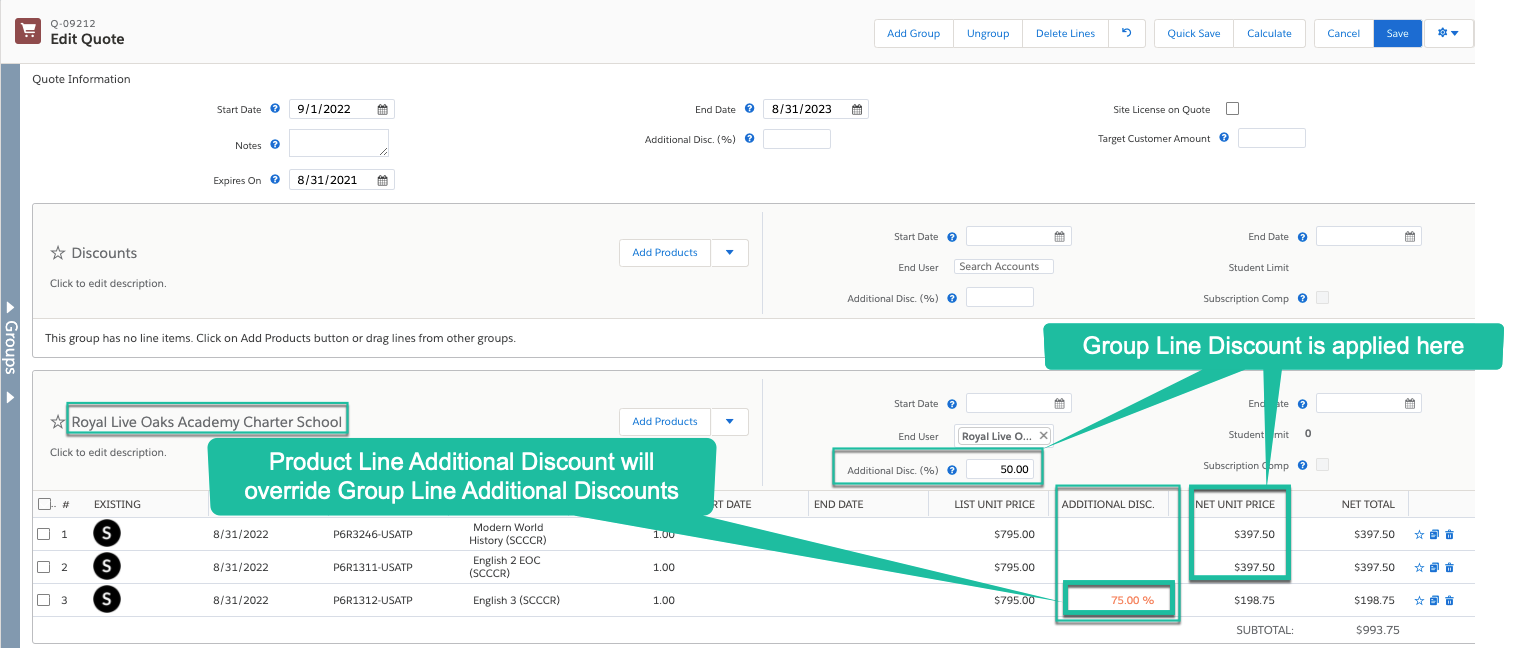
> Product Line- Additional Discount % Field
A discount percentage amount entered in this field will override any other discounts that are entered on the quote at the Global or Group Line levels. Discounts entered at the Discount group level cannot be overridden.
In some cases when quoting a district account there may be the need to provide free or complimentary subscriptions for an alternative, virtual or charter school setup.
To simplify these quotes, you have the ability to flag the rooftop to be provided with free subscriptions as a Complimentary Rooftop on its account page. Later, when building a quote in CPQ, all products assigned to the flagged account will be pre-discounted 100% within the quote.
This functionality only works if ALL products associated with the rooftop are to be priced with a 100% discount. This functionality will override all other discount methods in the quote
Follow the steps below to set up and quote a free/ complimentary rooftop account.
Access the complimentary rooftop account in Salesforce that will receive free licenses
In the Details section of the account record, check the Complimentary Rooftop checkbox and save your changes
Next, build your quote in CPQ for the district or rooftop. Add a rooftop group for the complimentary school. Associate all of the products the school will receive as you would do in any quote.
After the rooftop group and products have been added to the quote, click the Calculate button at the top of the quote.
This will apply the 100% Complimentary Discount to the rooftop account you flagged above
Putting It All Together- The QLE Quote Building Process
Quote Line Groups
Start with your Quote Line Groups- The quote is built by first adding a group for the district or school(s) in the QLE. Then add your products to each group. Start and end dates can also be edited if they are different from the global dates.
Salesforce CPQ serves as the product and pricing source of truth.
After all products are added, then a global discount can be applied from the Discount group at the top of the QLE.
Once all products, pricing and discounts are added in the QLE, the quote is saved and is ready to preview and quote.
Q Is for Quote
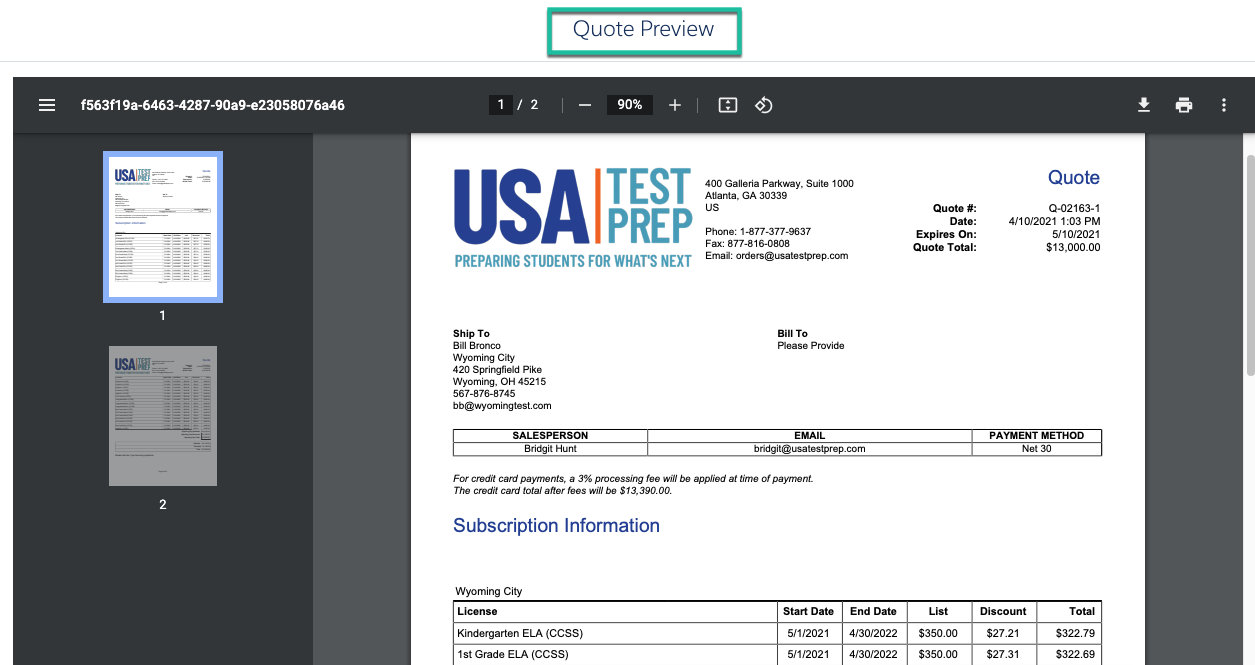
Now that all of the products and pricing are configured, you’re ready to generate a PDF with all quote details and review it before sending to the prospect.
Configure how the Quote PDF will be generated and generate a preview
Once finalized the quote is ready to send to your customer as a PDF attachment.
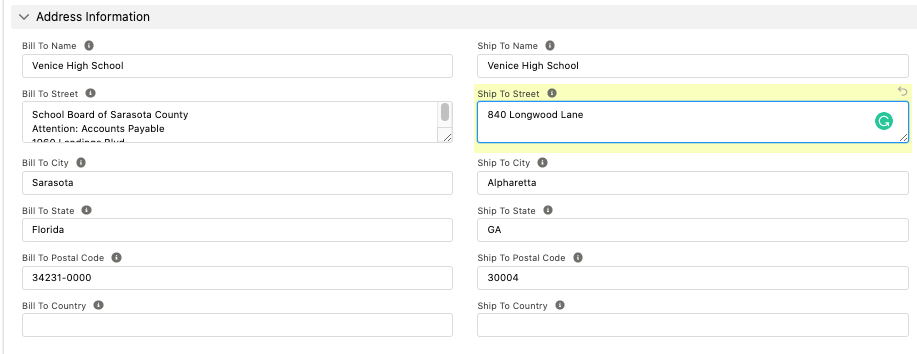
To ensure a correct shipping address in your quote, enter a complete shipping address in your account before a Quote is created
If the account's shipping address is incomplete, Salesforce CPQ copies a combination of the account's shipping and billing addresses to the quote's shipping address. If the shipping and billing addresses are different, the resulting shipping address in the quote is incorrect.
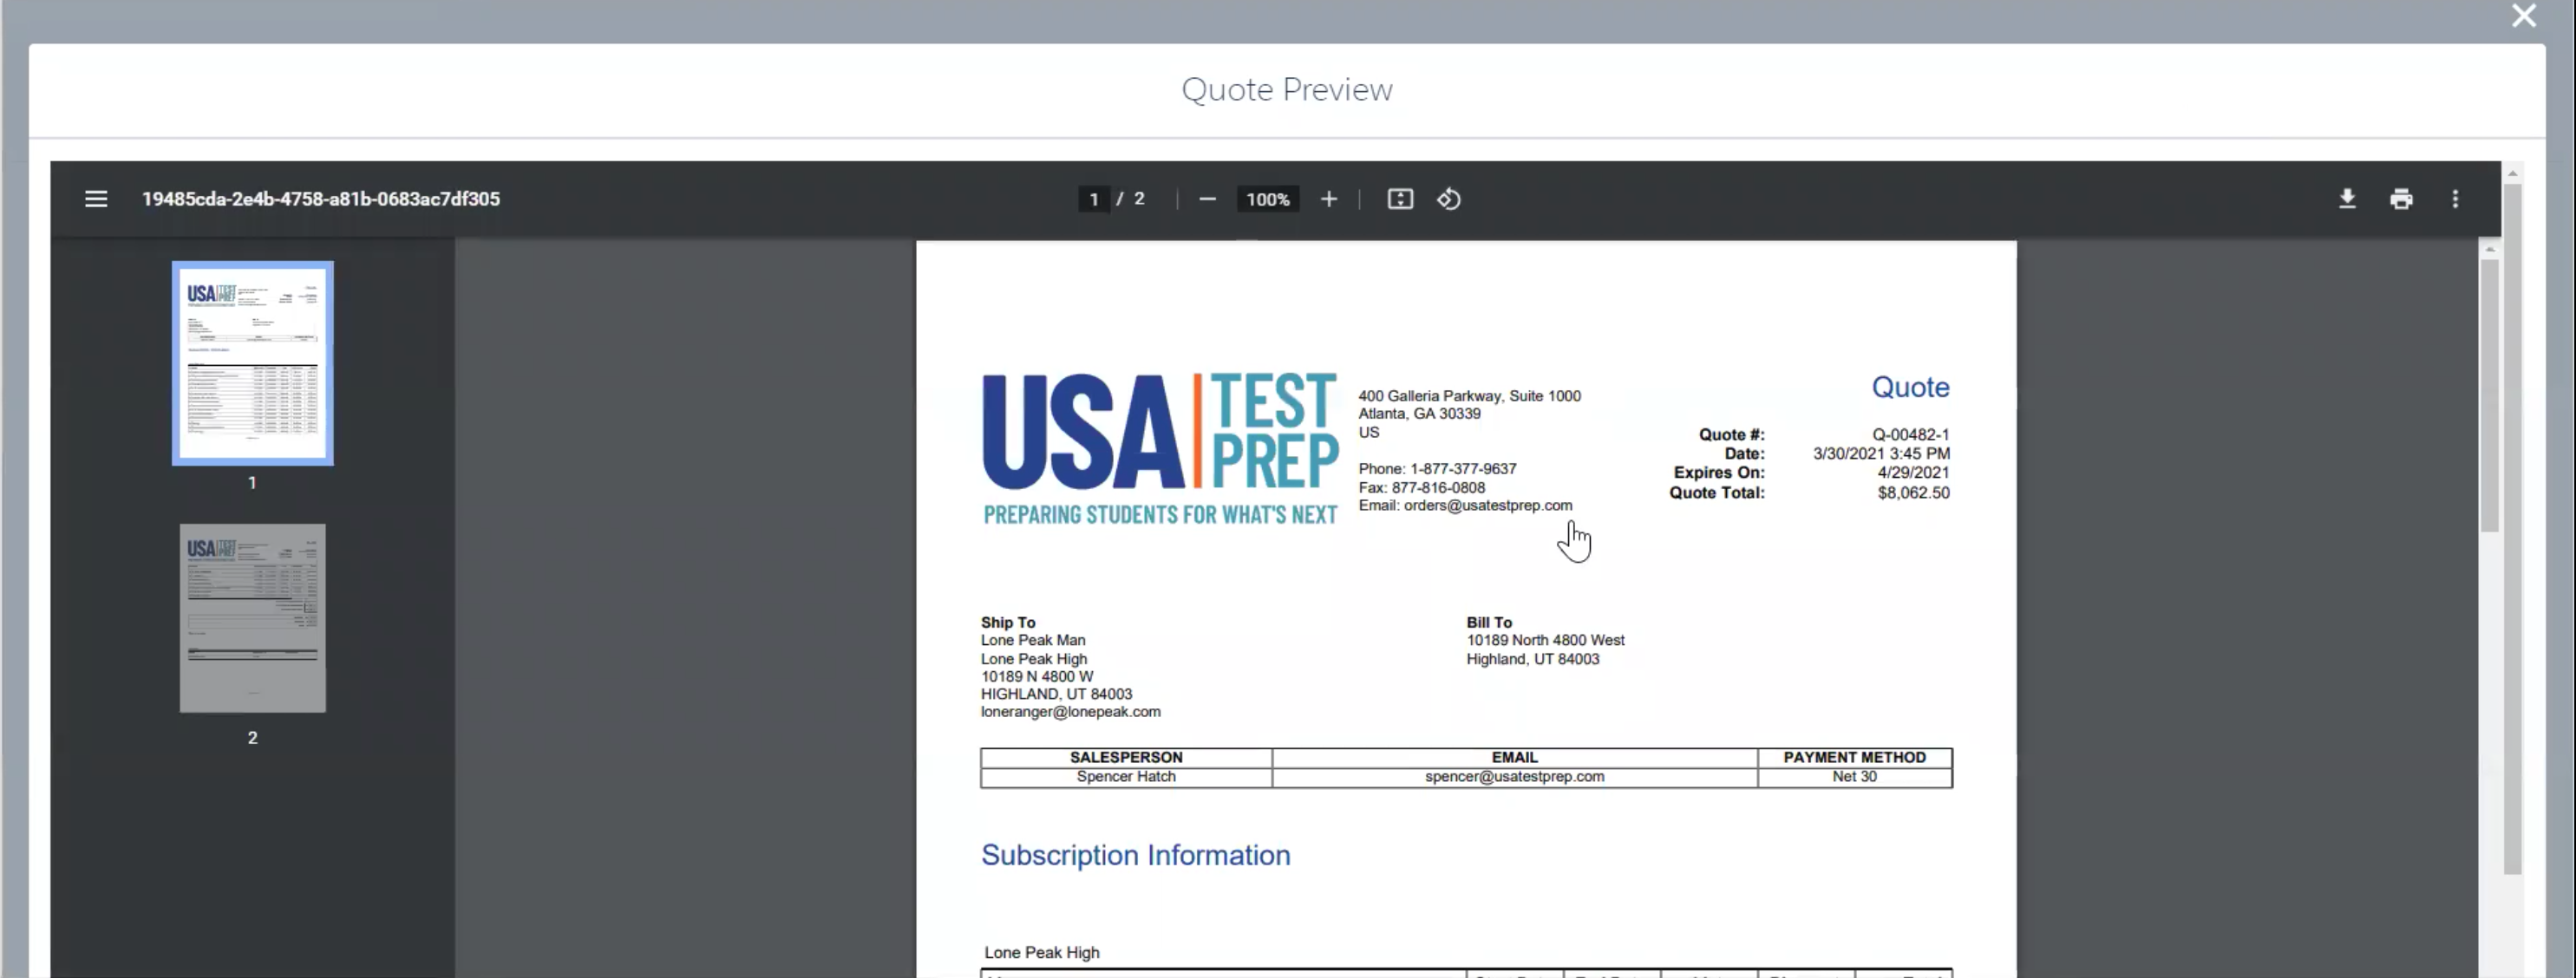
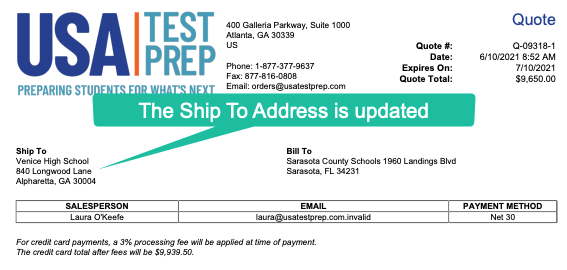
How To Update Or Add A Quote's Ship To Address
After a Quote has been generated and the Ship To address on your quote is blank, or you would like to change it, follow the steps below:
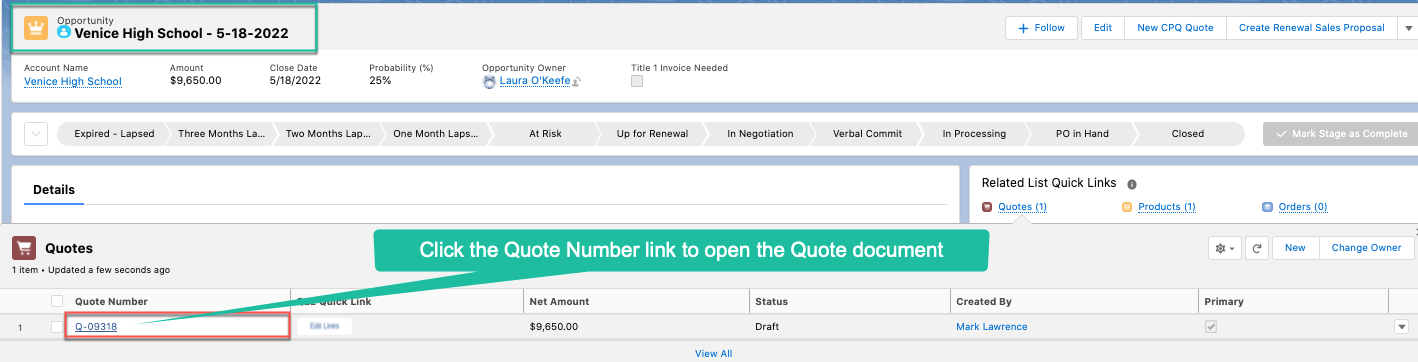
Open the Quote document
From the Quote document, (scroll down) and update the Ship To Address
The Ship To address is updated on the Quote document
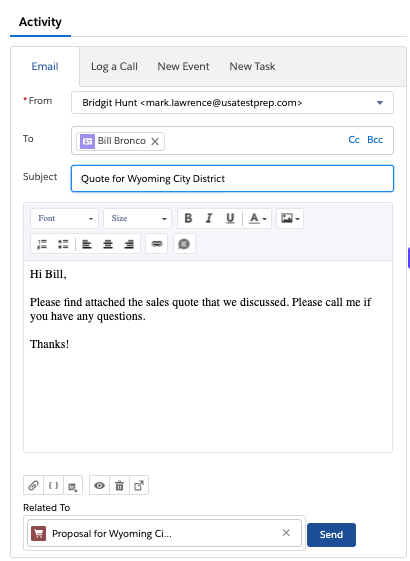
If you like what you see in the preview you can now Save & Email your quote!
Once saved, you can attach and Email the quote from your favorite Email application!
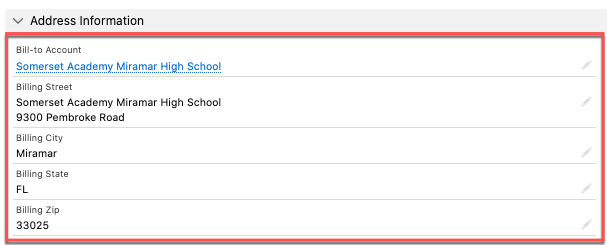
How To Update Or Add A Quote's Bill To Address
After a Quote has been generated and the Bill To address on your quote is blank, or you would like to change it, follow the steps below:
Open the Opportunity record that is associated with the quote
From the Opportunity, (scroll down) and update the Bill-to Account information
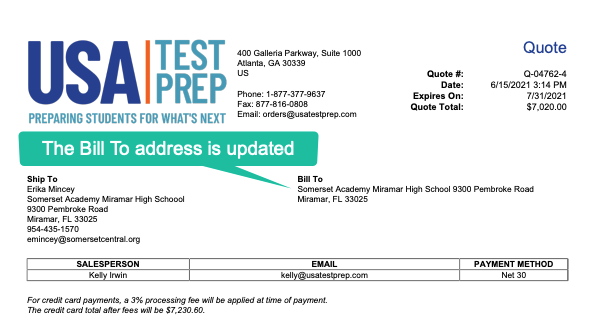
The Bill To address is updated on the Quote document
If you like what you see in the preview you can now Save & Email your quote!
Once saved, you can attach and Email the quote from your favorite Email application!
How To Create Title 1 Quote or Invoice Documents
To format your CPQ Quote or Invoice for a Title 1 customer follow the steps below
First, the Title 1 start and end dates need to be entered on the Opportunity record that is associated with the quote.
From the Opportunity record containing the required quote:
Fill in the Title 1 Start Date field
Fill in the Title 1 End Date field
Next, open the Quote that needs Title 1 dates
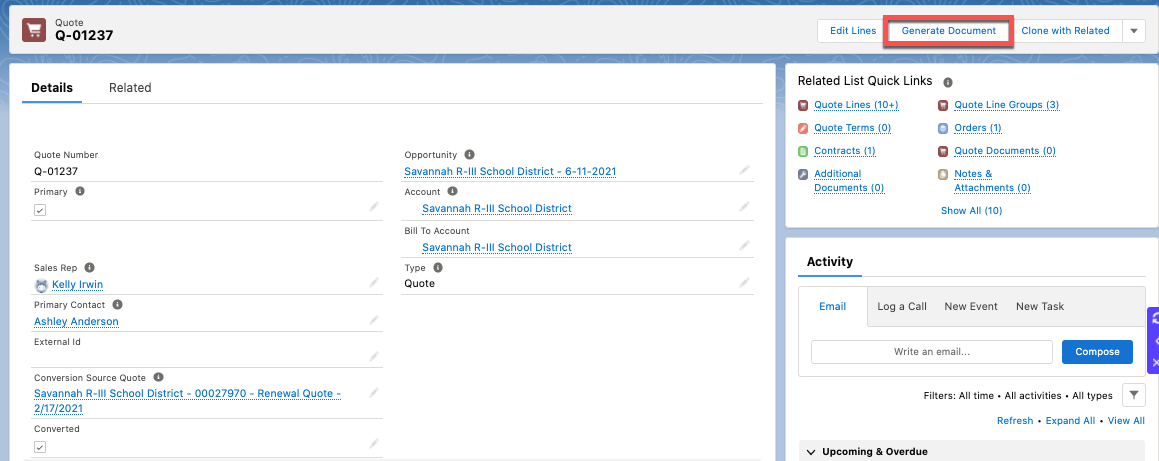
Click the Generate Document button
Choose the template for either Title 1 Quote or Title 1 Invoice
The provided start and end dates will be filled in on the selected form
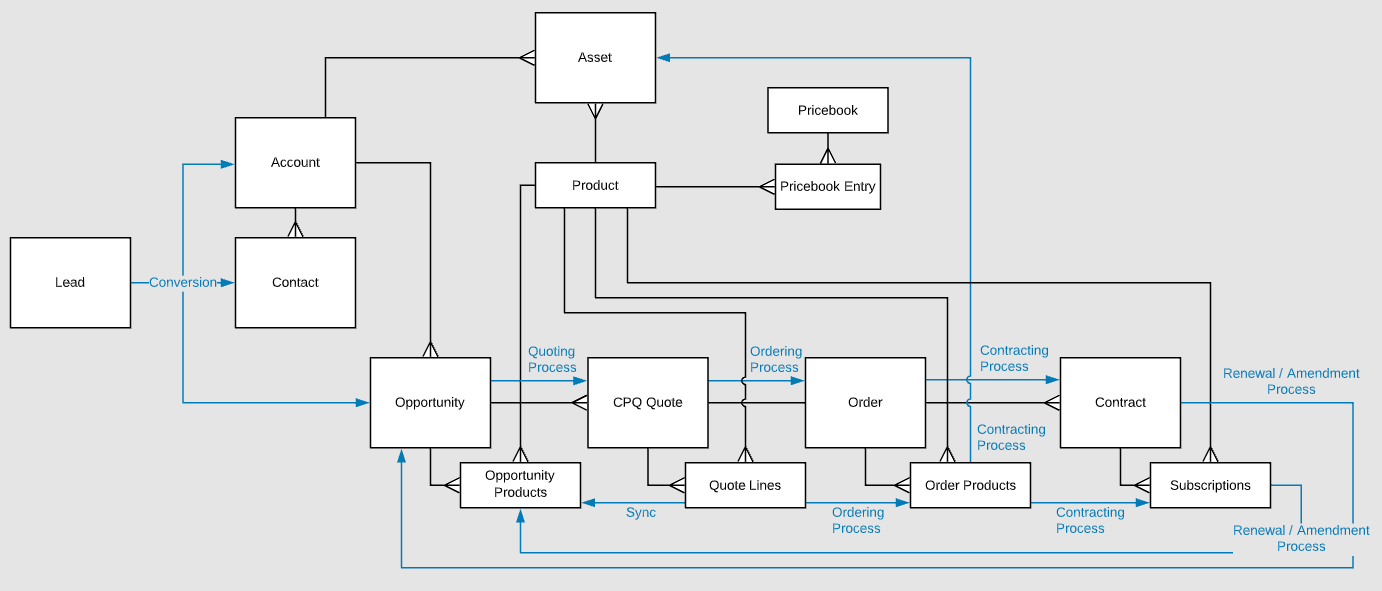
CPQ Data Model
Negative Discounts
If you would like for the Net Unit Price to be higher, please use the Quantity field to adjust the amount. Like this: