Table of Contents
- Before Creating an Opportunity Record
- Create the Opportunity Record
- Create the Quote
- Edit the Quote
- To determine the correct stage, follow the below definitions:
- Saving and Sending a Quote
- How to Change the Opportunity Stage to Closed Lost
- How to Book a Second Demo
- Please see these articles for additional reference:
- Invoice Requests/Questions from Customers
- Video Training
How Do I Create Opportunity and Quote Records?
- Before Creating an Opportunity Record
- Create the Opportunity Record
- Create the Quote
- Edit the Quote
- To determine the correct stage, follow the below definitions:
- Saving and Sending a Quote
- How to Change the Opportunity Stage to Closed Lost
- How to Book a Second Demo
- Please see these articles for additional reference:
- Invoice Requests/Questions from Customers
- Video Training
Before Creating an Opportunity Record
- Open the account record that will be associated with the new opportunity record. Verify the following on the account record:
- Spelling and capitalization ( I.E. - an account name should not be listed as HARPER ACADEMY. Instead the account name should be listed as Harper Academy)
- Verify the correct Parent Account is listed. If not, please contact your manager.
- Ensure the phone number and shipping address are correct.
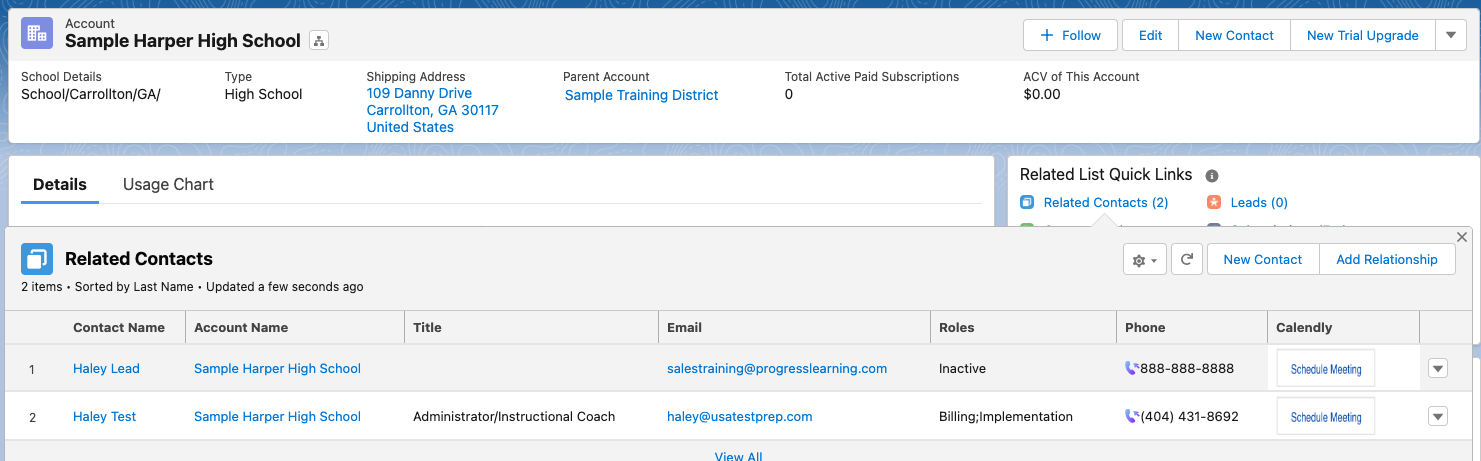
- Verify all contacts that you have been working with are related to the account(s) and have billing and implementation roles selected.
- Even if a school does not belong to a district, a district/parent account must be related to a parent account before syncing to progress learning as this will prevent issues in the future. For example: A charter school that is not related to a district, still must have a district account created and related. To view how to create the district record, click here.
- If your contact is not related to the account, using the Search bar, search for the contact's email, name, or phone number.
- If there's a lead record, convert the lead using the instructions found in this artcle.
- If a contact record exists, but is not related to the account, relate the contact to the account using the instructions in this article.
- If the contact records are not associated with the account record and do not exist in Salesforce, create a new contact record using the instructions in this article.
Remove account relationships if the contact is no longer associated with those accounts. Please note, you are not able to do this if the relationship is a Direct Relationship. In the Account Name field, click the pencil and type in the appropriate account name. Click Save. Now you may remove the relationship if needed.
Create the Opportunity Record
- In the Account record that will be associated with the new Opportunity record, hover over Opportunities in the Related List Quick Links section and click New.
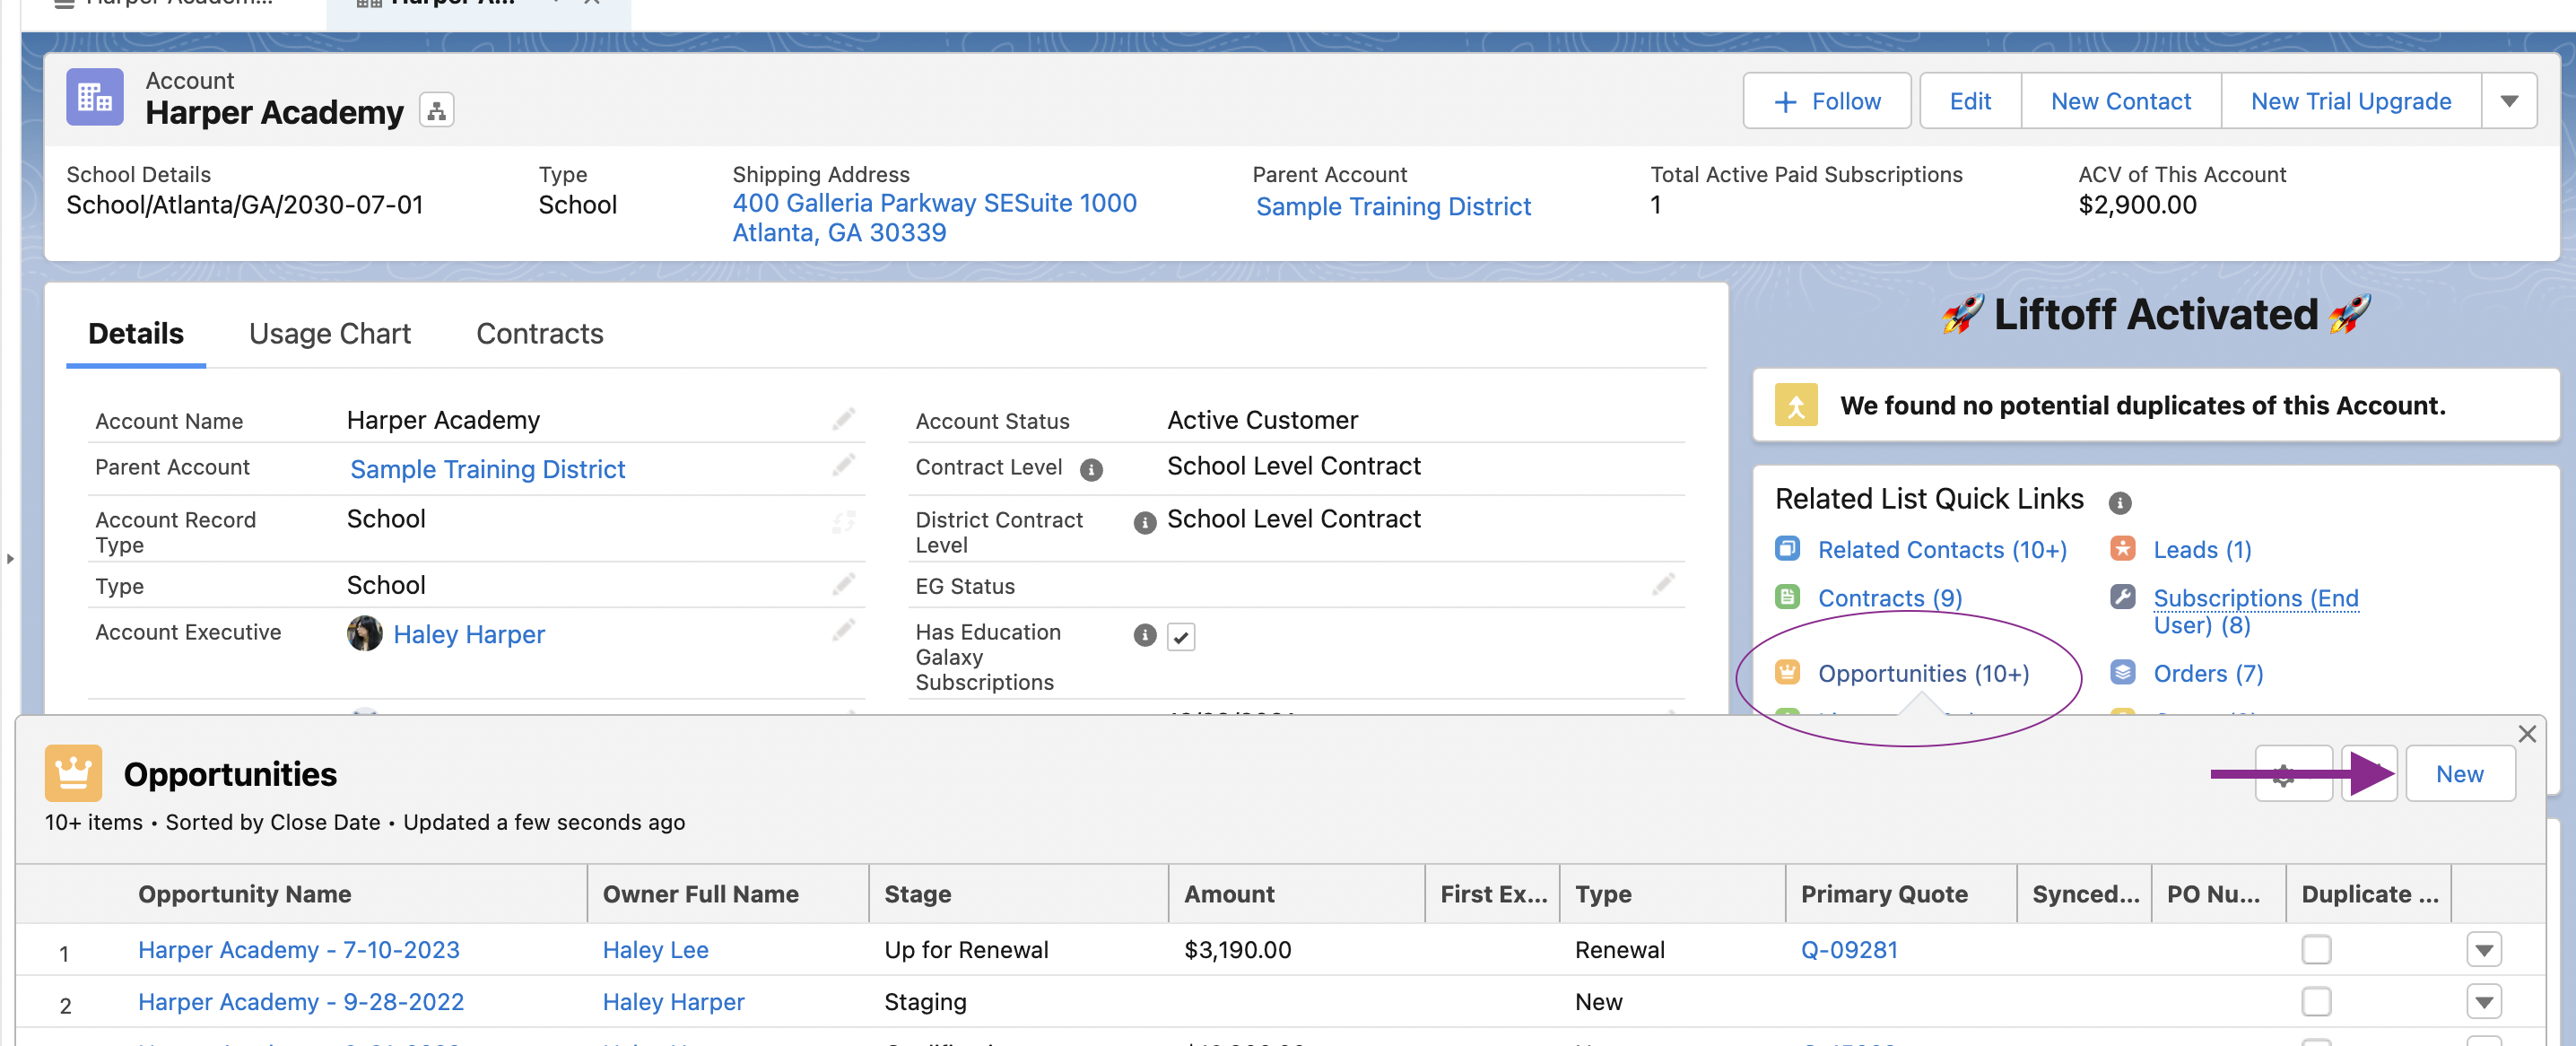
- Select New Customer, and click Next.

- Complete the required fields and click Save.
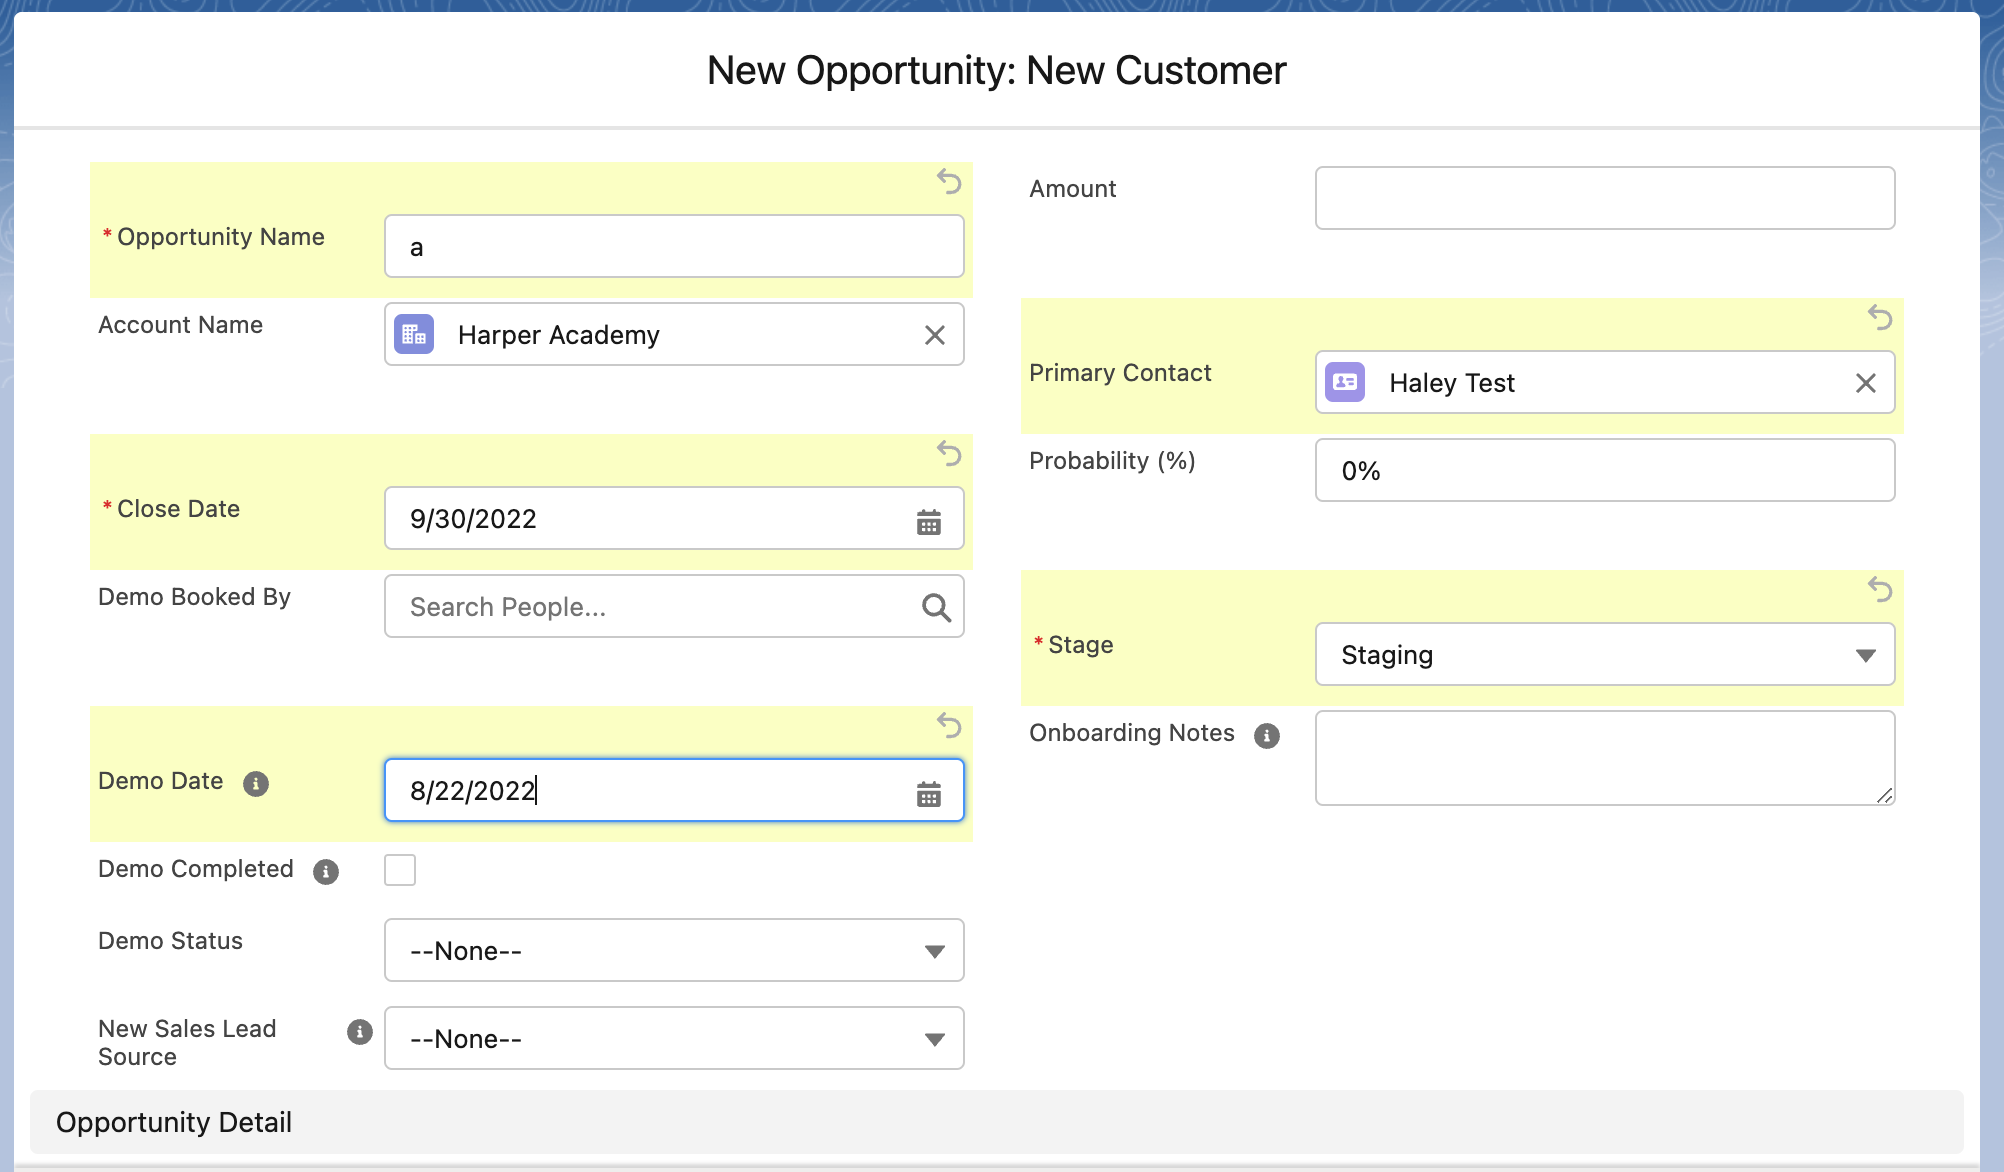
- Opportunity Name Account Name + the Close Date (you can enter anything here, once you click save, the Opportunity Name will default)
- Primary Contact - demo attendee or the person whose name should be on the quote
- Close Date - select the date 90 days past the demo date (demo date + 90 days)
- Demo Booked By - BDR/AE name (if applicable)
- Demo Date - select the date of the demo (if applicable)
- Demo Status - select No Show, Canceled, Reschedule, Completed (if applicable)
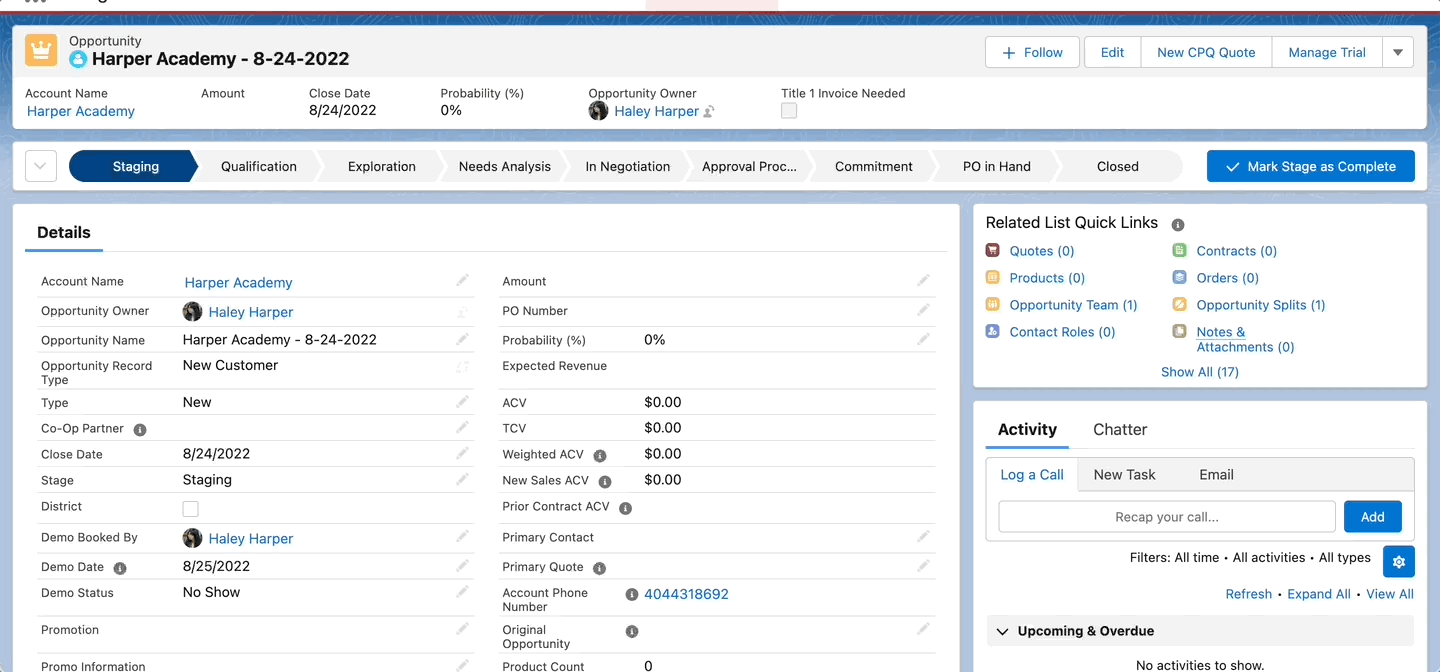
- Stage - select the appropriate stage using this table for descriptions of each stage. You will continue to update the opportunity stage as you work your pipeline.
- New Sales Lead Source - select the lead source
- Optional - For Title 1 opportunities, input the appropriate dates in the Title 1 start/Title 1 end date fields.
- Optional - Select the appropriate promotion.
- In the Related List Quick Links section, hover over Opportunities and click the opportunity name of the record you created.
- On the opportunity record, confirm all of the applicable information is entered.
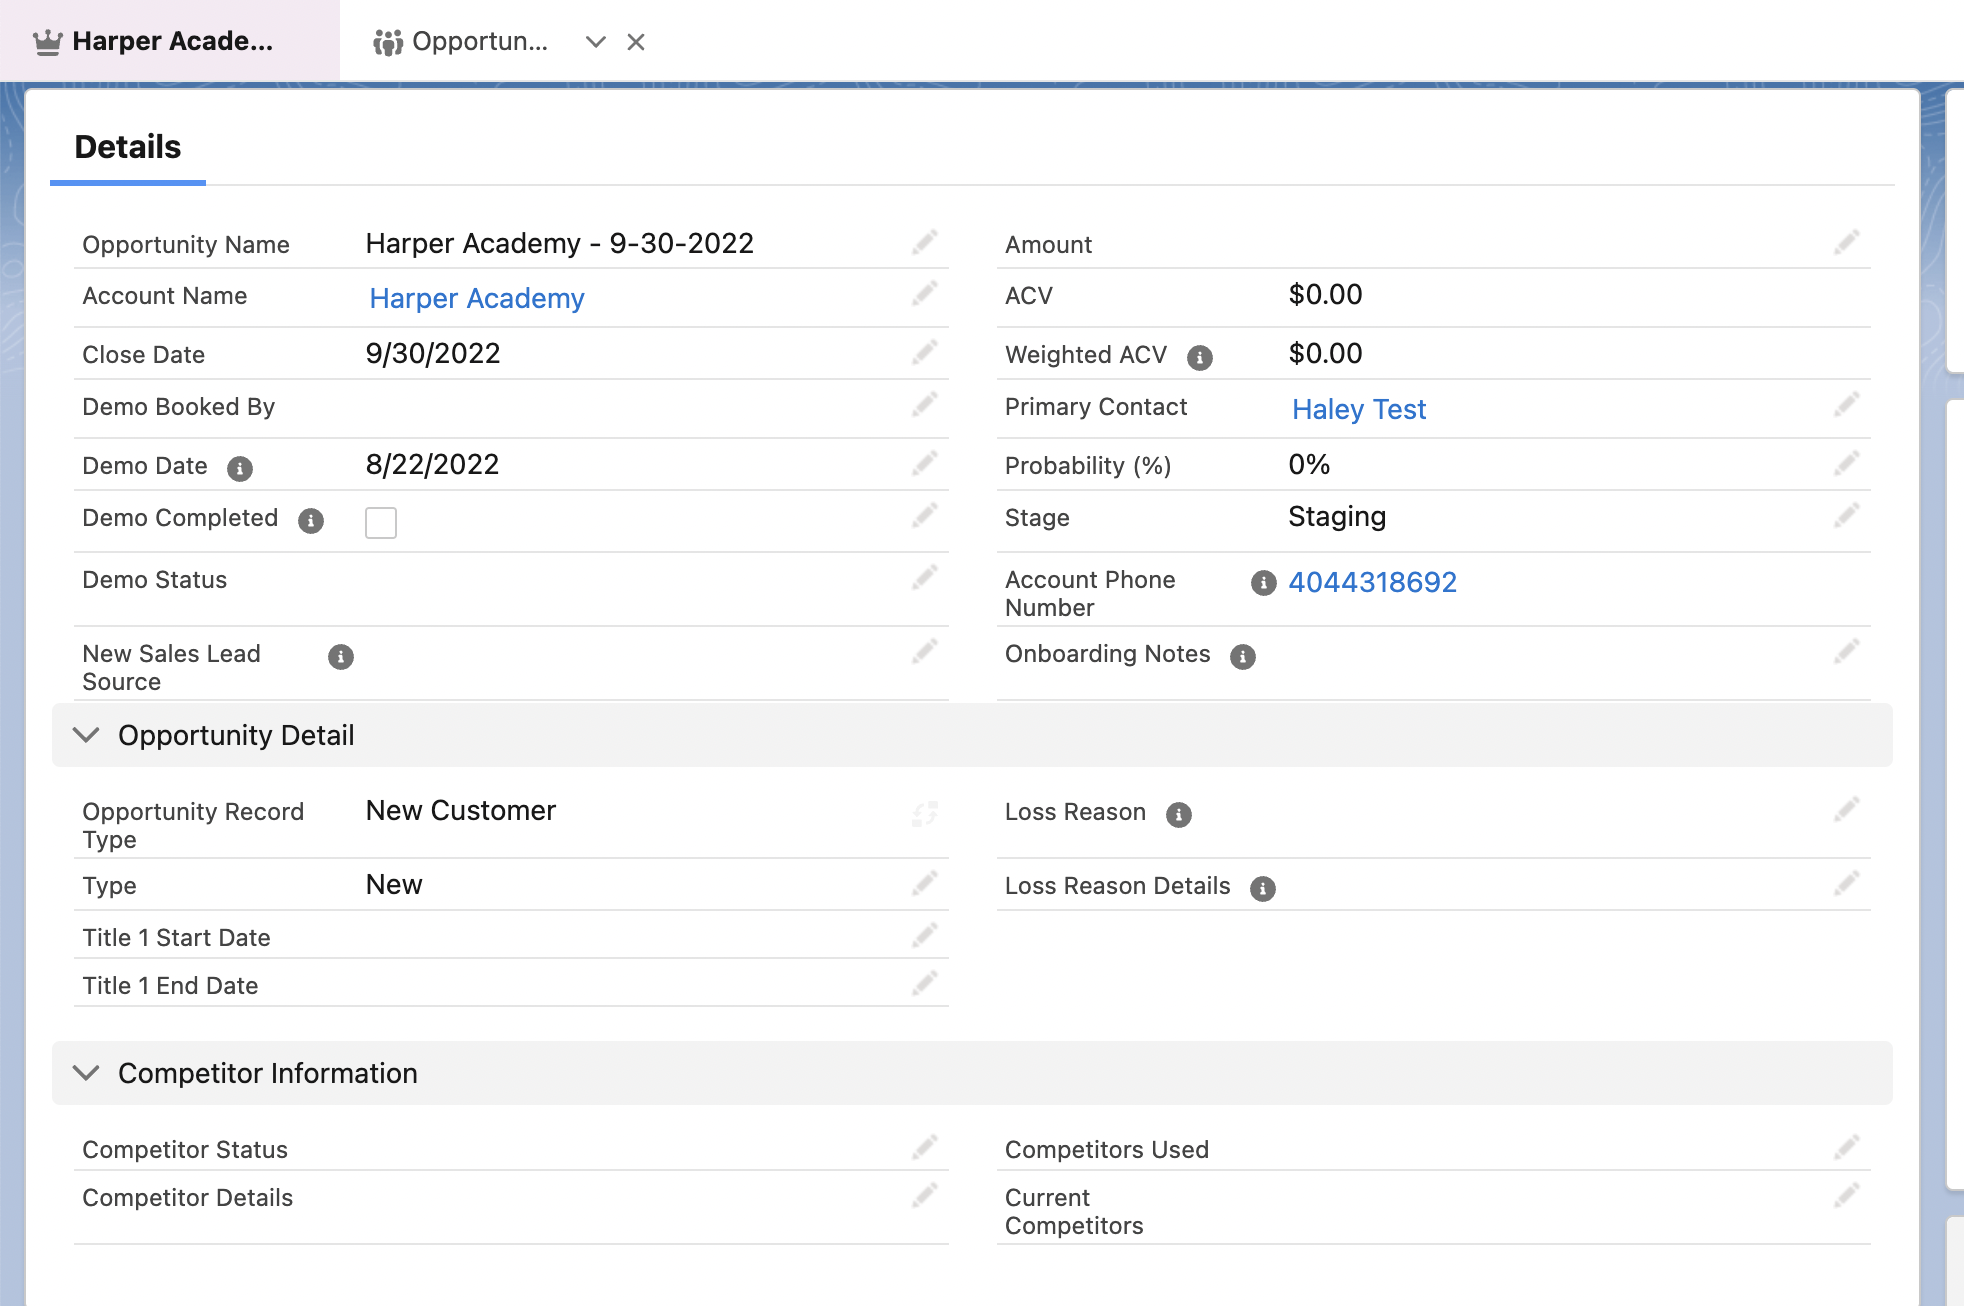
- In the activity section, add any applicable pre/post-demo notes. Click Save.
- Subject: Sent Email
- Activity Type: Demo Notes
- Comments: enter anything related to the demo
Create the Quote
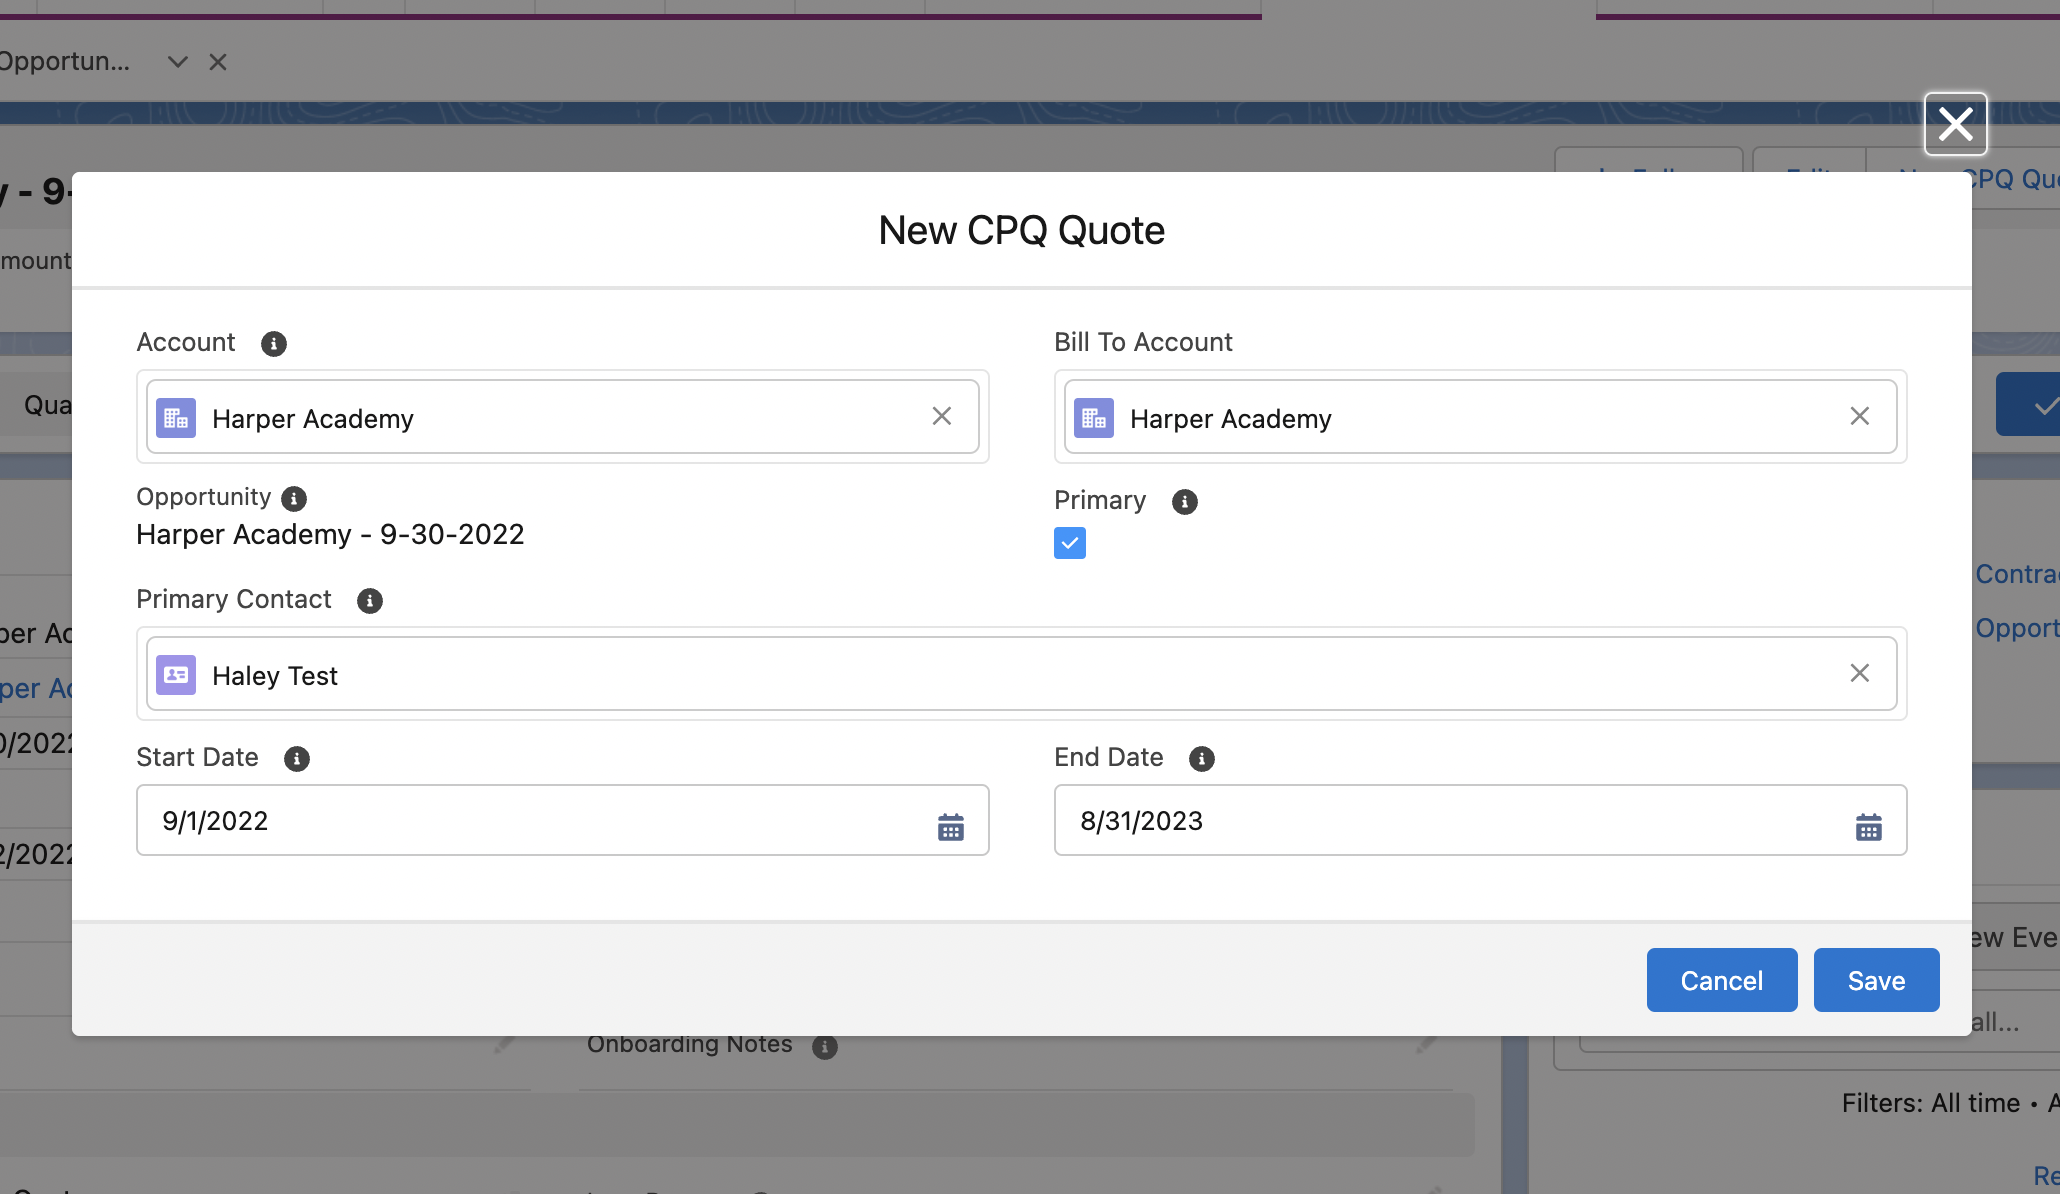
- In the opportunity record, click New CPQ Quote.
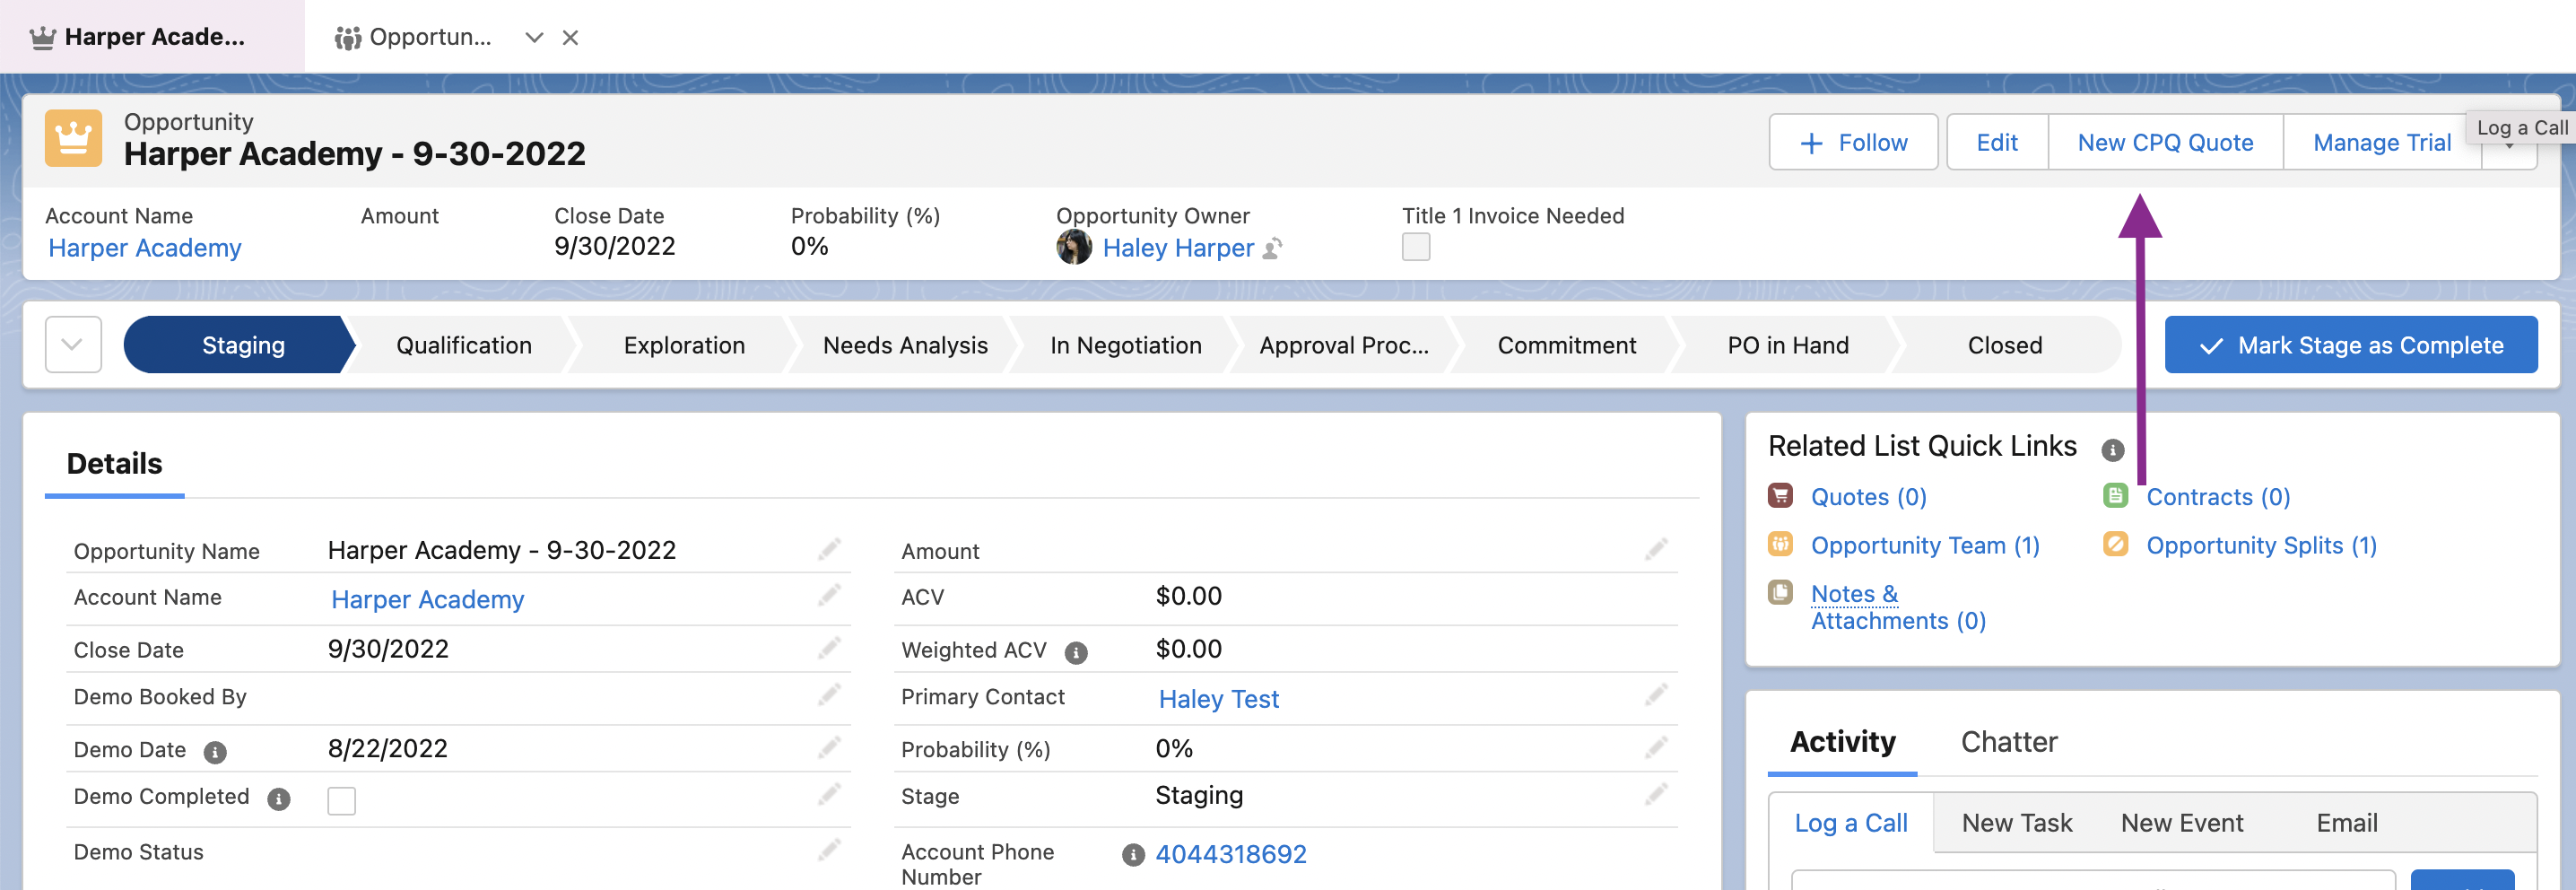
- Confirm the details and click Save.
Edit the Quote
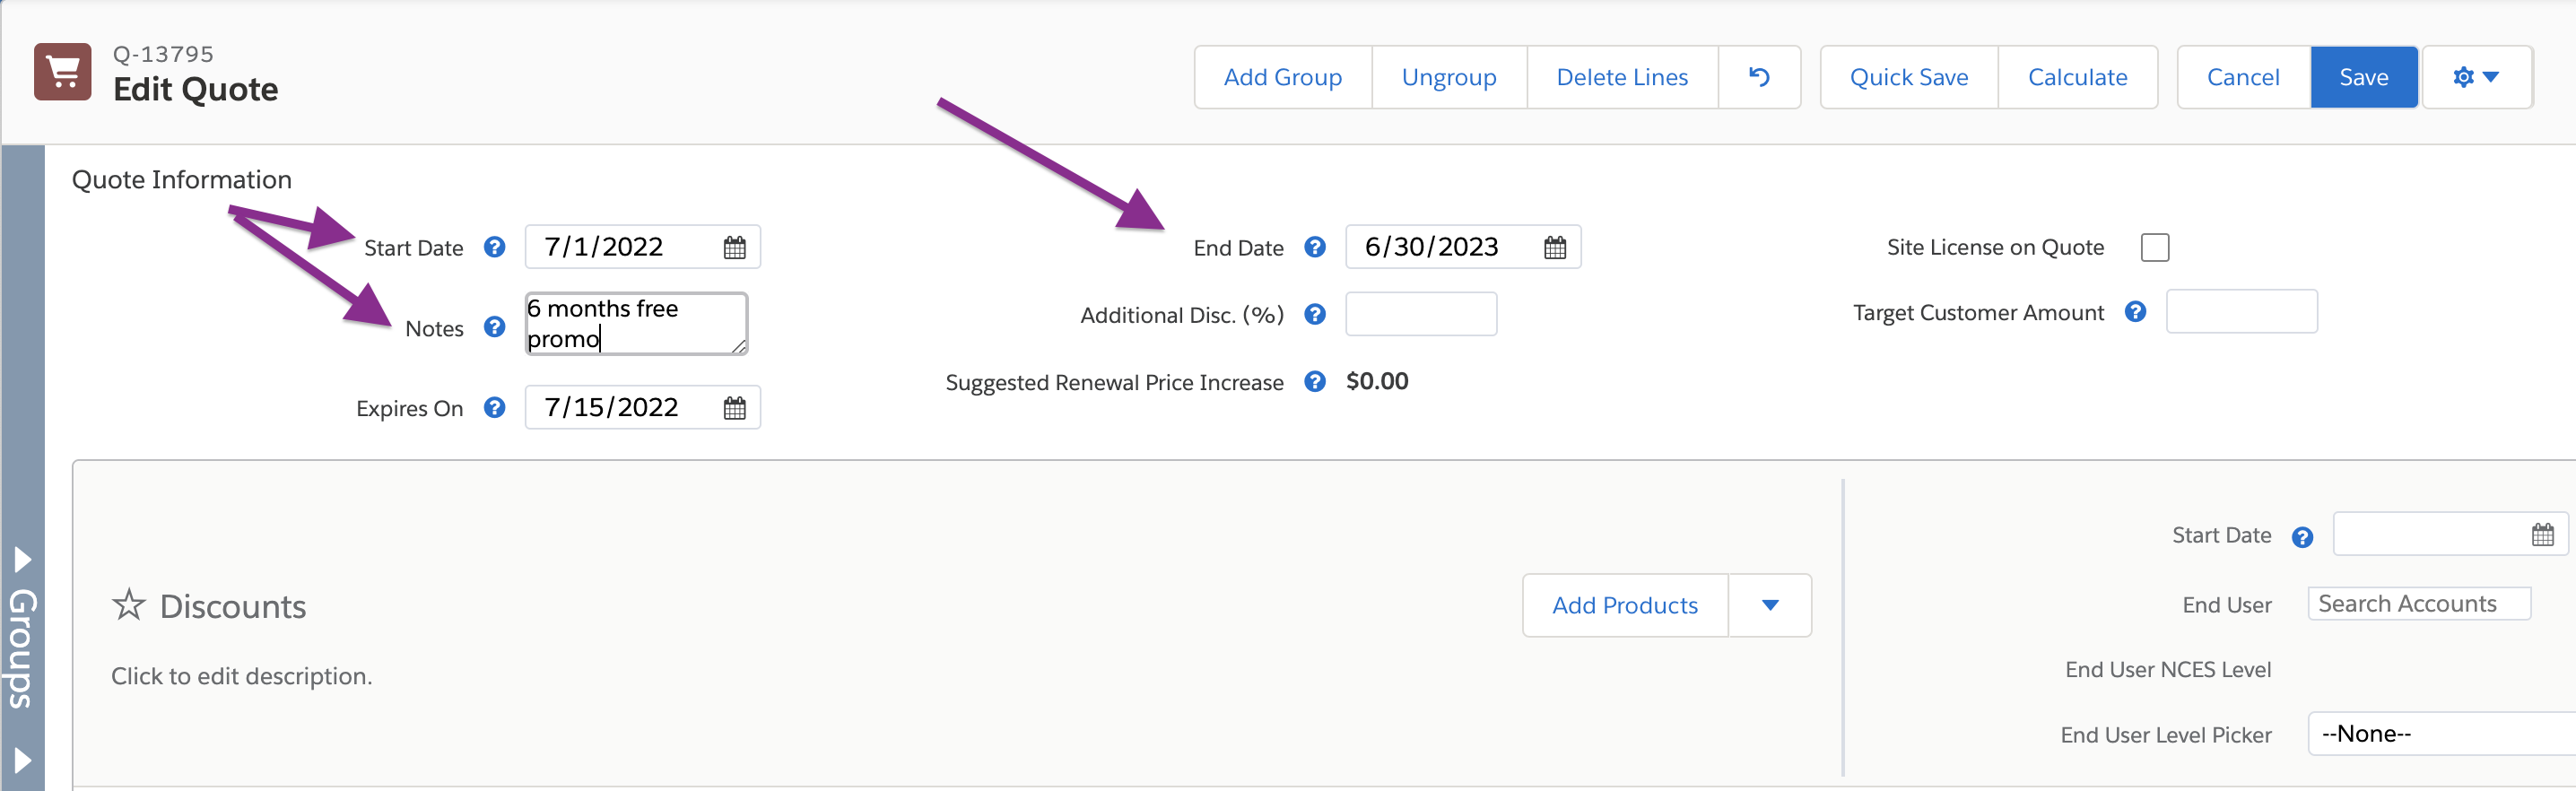
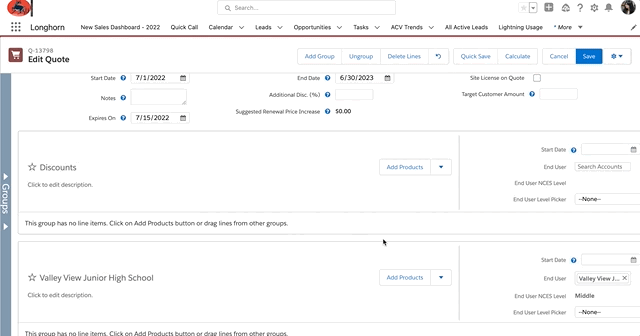
- In the Opportunity record's Related Quick Links section, hover over the Quotes link and click Edit Lines. Select the CPQ Price book. Click Save.

- Ensure the default global Start Date and End Date listed on the quote are correct.
- Enter a Note if applicable that you would like to be printed at the bottom of the quote document for the prospect. A note example may be "Spring Promo Discount is included".For Promotions: Ensure the End Date and Notes reflect the promo. For Example: for a 6-month promo, on the quote, ensure the end date is set for 6 months past the term and put the promo in the notes (6 months free January promo).
- Ensure the account in the End User field is the account that will receive the products. If you're creating a District quote, please see this article.The end-user is the name of the school that will receive the products.
- If you need to update the end user or add multiple schools to the quote: Update the End User field with the school account that you would like to add to the quote. Click the arrow next to add products, and click Clone. On the second group, remove the account currently populated as the end-user- click the X after their name in the End User field. Update the Products as needed.
In the End User field, select the Search in Accounts option, or click in the empty End User field and hit the return key to bring up a list of all schools mapped to the account. If the school does not populate, please ensure you have related all school account records to the district account that you are quoting. If this doesn't correct the issue, contact your Salesforce team using the IT ticket form. Repeat this process for as many schools as you need to add to the quote.- The new group will be renamed and associated with the group.

- If you need to update the end user or add multiple schools to the quote: Update the End User field with the school account that you would like to add to the quote. Click the arrow next to add products, and click Clone. On the second group, remove the account currently populated as the end-user- click the X after their name in the End User field. Update the Products as needed.
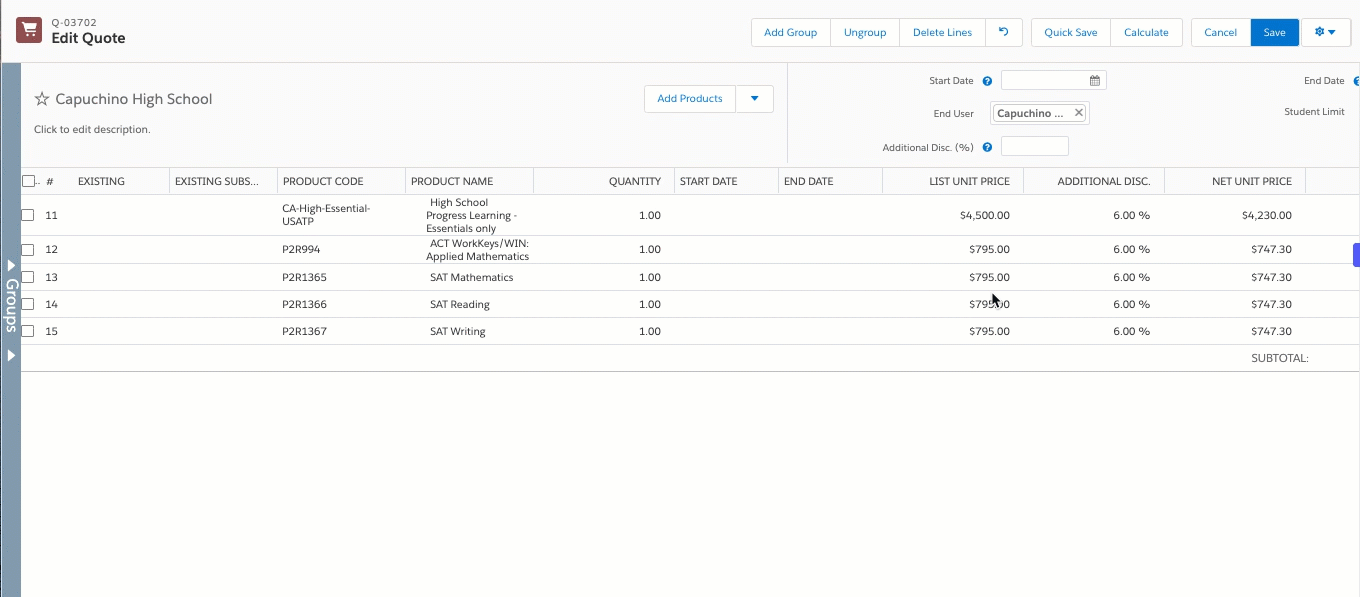
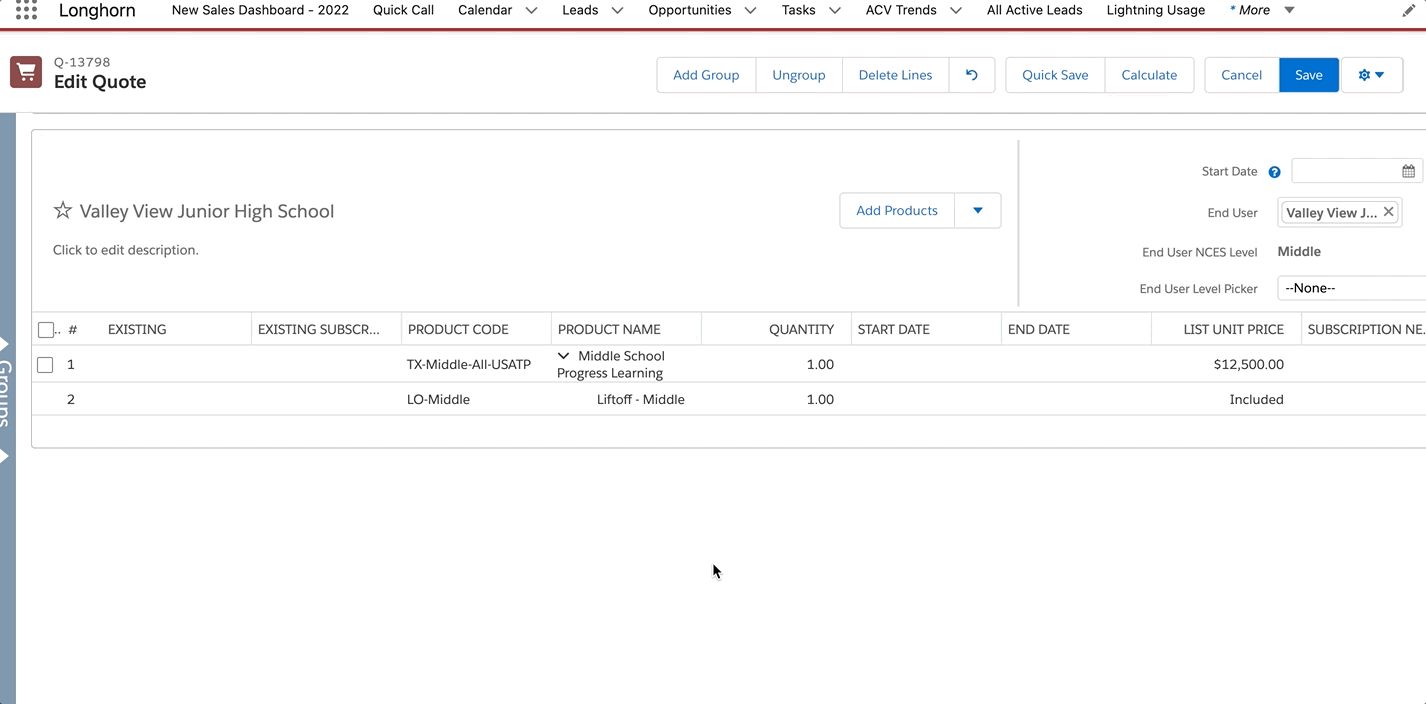
- In the first group (your first school group), click Add Products. Click on a category. Check the checkbox next to each product you would like to add. Click Select. To view the 2022 Progress Learning pricing sheet, click here.
For Liftoff-only quotes, you must add a single subject along with Liftoff before saving your quote. Next to the single subject line item, you can add a 100% discount so that the customer is only charged for Liftoff.
- The End User NCES Student Count and End User NCES Level fields automatically populate according to NCES data. You may override these fields as necessary by using the End User Level Picker and End User Student Count Picker drop-down fields. Please note the pricing will update to reflect your adjustments.
- The easiest way to discount is to enter the amount that you would like for the quote total to be in the Target Customer Amount field. The discount will be applied to your quote automatically. more about discounts here.
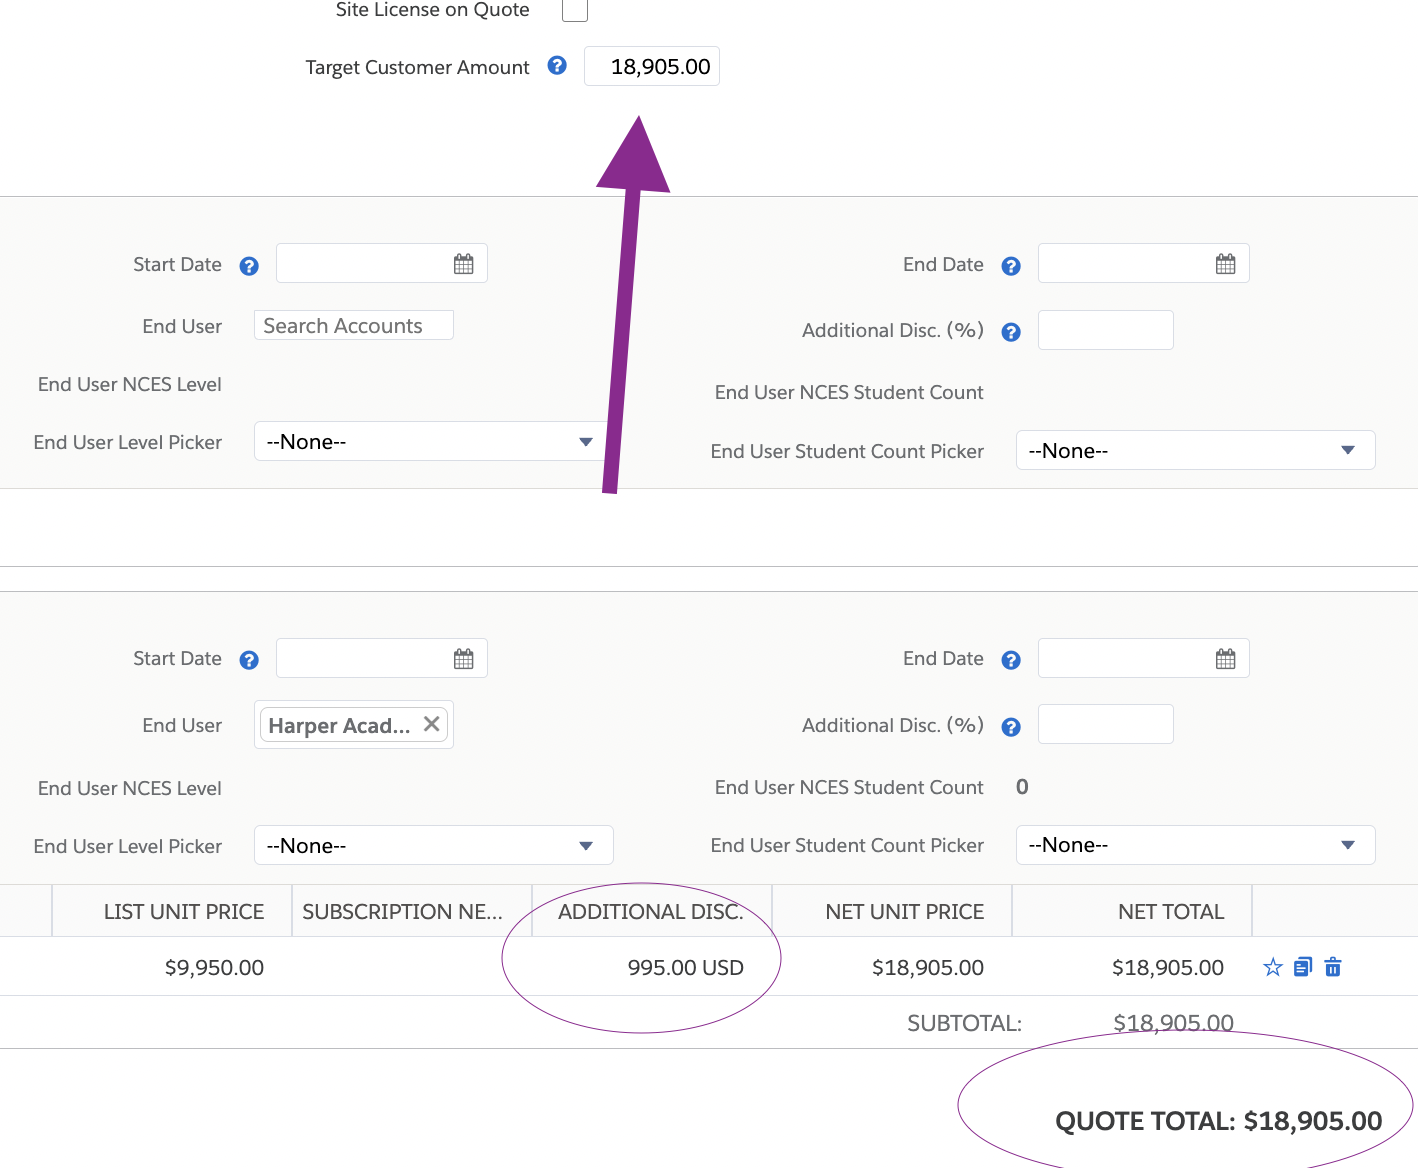 Do not combine % and $ discounts in the same quote- an error will occur.
Target Customer Amount Field
- Enter the amount that you would like for the quote total to be in the Target Customer Amount field. The discount will be applied to your quote automatically.
Product Line - ADDITIONAL DISC. field
- Enter the percentage or dollar amount that you would like to discount off of a single product.
- Click Save to save your quote.
- On the Opportunity record, click the appropriate status and click Mark Stage as Complete. You can also use the Activity section to Log a Call, Create a task, and Email from Salesforce.
- As the opportunity progresses through the sales process, update the stage. Click on the new stage. Click “Mark as Current Stage”.Once you have the PO in hand, mark the stage as PO in Hand and email the PO to orders@progresslearning.com and include the Quote number or DPO number in the Email subject.

To determine the correct stage, follow the below definitions:
Stage Name
Weighting
Prospect Interactions
Staging
0%
- Any lead or contact that an AE wants to track via an opportunity
- Demo scheduled
Qualification
2%
- Quote request
Exploration
10%
- Demo in hand
Needs Analysis
25%
- Post-demo
- Customer provided feedback on what school(s) need
In Negotiation
50%
- Customer has stated they are interested in having more discussions. needs to see pricing, bring in others, etc.
Approval Process
75%
- Customer has stated they want to move forward and the deal is getting approved by the board, principal, etc.
Commitment
90%
- Customer has stated that deal was approved, with a signing date.
PO in Hand
99%
- We have received the PO from the customer (Send PO to orders@progresslearning.com)
Closed Won
100%
- A completed opportunity has been processed, activated, and invoiced. This stage is selected by the processing team.
Saving and Sending a Quote
Quote PDF documents are created from the Quote document. To send a quote to a prospect, follow the steps below. To send a Multi-Year Proposal, click here.
To ensure a correct shipping address in your quote, enter a complete shipping address in the account record before a Quote is created.
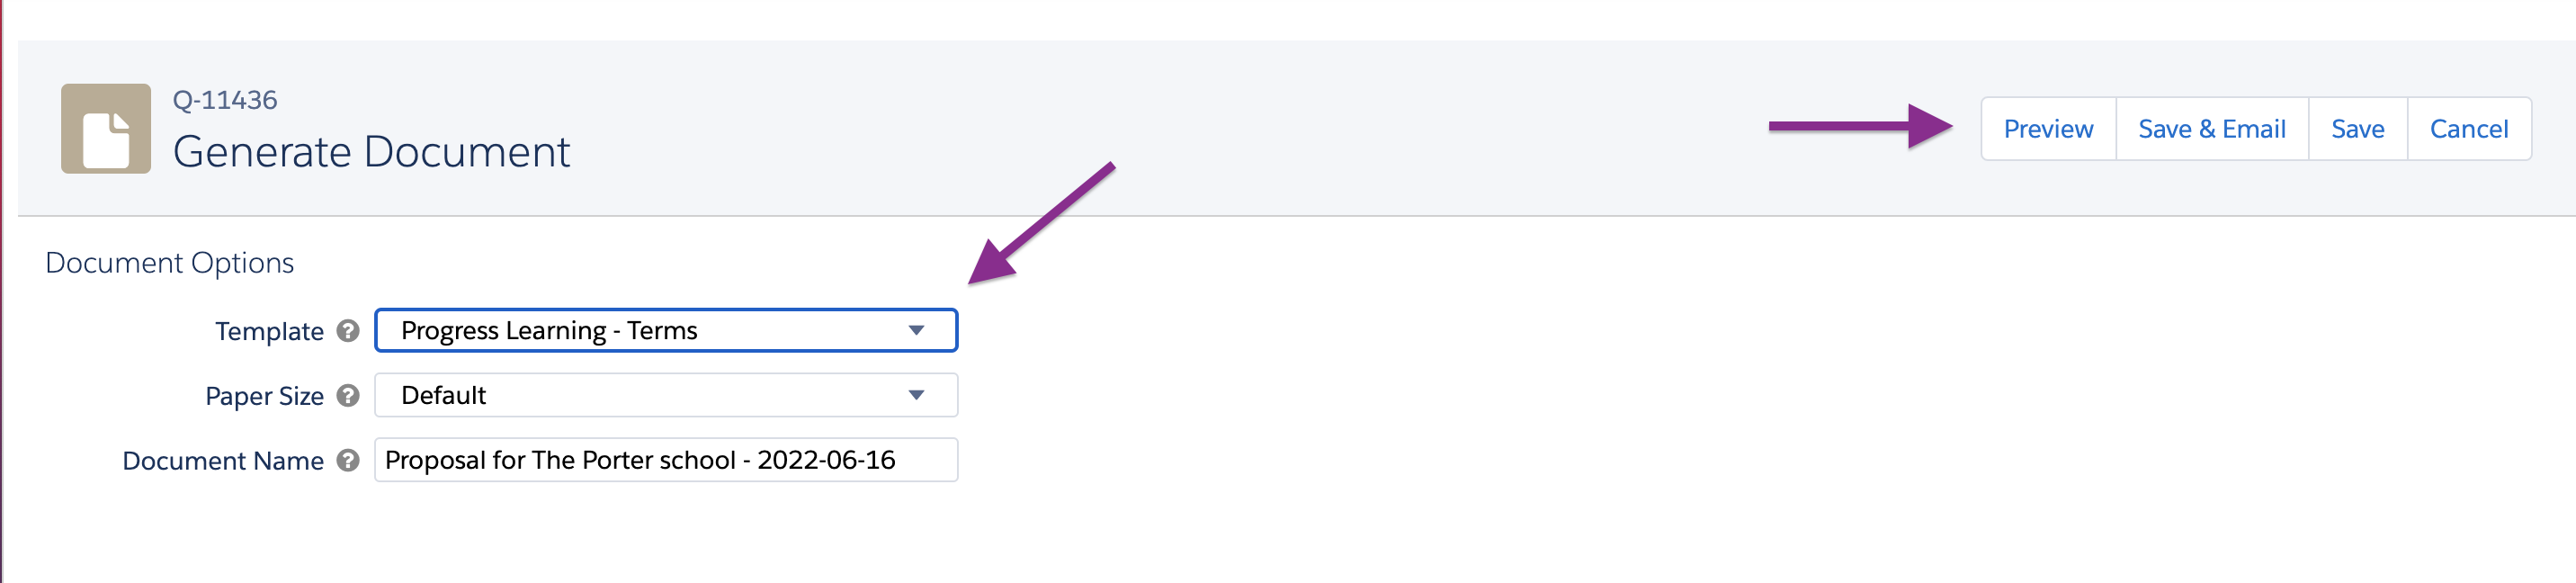
- From the Quote document, click the Generate Document button.

- In the Generate Document screen
- Select the quote template - Progress Learning - Terms
- For Title 1 opportunities, select the Title 1 template
- Edit the Document Name if desired
- Click the Preview button.
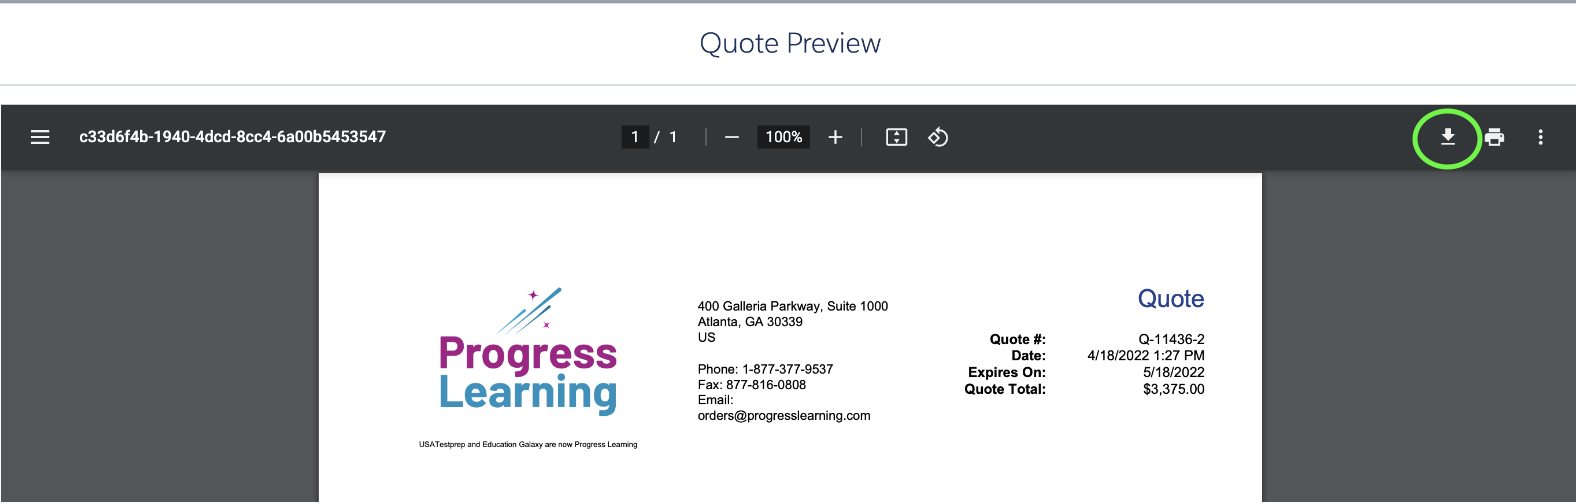
- **OPTIONAL & not needed with Sales Engagement**Review the Quote document and click the download icon to download the quote to your computer. Click to close when complete.
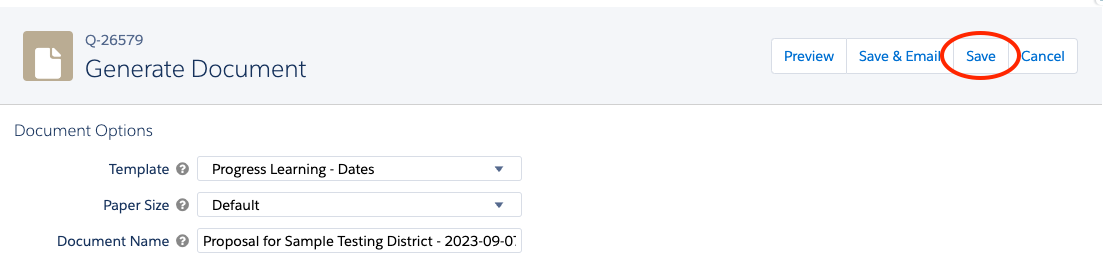
- Click Save, to save the quote document.
If you need to access the quote document after saving, navigate to the opportunity record and scroll down to the Notes & Attachments section (bottom right side)to open the PDF quote document.
How to Change the Opportunity Stage to Closed Lost
If your demo was canceled, a no show, or needs to be rescheduled but you have no new demo date, mark the opportunity as CLOSED LOST. AEs should also mark the opportunity as closed lost if they need to merge the opportunity with another opportunity or to no longer work the opportunity.
- Open up the opportunity record.
- Click the pencil in the Demo Status field. Select no show or cancelled.
- Click the pencil in the Stage field. Select Closed Lost. Click Save.
How to Book a Second Demo
- Navigate to the appropriate opportunity record.
- In the Activity section, click Log a Call.
- Subject: select anything here
- Activity: Demo
- Comments: enter anything here
- Name: select the demo contact
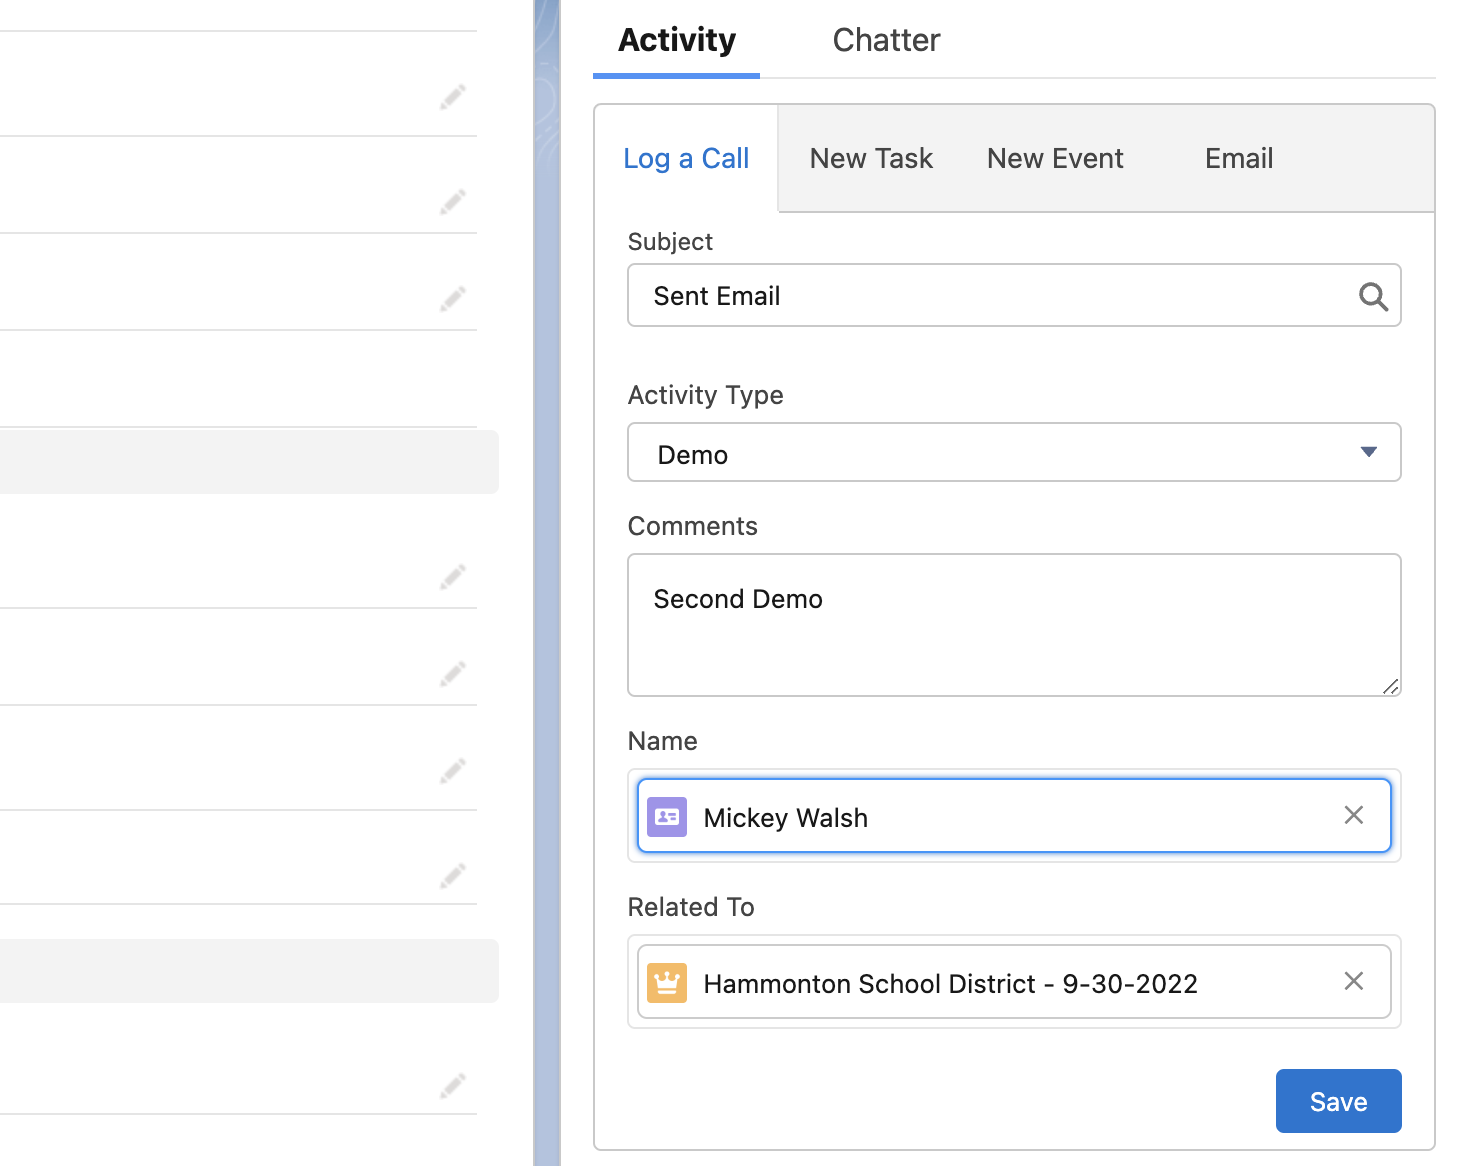
- Click Save.
Please see these articles for additional reference:
Invoice Requests/Questions from Customers
- Invoice requests on closed-won opportunities - send to billing@progresslearning.com and cc orders@progresslearning.com
- In instances where the request is urgent, please add "URGENT" in the subject line of the email and my team will prioritize the request.
- Pre-invoice requests - open opportunities - send to orders@progresslearning.com
- All questions regarding an invoice by email or phone can be forwarded or sent to - orders@progresslearning.com or lenne@progresslearning.com. In instances a customer is on the phone, please slack a processing team member by using @here in the accounting-renewals-phonequeue.
Video Training
How Do I Manage my Opportunities and Create Quotes?
How Do I Create a District Quote? (Coming Soon)