macOS Tahoe 26 Guide

Release date: Wednesday, October 15, 2025
Audience: All Mac users at Progress Learning
Maintained by: IT (Senior IT Specialist & IT Manager)
What’s changing
macOS Tahoe 26 brings a cleaner look, a revamped Spotlight with quick keys and a built in clipboard history, an Apps view that replaces Launchpad, more Control Center options, and easy folder color customization. This guide highlights the items that matter for work at Progress Learning.
Table of contents
- What’s changing
- Quick upgrade plan
- Features we’re rolling out
- What we do not use
- Short how to cards
- For managers
- Support
Note: Apple Intelligence features are disabled on company Macs.
Quick upgrade plan
- When: Available company wide starting Oct 15.
- How: On your Mac, go to System Settings → General → Software Update and follow the prompts.
- Before you update:
- Plug in your power adapter.
- Close any large video calls or recordings.
- Make sure important files are saved or synced to Google Drive.
- If something looks off after updating: Reboot once. If it persists, open an IT ticket.
Features we’re rolling out (and how to use them)
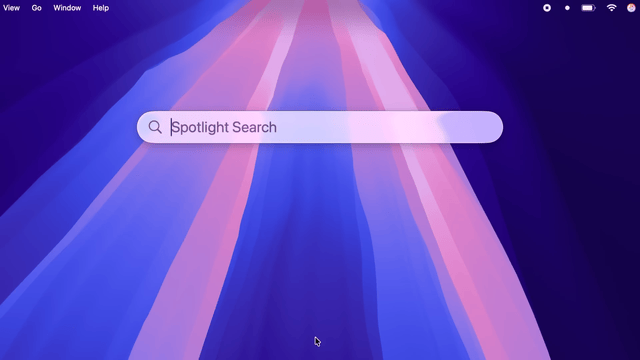
1) Spotlight got faster
- Category quick keys: Open Spotlight with command (⌘) + Space. While Spotlight is open, hold command (⌘) and press a number to switch categories: command (⌘) + 1 = Apps, command (⌘) + 2 = Files, command (⌘) + 3 = Actions, command (⌘) + 4 = Clipboard.
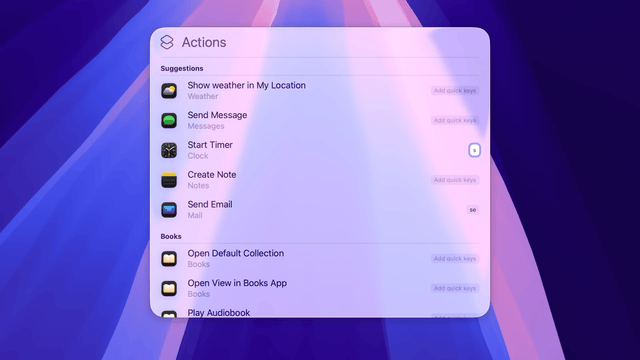
Spotlight category quick keys - Quick Actions: Type an action (for example, set timer) and run it directly from Spotlight.
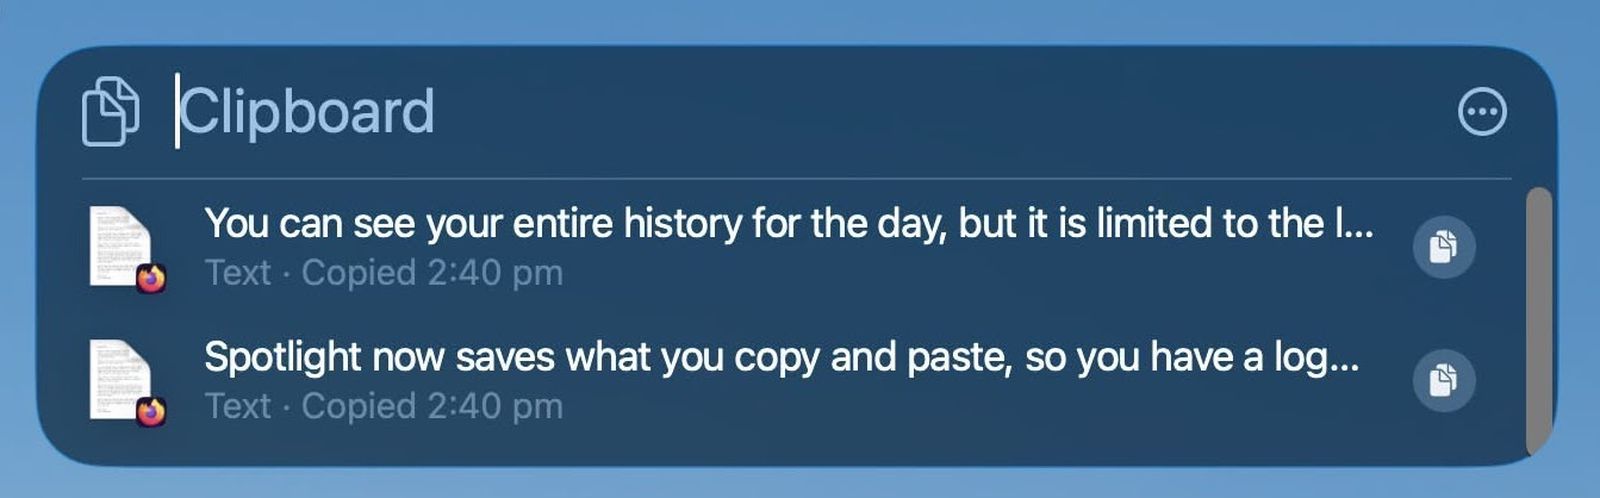
Example Quick Action: set a timer - Clipboard history: Spotlight keeps a same day clipboard log so you can paste something copied earlier. Open Spotlight and select the Clipboard category to view items.
Clipboard history view - Pro tip: To open the folder of a search result, select it in Spotlight and press command (⌘) + Return.
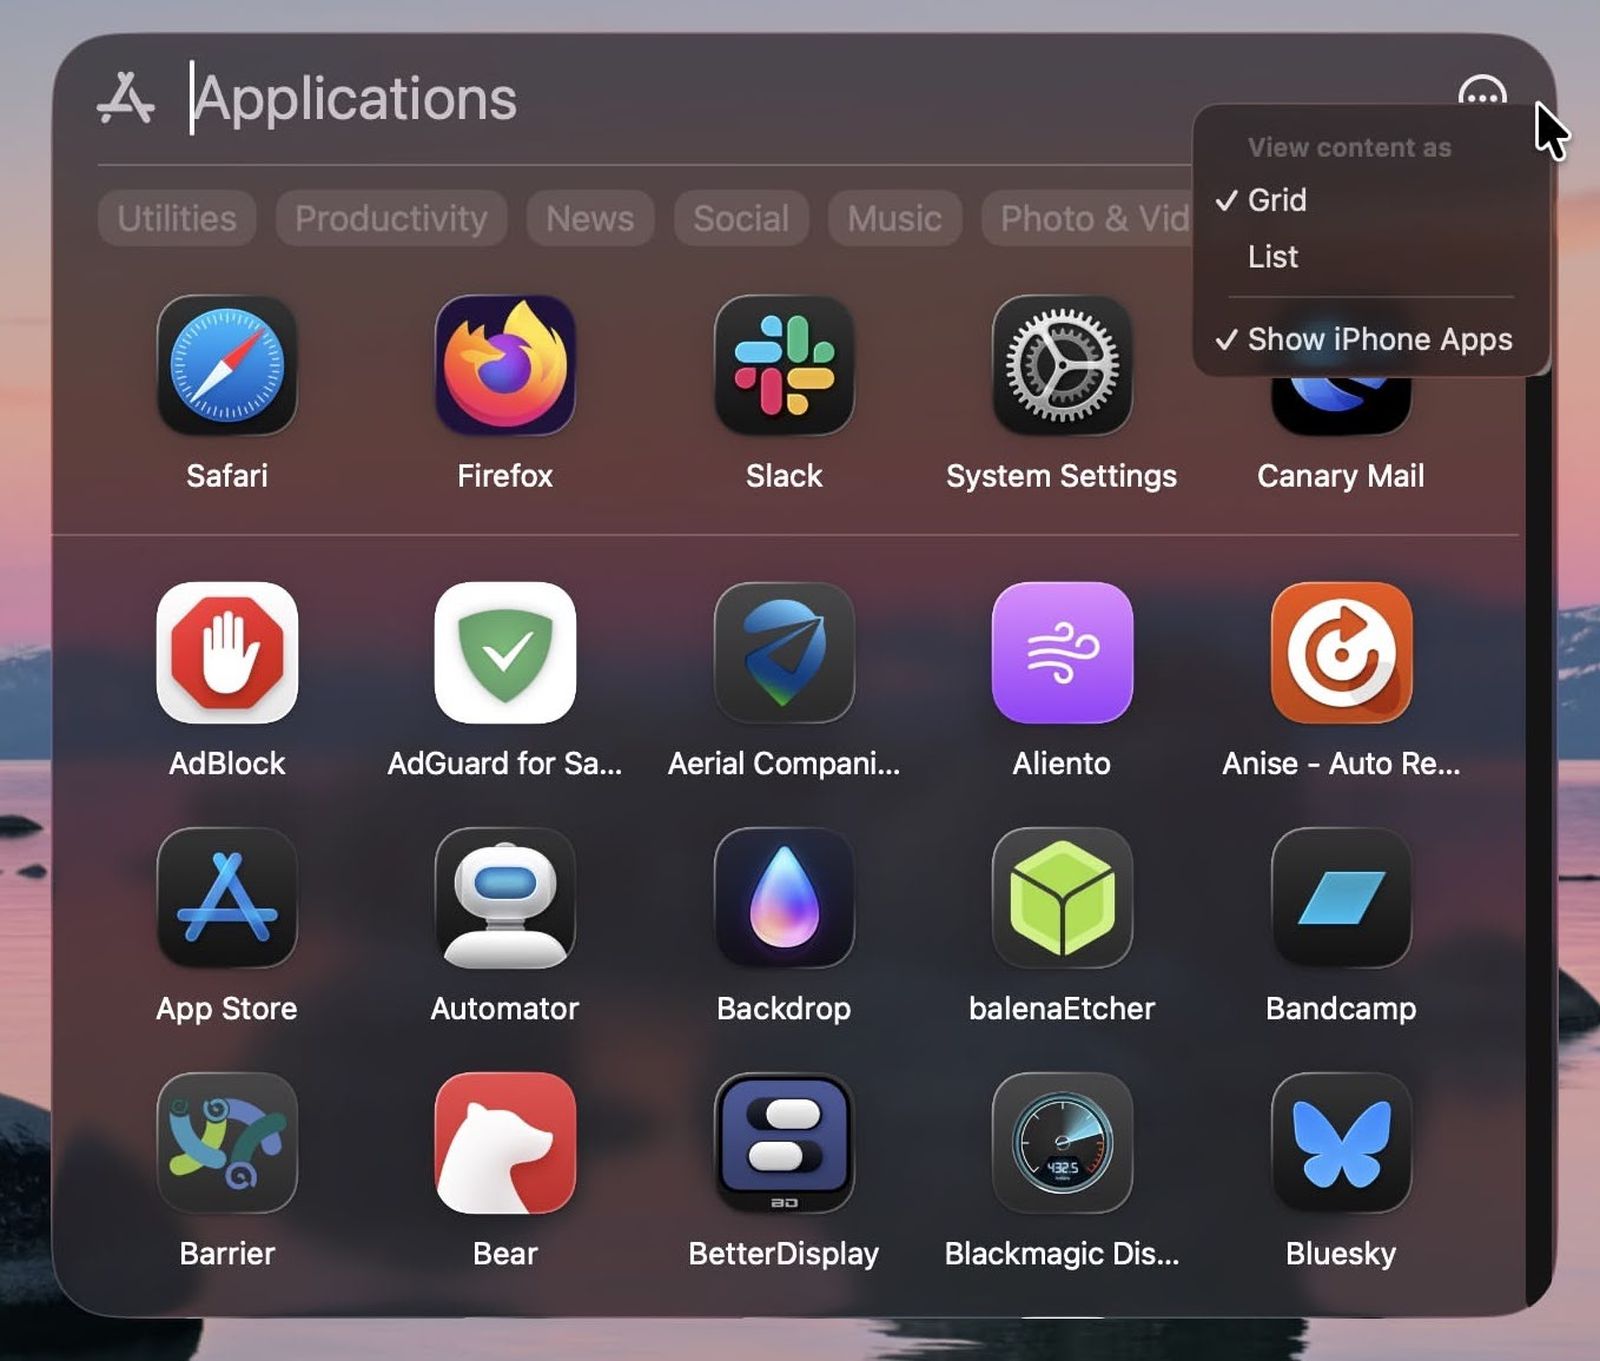
2) New Apps view replaces Launchpad
- What changed: Launchpad is replaced by the Apps icon in the Dock. It opens a categorized view of installed apps with grid or list options.
- Why it helps: It is faster to find work apps and keep clutter down.
3) Control Center and Menu Bar are more flexible
- Customize layout and toggles: Go to System Settings → Menu Bar → Menu Bar Controls to add, remove, or reorder controls. Use Show in Menu Bar to pin a control up top.
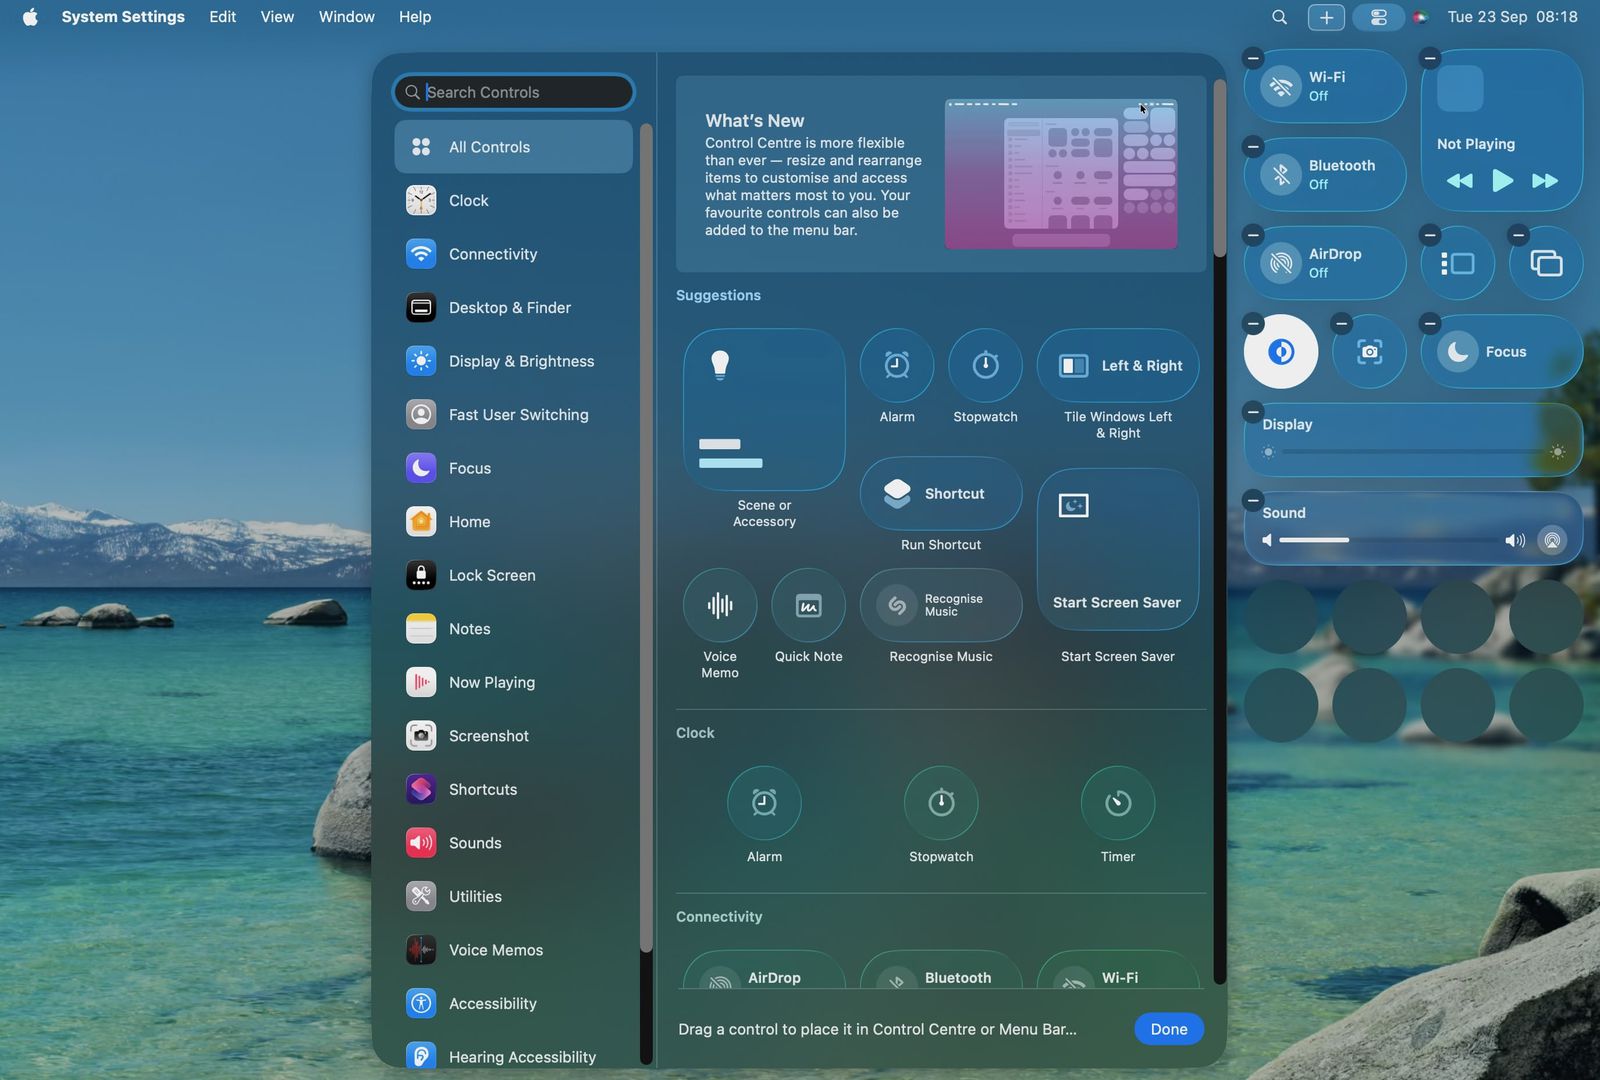
Customize Control Center & Menu Bar - Transparent menu bar: Tahoe blends the menu bar into the desktop. If you prefer the classic look, enable Show menu bar background under System Settings → Menu Bar.
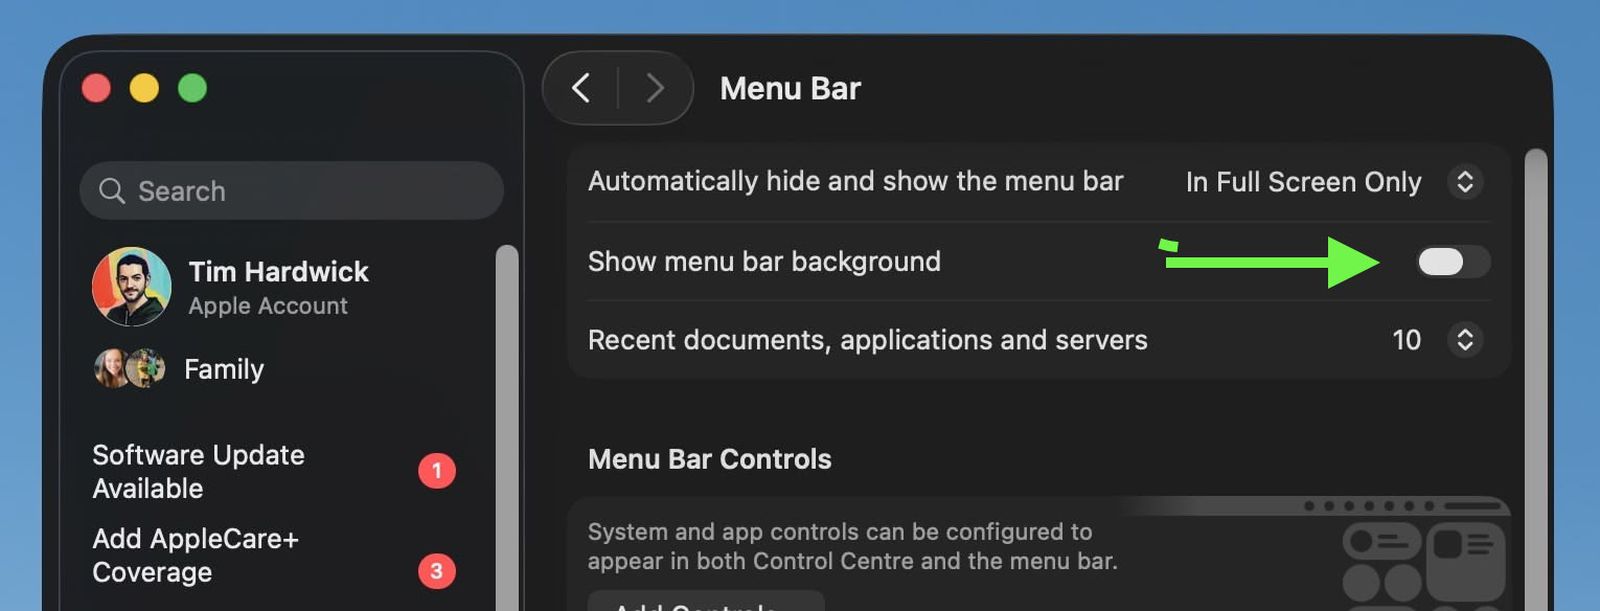
Toggle: Show menu bar background
4) Personalize folders and icons
- Folder colors: Set a system wide folder color in System Settings → Appearance → Folder Color (for example, purple for projects, blue for archives).
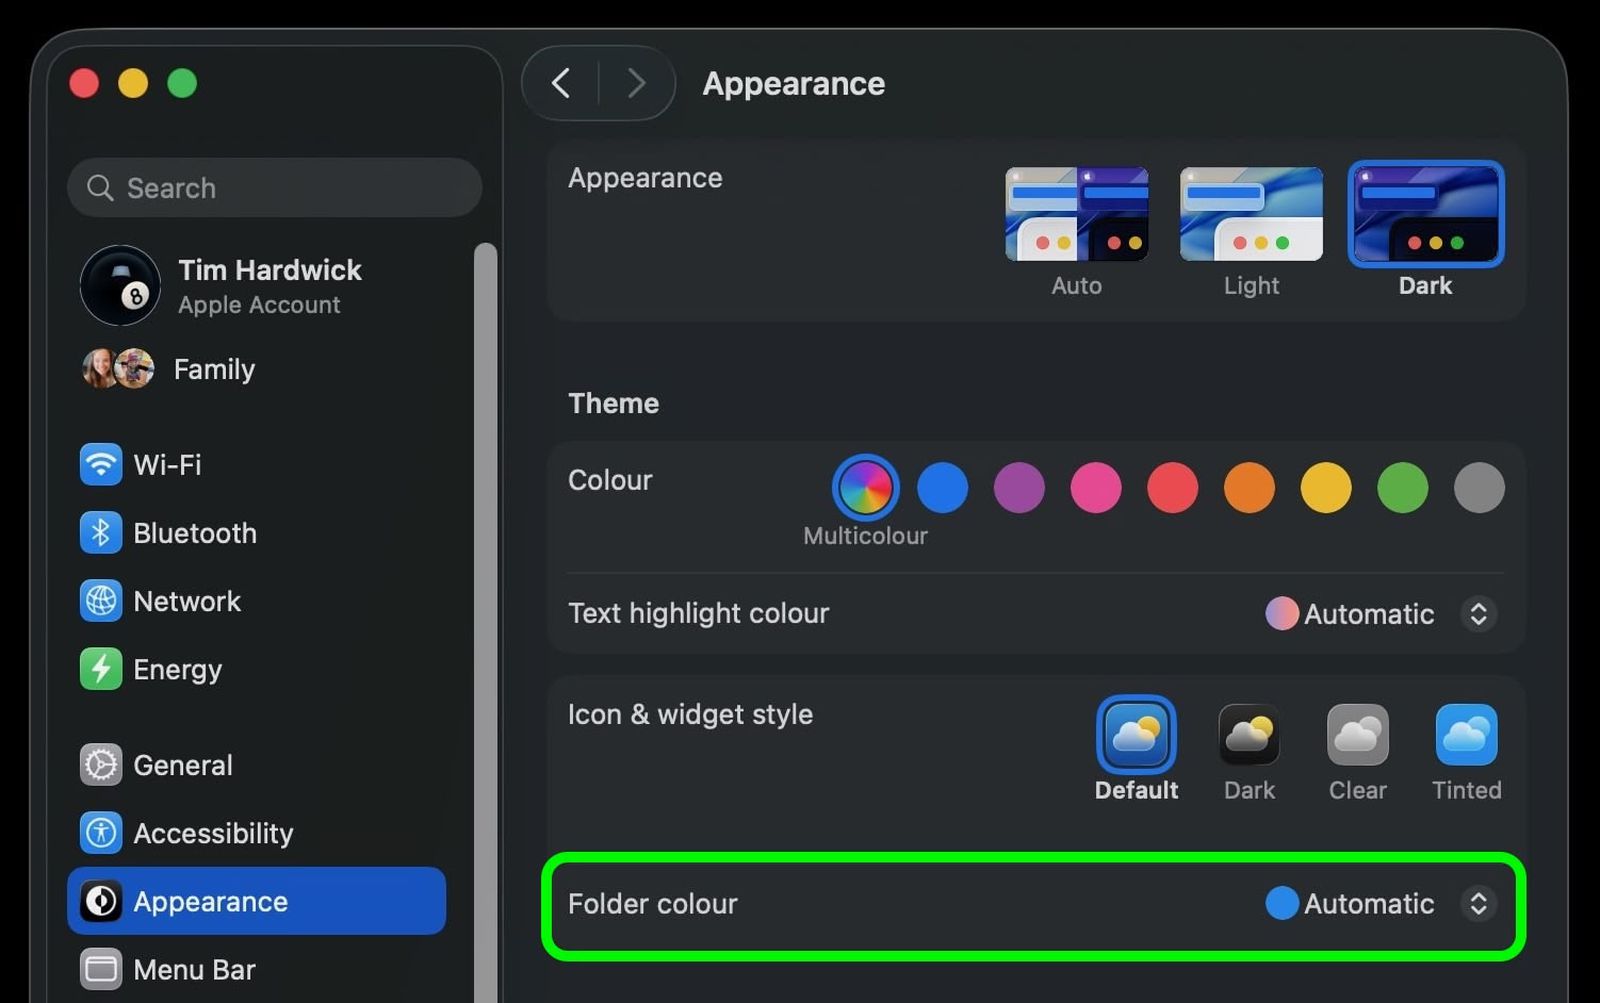
Appearance → Folder Color - App icon themes: Choose updated light or dark looks, tinted icons, or a clear look for a simpler desktop under System Settings → Appearance.
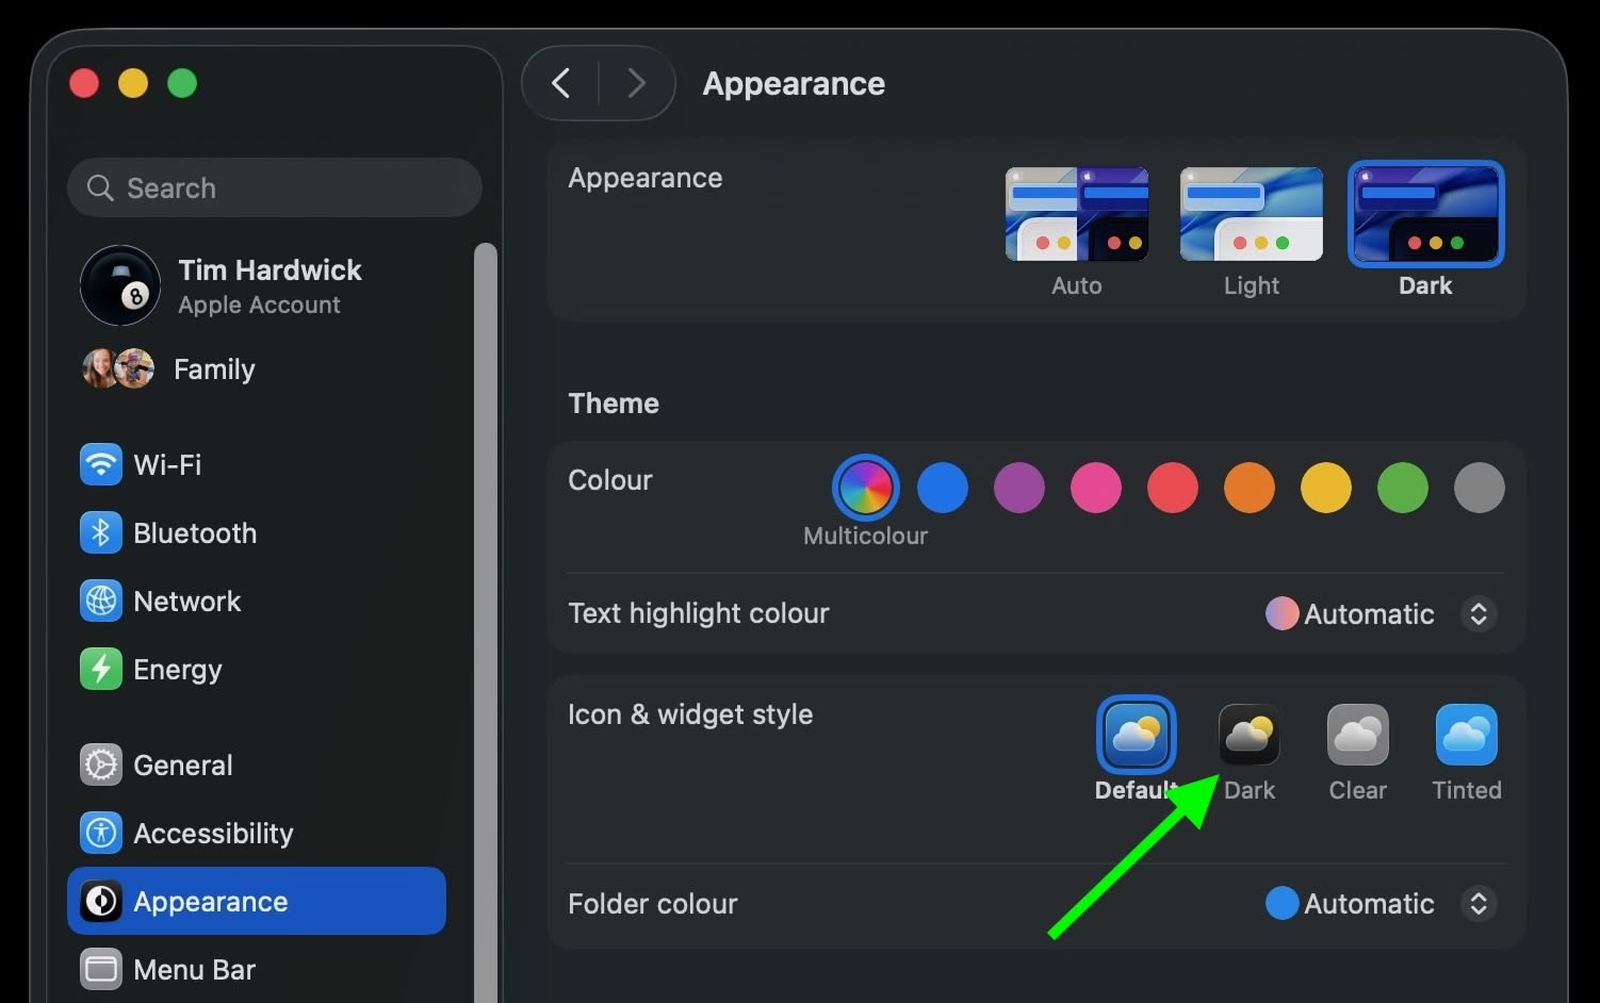
Appearance → Icon & widget style (App icon themes)
5) Accessibility and focus
- Reduce Transparency: If the “Liquid Glass” translucency is distracting, turn on System Settings → Accessibility → Display → Reduce Transparency.
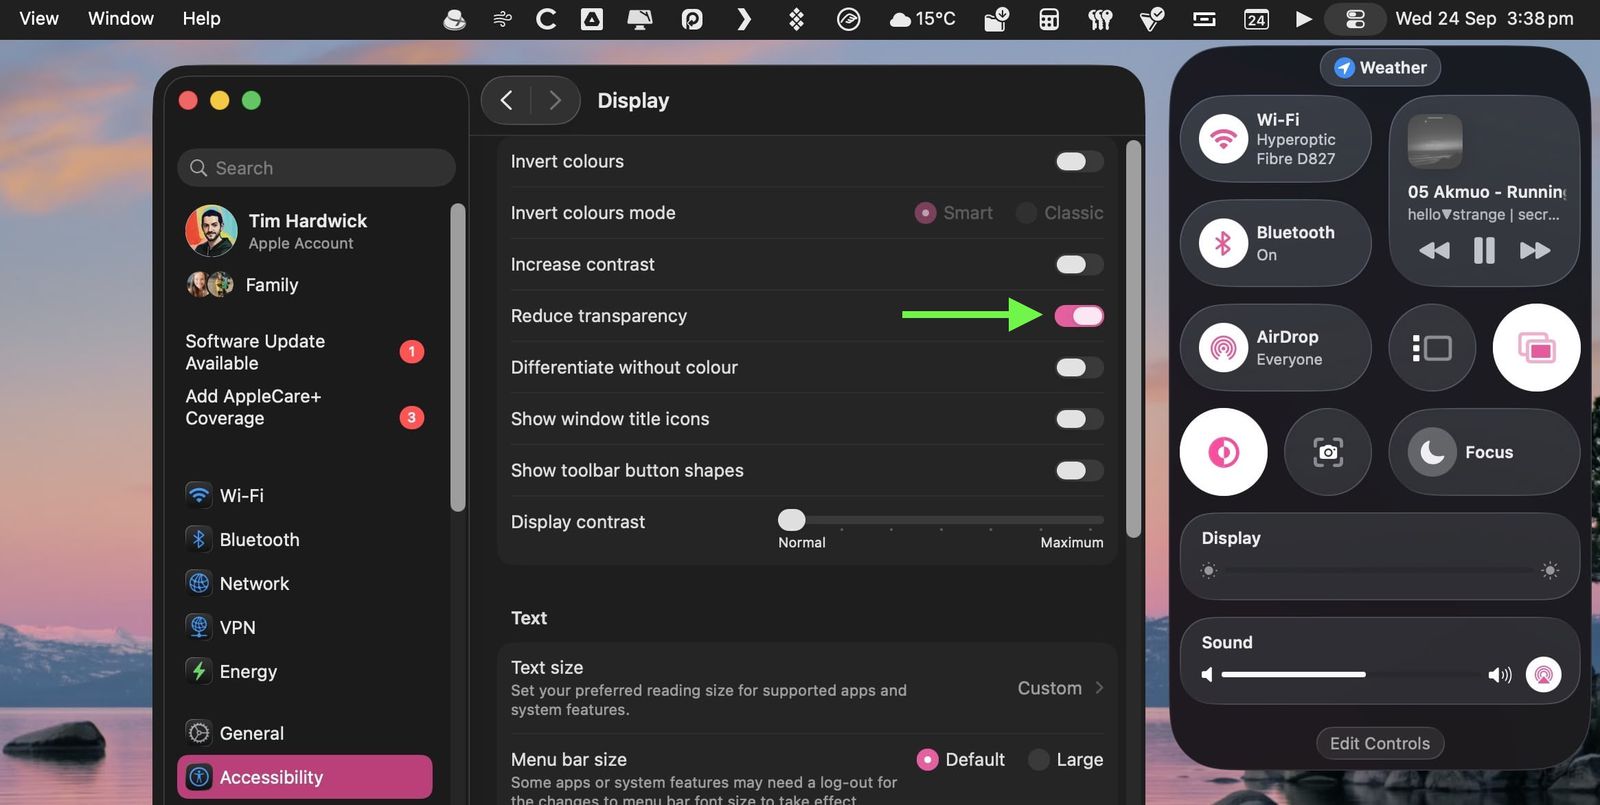
Accessibility → Display → Reduce Transparency
6) Widgets: add, customize, or remove
Widgets are optional. If you’re sharing your screen and don’t want personal info visible, remove any widgets first.
- Add widgets to the desktop:
- Control (⌃) click the wallpaper and choose Edit Widgets.
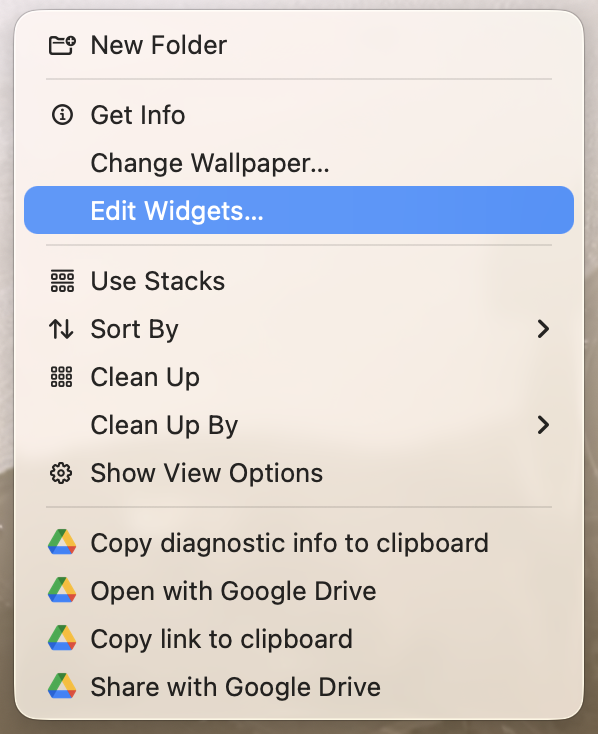
Right click (Control (⌃) click) → Edit Widgets… - Search or browse categories in the gallery.
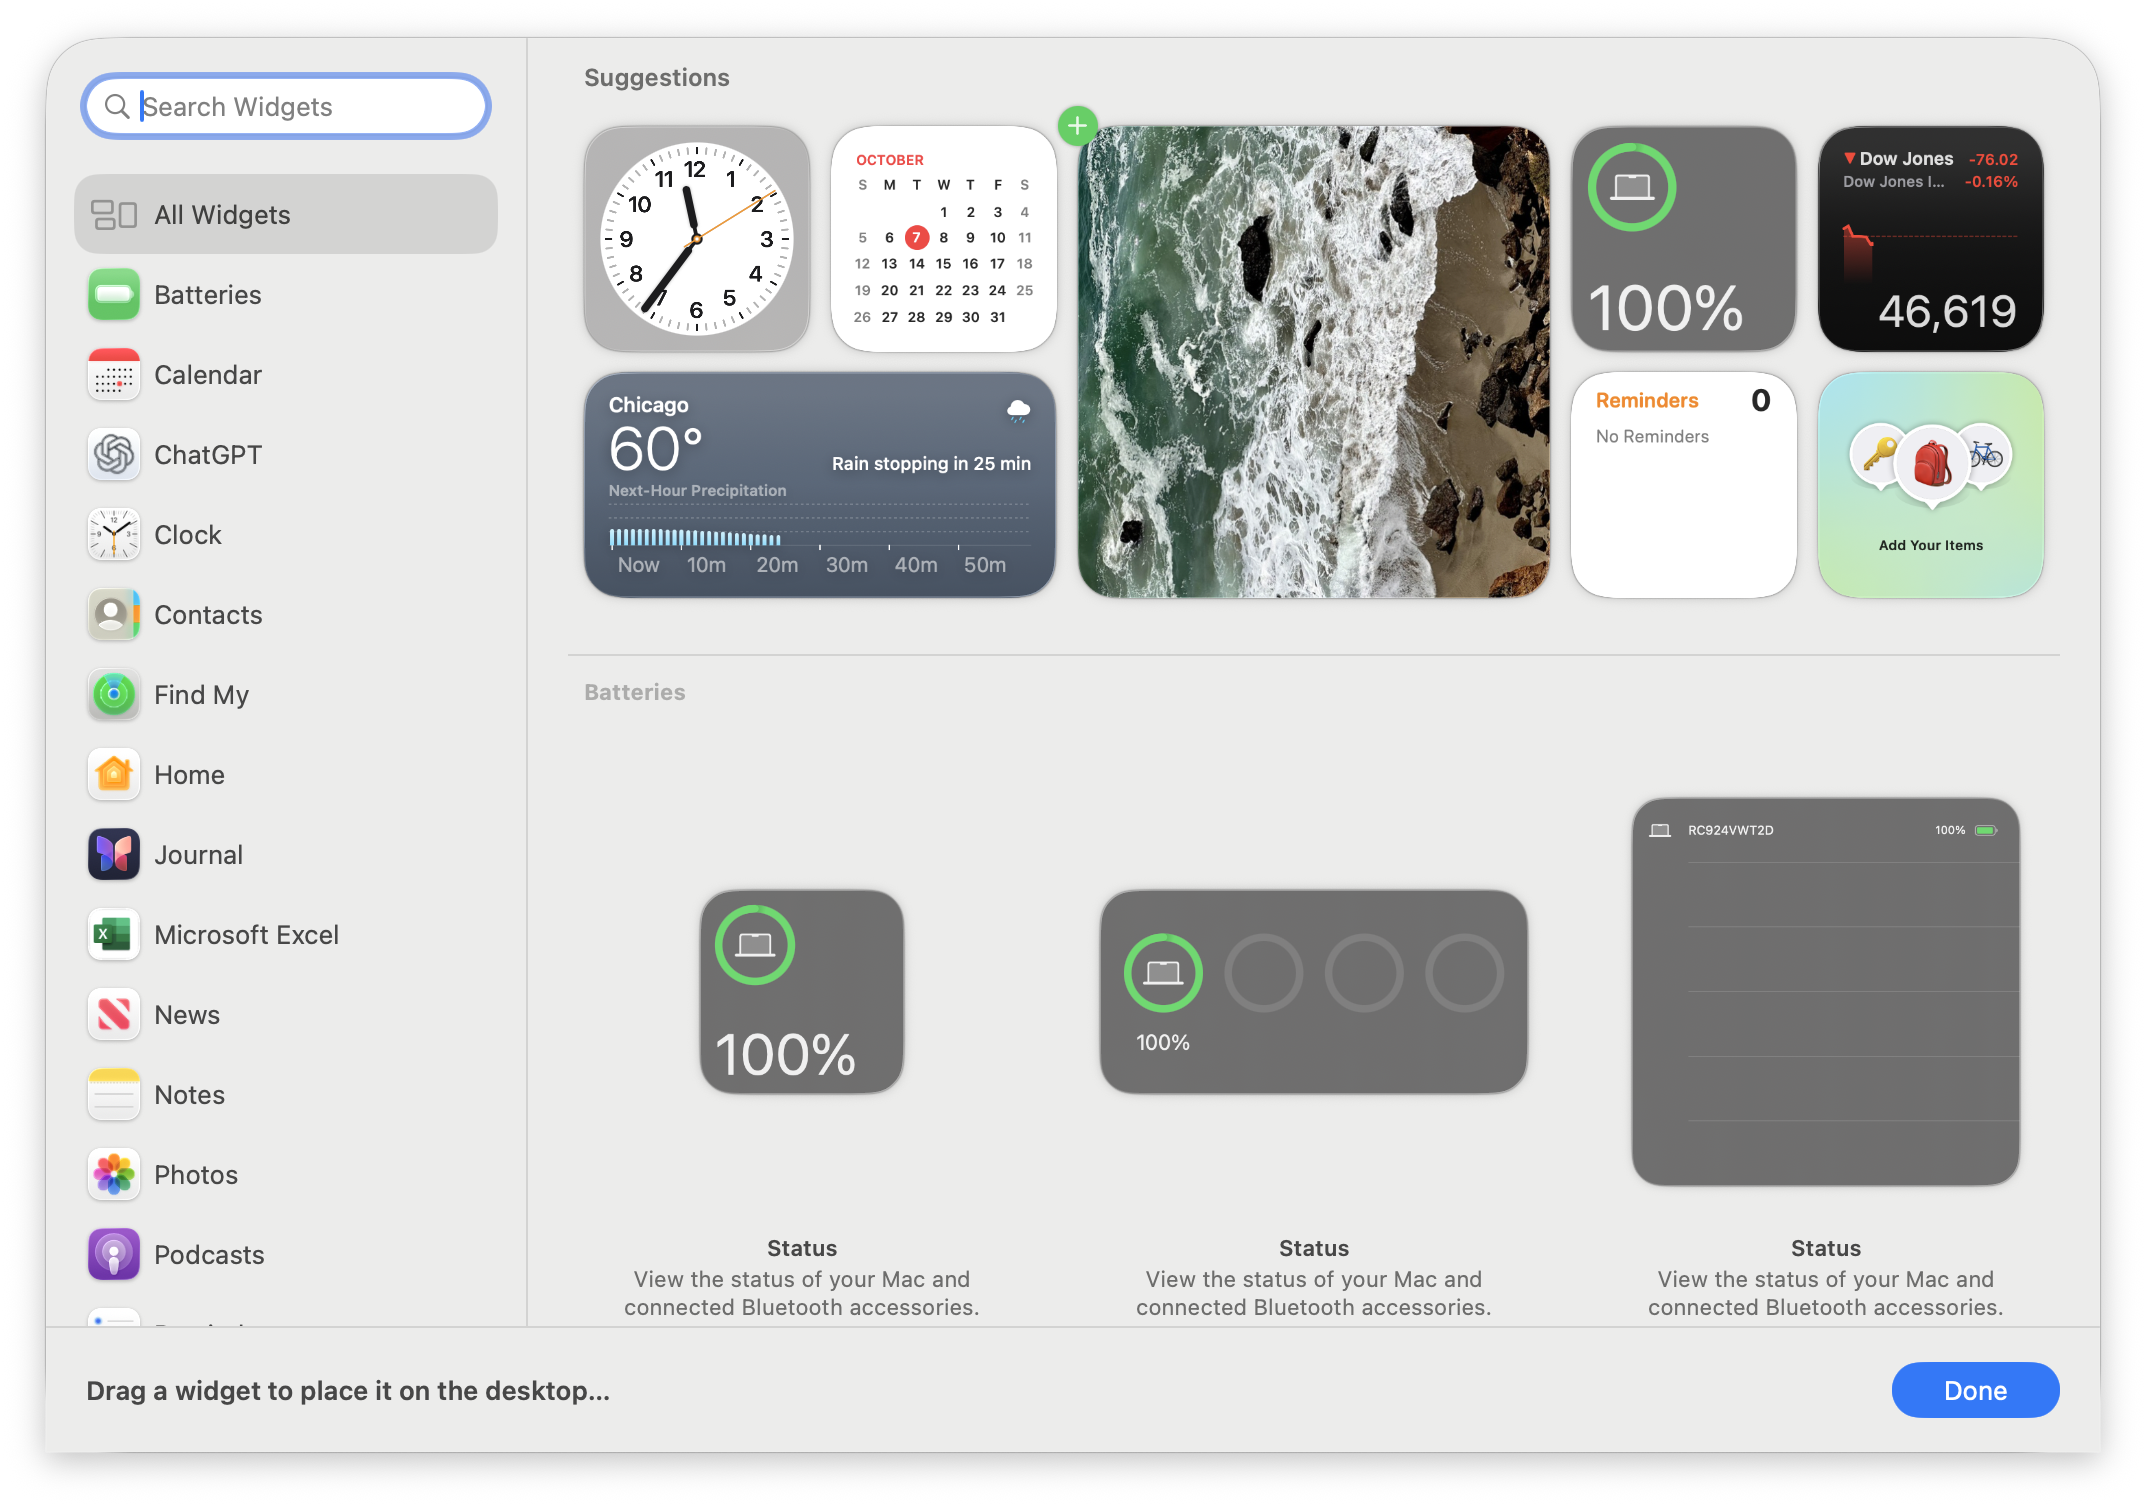
Widgets gallery (drag to desktop or click +) - Click a widget (or its +) to add, or drag it to position. Choose a size if prompted, then click Done.
- Control (⌃) click the wallpaper and choose Edit Widgets.
- Add widgets to Notification Center:
- Click the date and time to open Notification Center.
- Click Edit Widgets, then add widgets (click or drag). Click Done when finished.
- Customize a widget:
- Control (⌃) click the widget and choose Edit [widget name] (if available) to change what it shows.
- Control (⌃) click to change size, or drag to move it.
- Remove widgets (desktop):
- Click the wallpaper and choose Edit Widgets.
- Click the Remove (–) button on the widget you want to remove.
- Remove widgets (Notification Center):
- Open Notification Center.
- Control (⌃) click a widget and choose Remove Widget, or hold Option (⌥) and click the Remove (–) button.
- Settings shortcut: Go to System Settings → Desktop & Dock → Widgets for additional controls (e.g., iPhone widgets).
What we do not use at Progress Learning
- Apple Intelligence: Disabled organization wide.
- Apple Mail: Not used; use Gmail in Chrome.
- iMessage, FaceTime, Journal, Games, Phone: Not part of our standard workflow on company Macs. If you see them, leave them as is.
Short how to cards
Search Clipboard History
- Press command (⌘) + Space to open Spotlight.
- Switch to the Clipboard category.
- Click any earlier copied item to paste it again.
Spotlight Quick Keys
- Press command (⌘) + Space, then use the number keys to jump between Apps, Files, Actions, and Clipboard.
Folder Colors
- System Settings → Appearance → Folder Color → pick a color; applies system wide.
Restore Menu Bar Background
- System Settings → Menu Bar → toggle Show menu bar background.
Allow in Menu Bar (pin a control)
- System Settings → Menu Bar → Menu Bar Controls → choose a control → enable Show in Menu Bar.
Control Center layout
- Reorder or add controls under Menu Bar Controls; some third party items are supported.
macOS Themes (icons)
- System Settings → Appearance → choose updated app icon options: light, dark, tinted, or clear.
Apps icon (replaces Launchpad)
- Click Apps in the Dock → browse by category → use the three dot menu for Grid or List.
Reduce Transparency
- System Settings → Accessibility → Display → Reduce Transparency to minimize visual glass effects.
For managers (what to expect)
- Minimal disruption: The update is stable and focused on user experience polish and navigation speed.
- Productivity benefits: Faster Spotlight, simpler app browsing, clearer folder organization.
Support
Questions or issues? Open an IT ticket with a brief description of the issue.